PUBG: Battlegrounds’ UGC tools let you take the familiar PUBG sandbox and turn it into something truly epic. You can build custom arenas, reshape the battlefield, set up teams and spawns, tweak match rules, hand out gear, track scores, and use special devices to bring your gameplay ideas to life.
Today, we’ll walk through the essentials of creating your first custom UGC mode, from placing objects and setting the rules to connecting gameplay devices, alongside some common pitfalls to watch out for.
So, are you pumped to build something of your own? Let’s dive right in!
What You’ll Need to Get Started
Before jumping into UGC, you’ll need PUBG: Battlegrounds with the paid Battlegrounds Plus upgrade, as well as access to UGC Alpha. Once you’re set, boot up the game and head to "Play" → "Custom" → "UGC Alpha" to create a room and launch the built-in editor.
Mastering Controls and Object Placement
We’ll start with the editor itself: getting into UGC Alpha, moving around your map, and learning how to work with the objects that make up your playable space.
If you’re more of a visual person and want to learn all the nitty gritty details behind each step, make sure to watch the first part of the CurseForge Academy tutorial series on creating a custom PUBG mode:
Creating a UGC Alpha Room
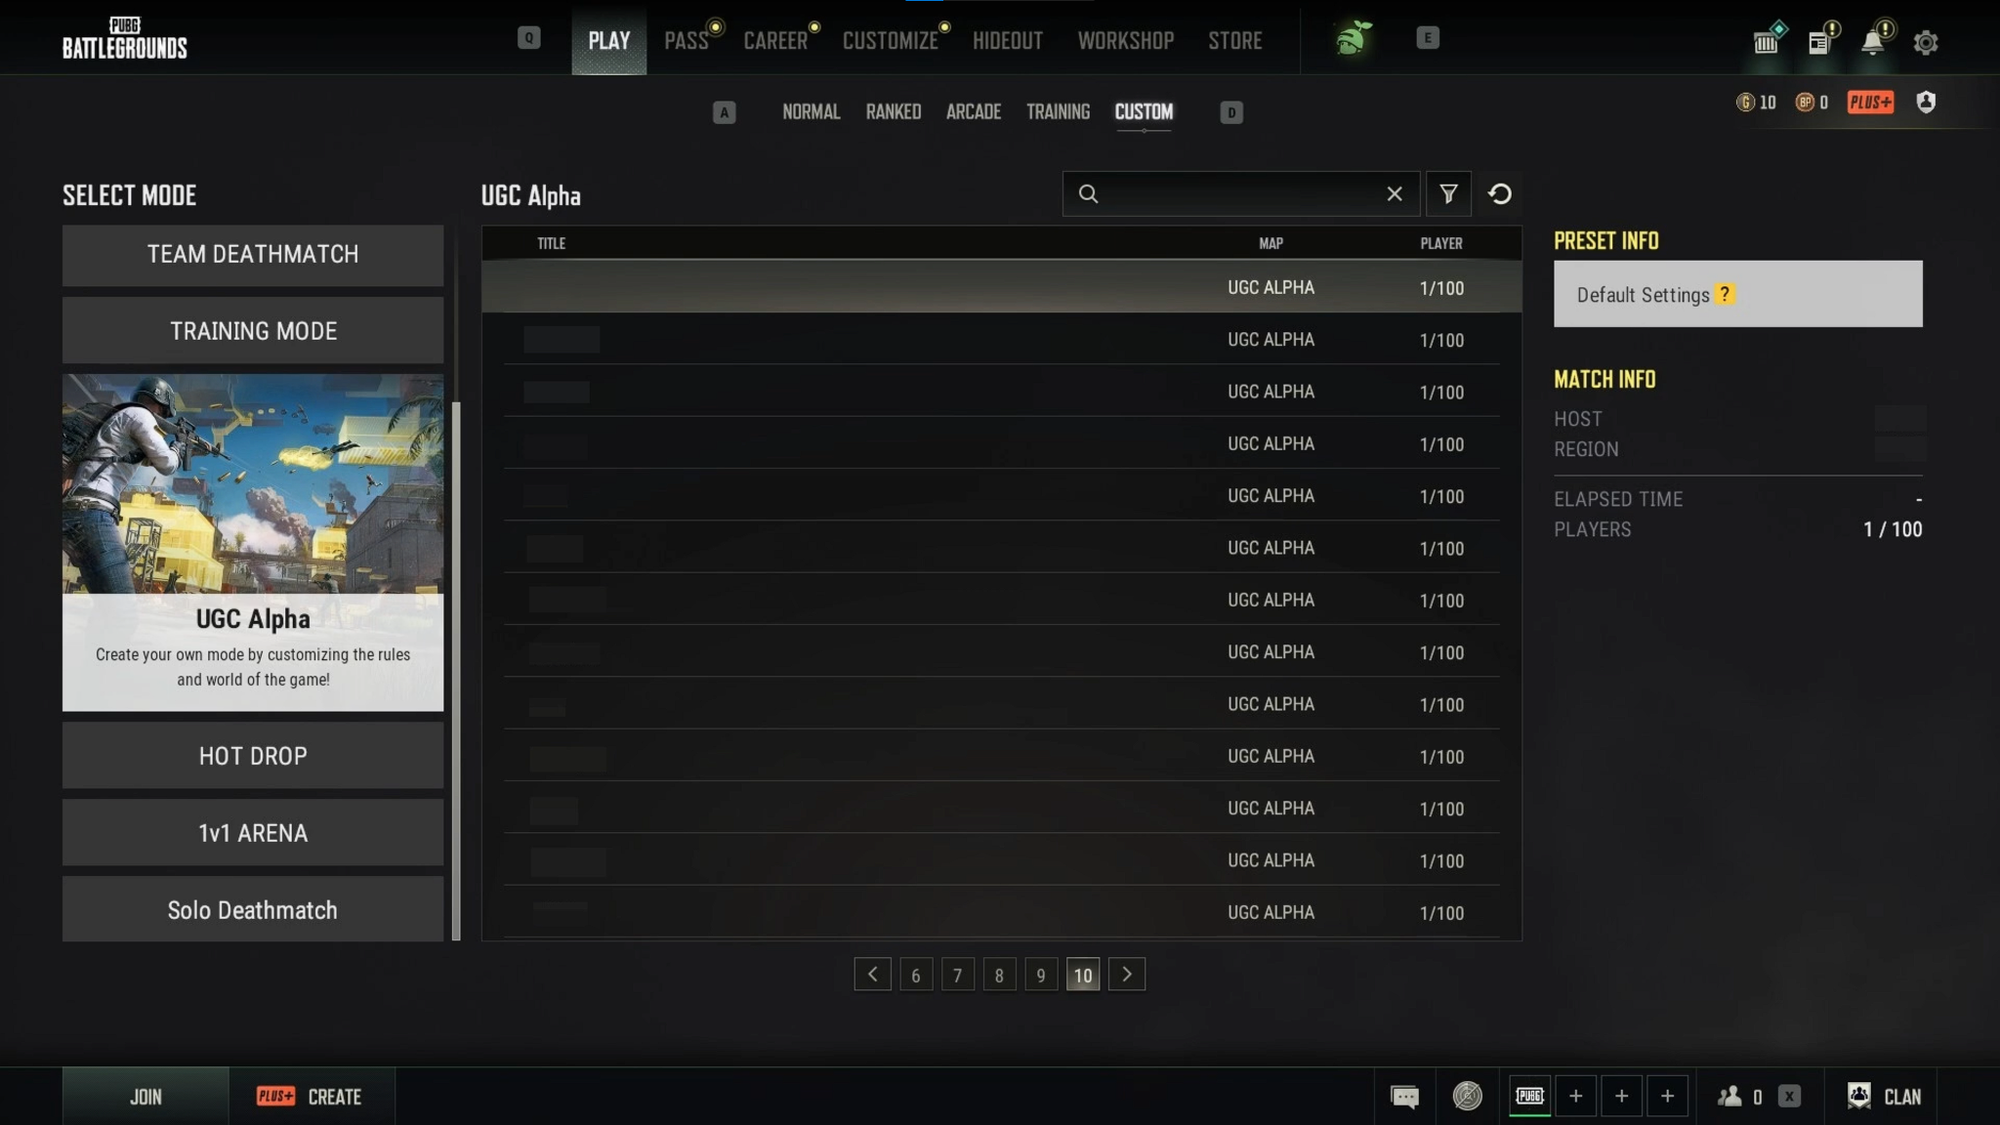
Launch PUBG: Battlegrounds, then:
- Go to "Play" → "Custom" → "UGC Alpha".
- Click "Create" in the bottom-left corner.
- Create the room.
- Press "Start" once the match room is ready.
Tip: We recommend setting up a password to prevent random players from getting in your way.
Learning the Basic Editor Controls
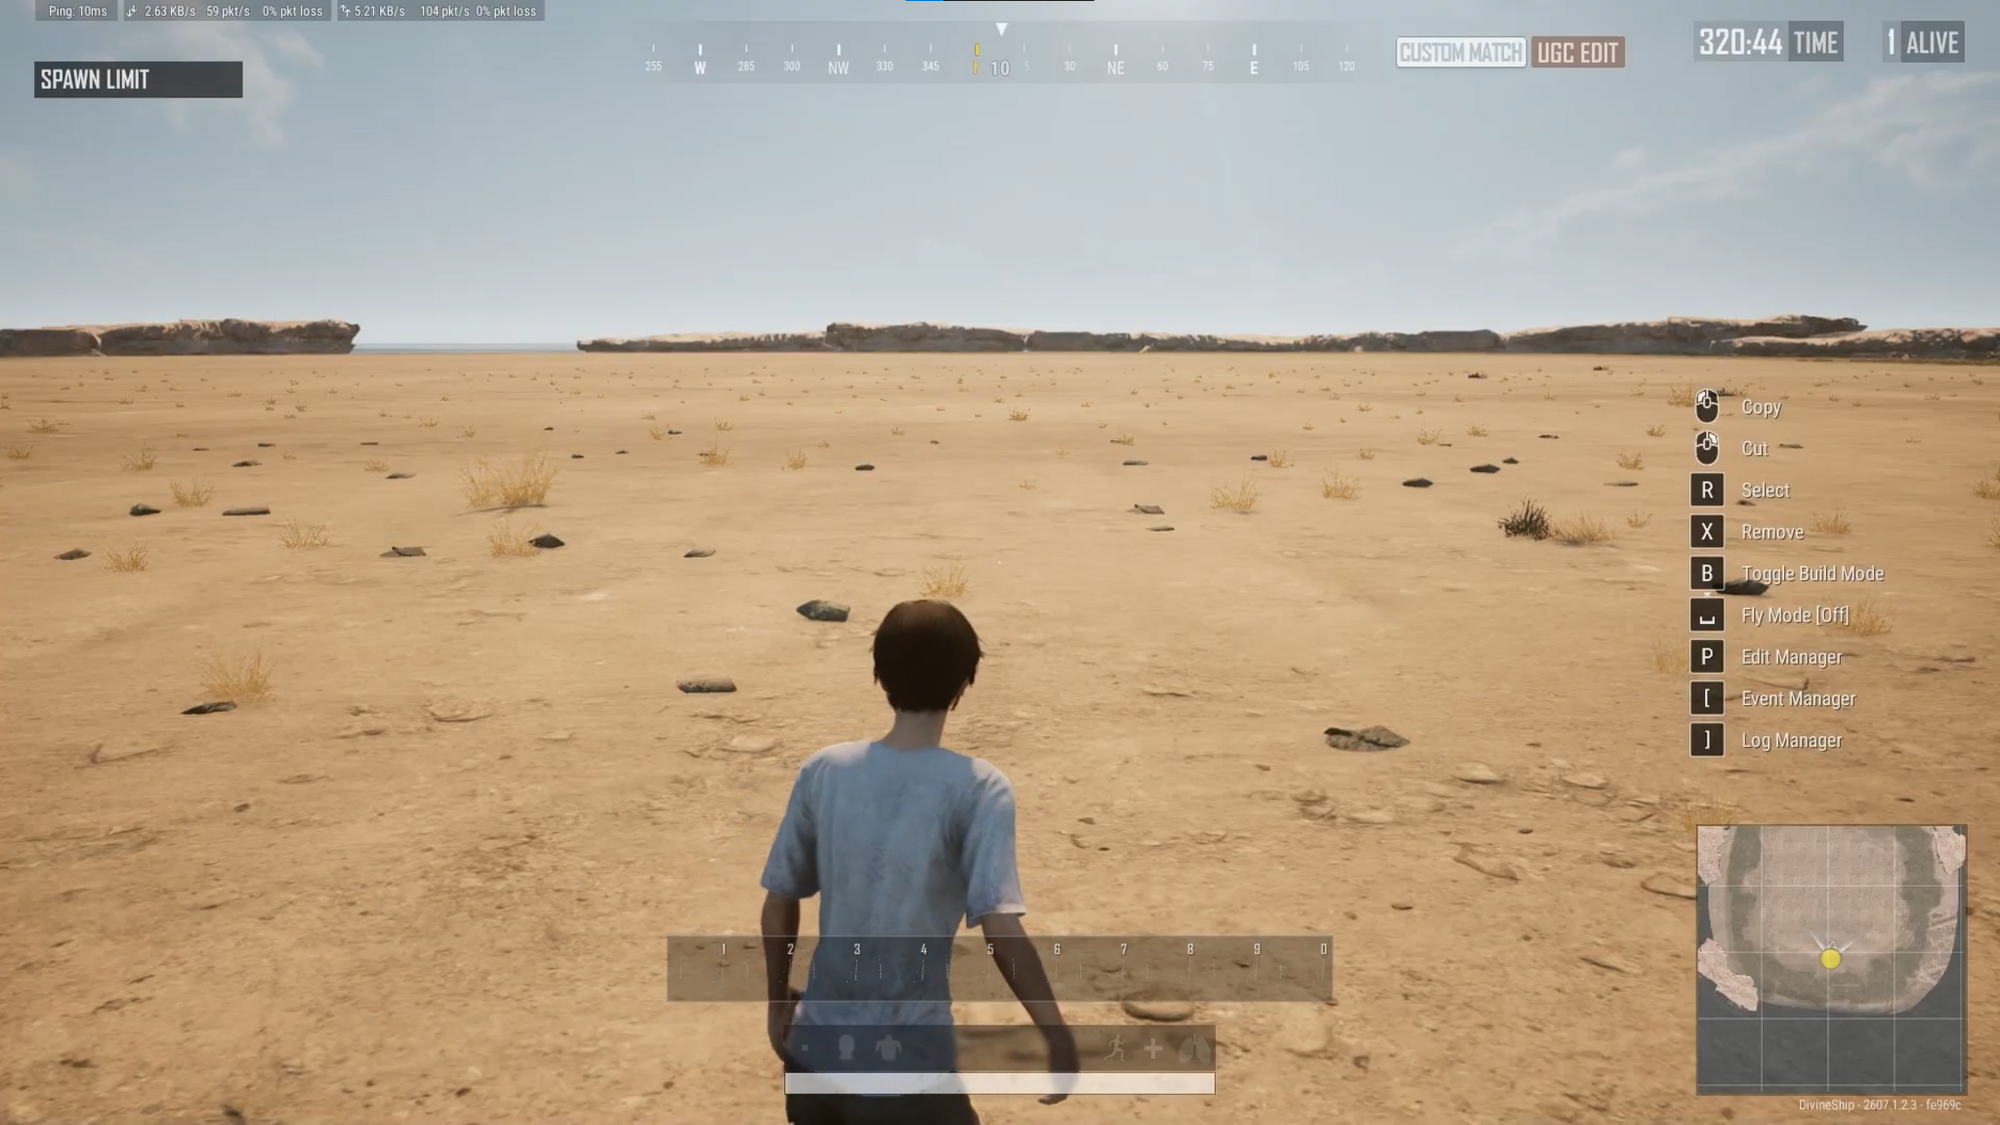
Once you’re in, spend a few minutes getting comfortable with the editor controls:
- "W/D": Basic movement.
- "P": Opens the "Edit Manager".
- "B": Switches perspective.
- Double-tap "Space": Enters "Fly Mode".
- "Space" while flying: Ascends.
- "C" while flying: Descends.
- "N" while flying: Enables "No Clip Mode".
"No Clip Mode" is especially handy when an object ends up underground or wedged inside another prop, since it lets you move straight through scenery.
Adding Objects to Your Hotbar
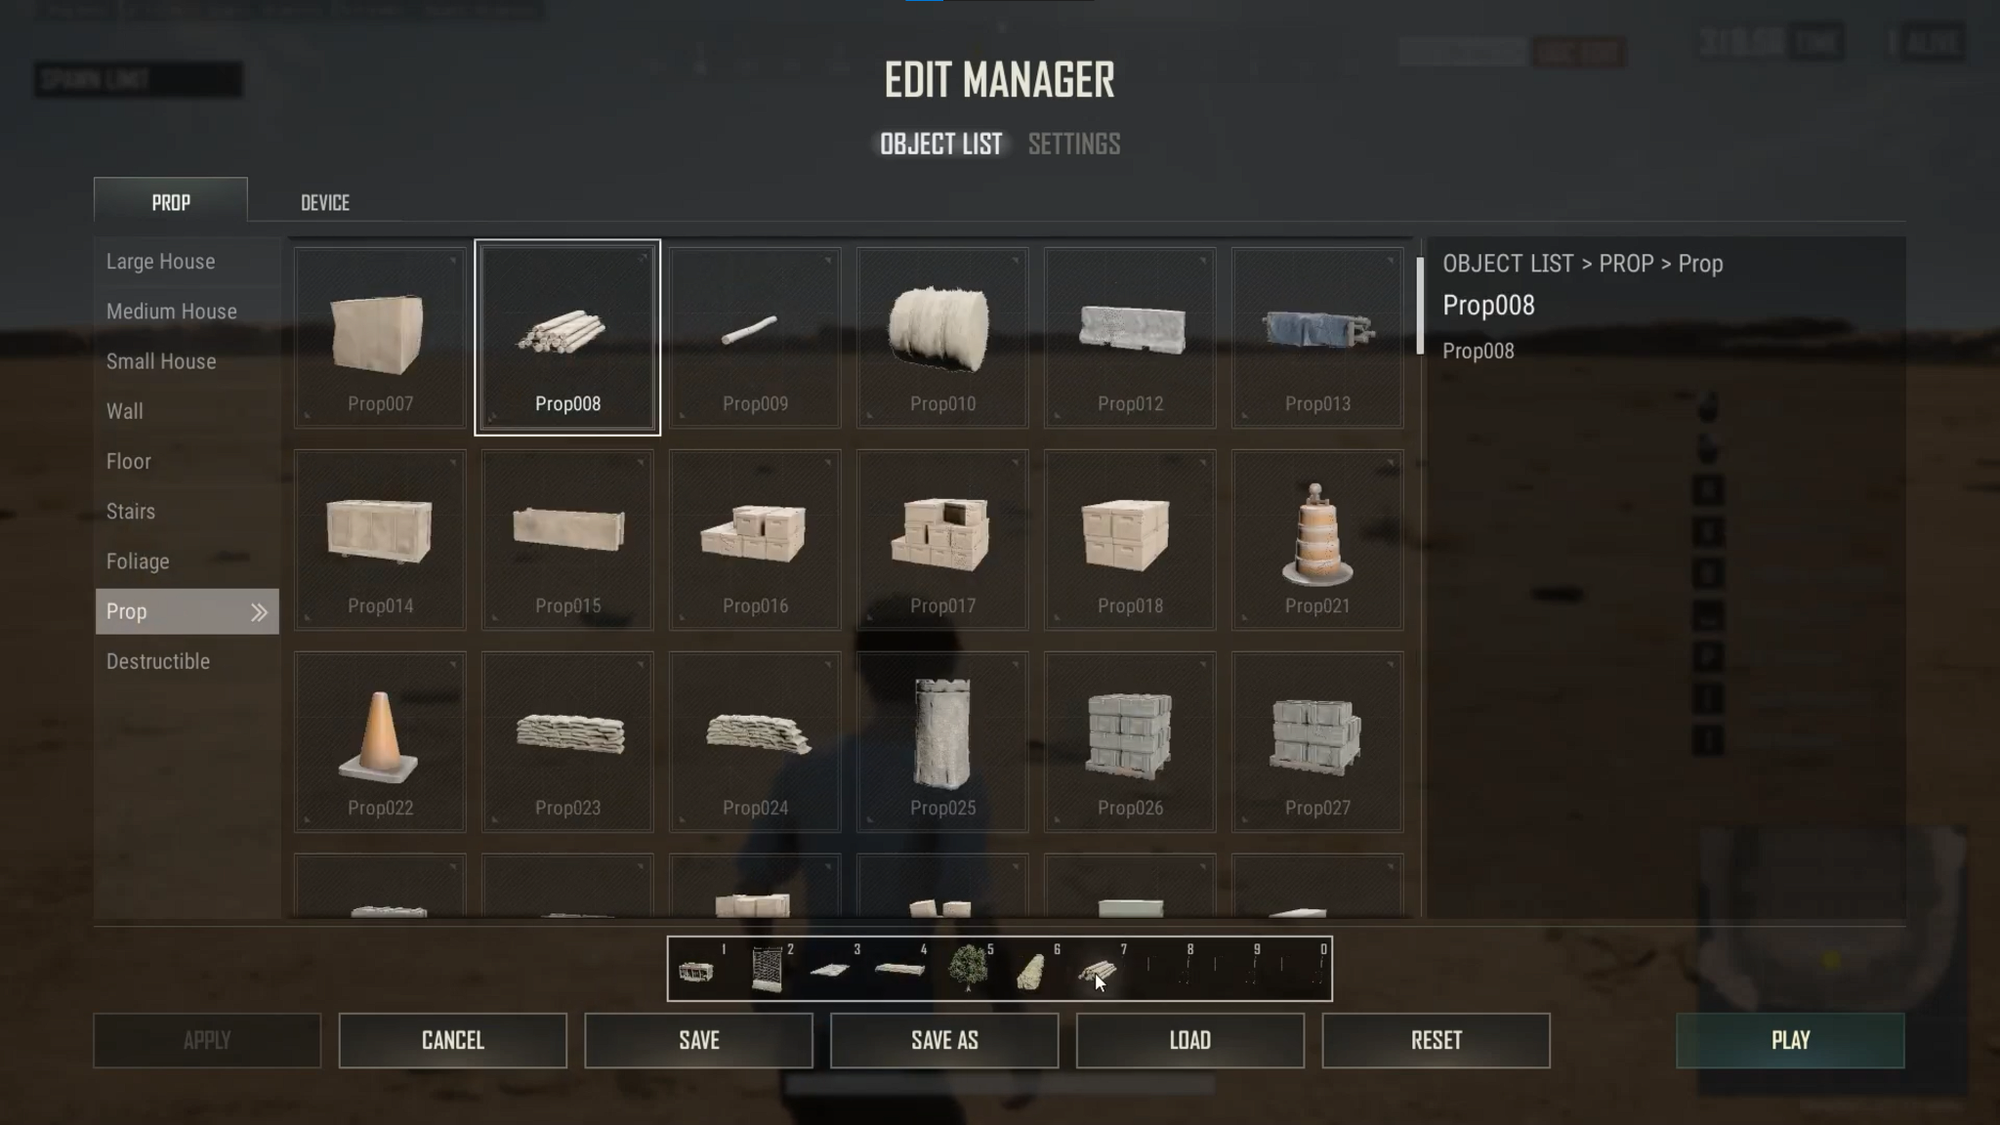
Press "P" to open the "Edit Manager", then browse through the available objects and assign anything you expect to use regularly to your numbered hotbar. While a bit tedious at first, this will save you a lot of back-and-forth once you start building larger areas, since you can place your most-used objects without reopening the browser every time.
Duplicating, Moving, and Grouping Objects
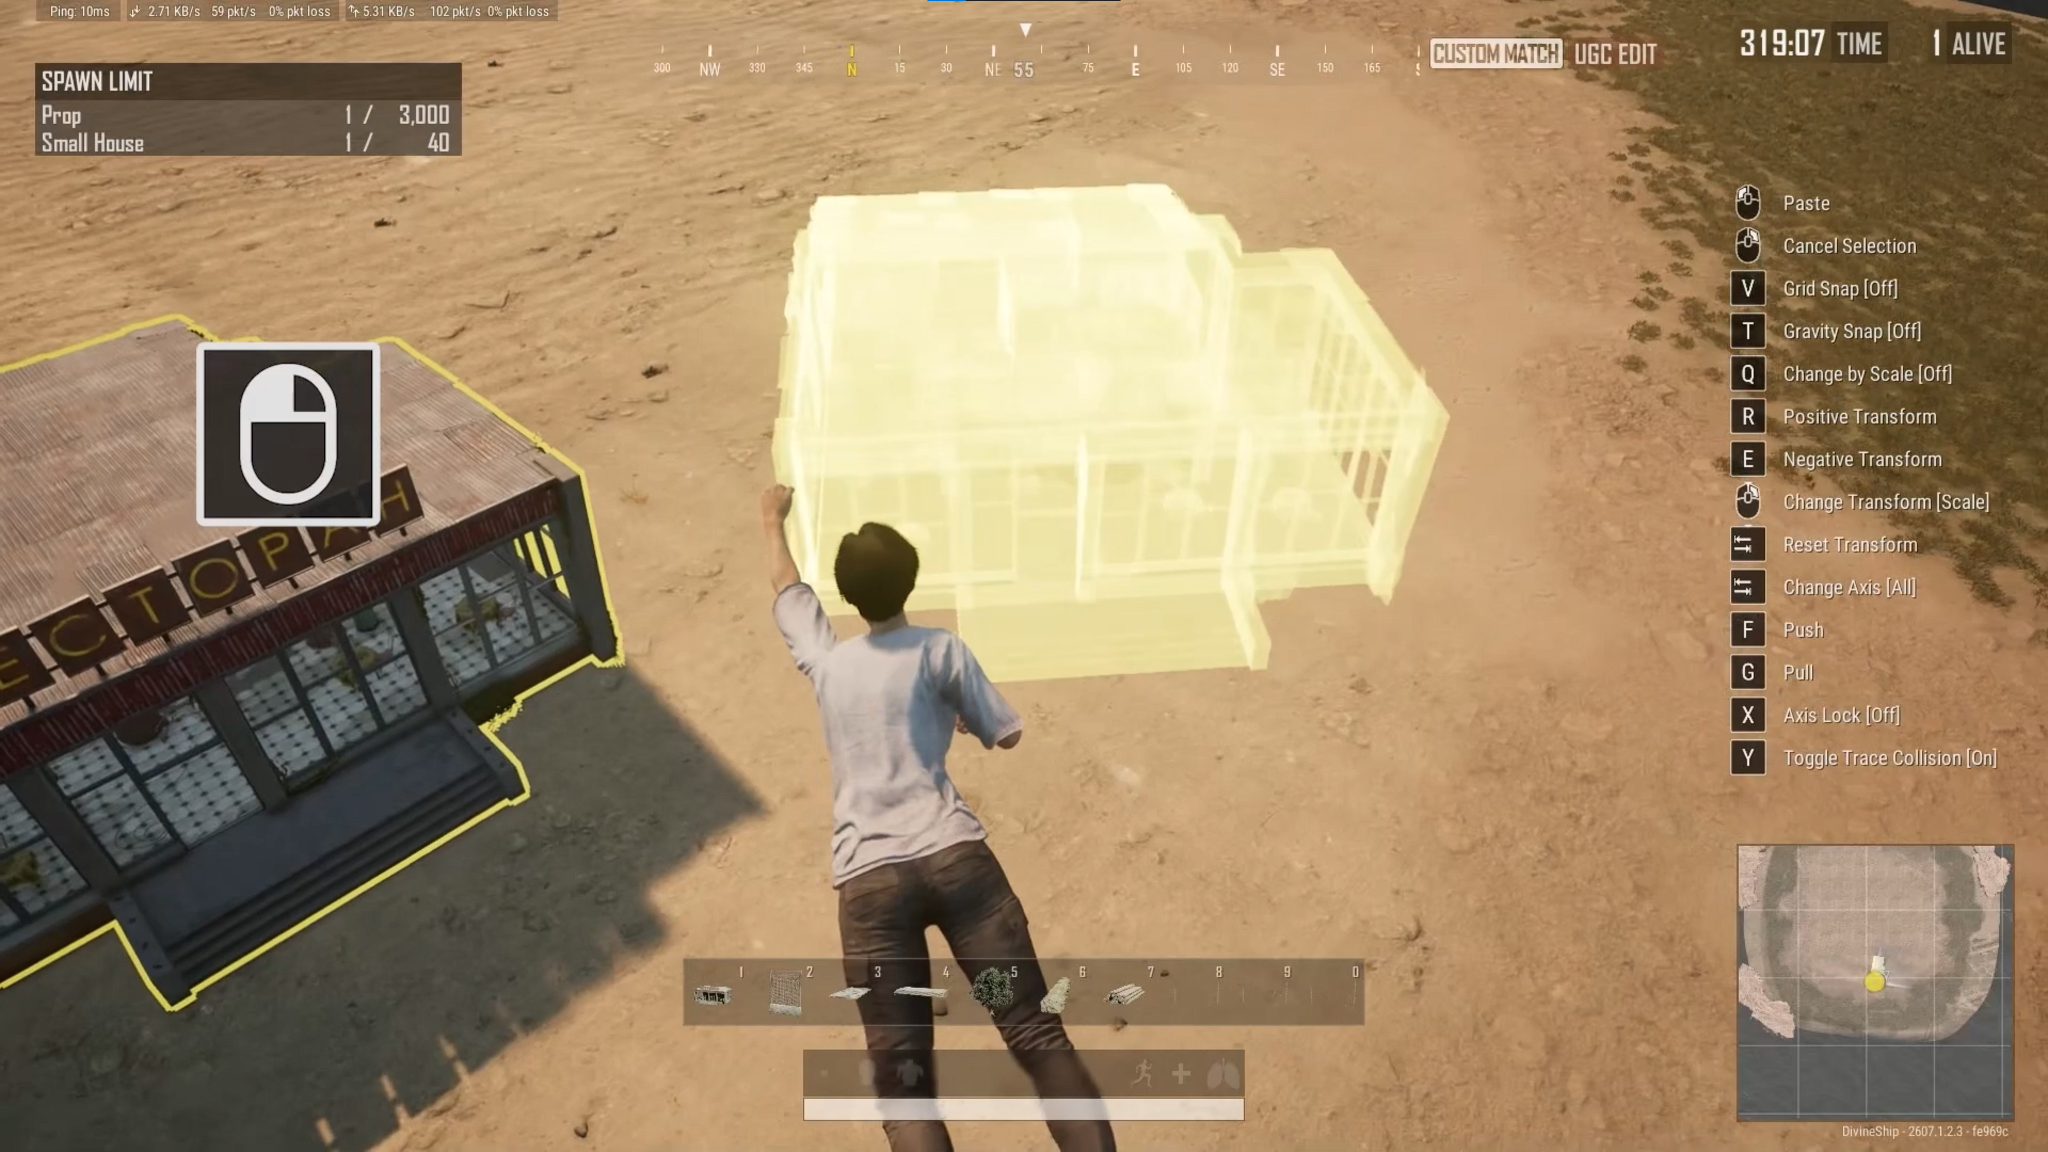
Once an object has been placed:
- Left-click it to duplicate it.
- Right-click it to cut and move it.
- Hover over objects and press "R" to select them as a group.
- Left-click a selected group to duplicate it.
- Right-click a selected group to move it.
For smaller positioning adjustments:
- Press "F" to push an object.
- Press "G" to pull it.
- Press "X" to delete it.
Tip: Grouping becomes particularly useful when you’re working with repeated structures like walls, platforms, arena sections, or obstacle-course pieces.
Rotating and Scaling Objects
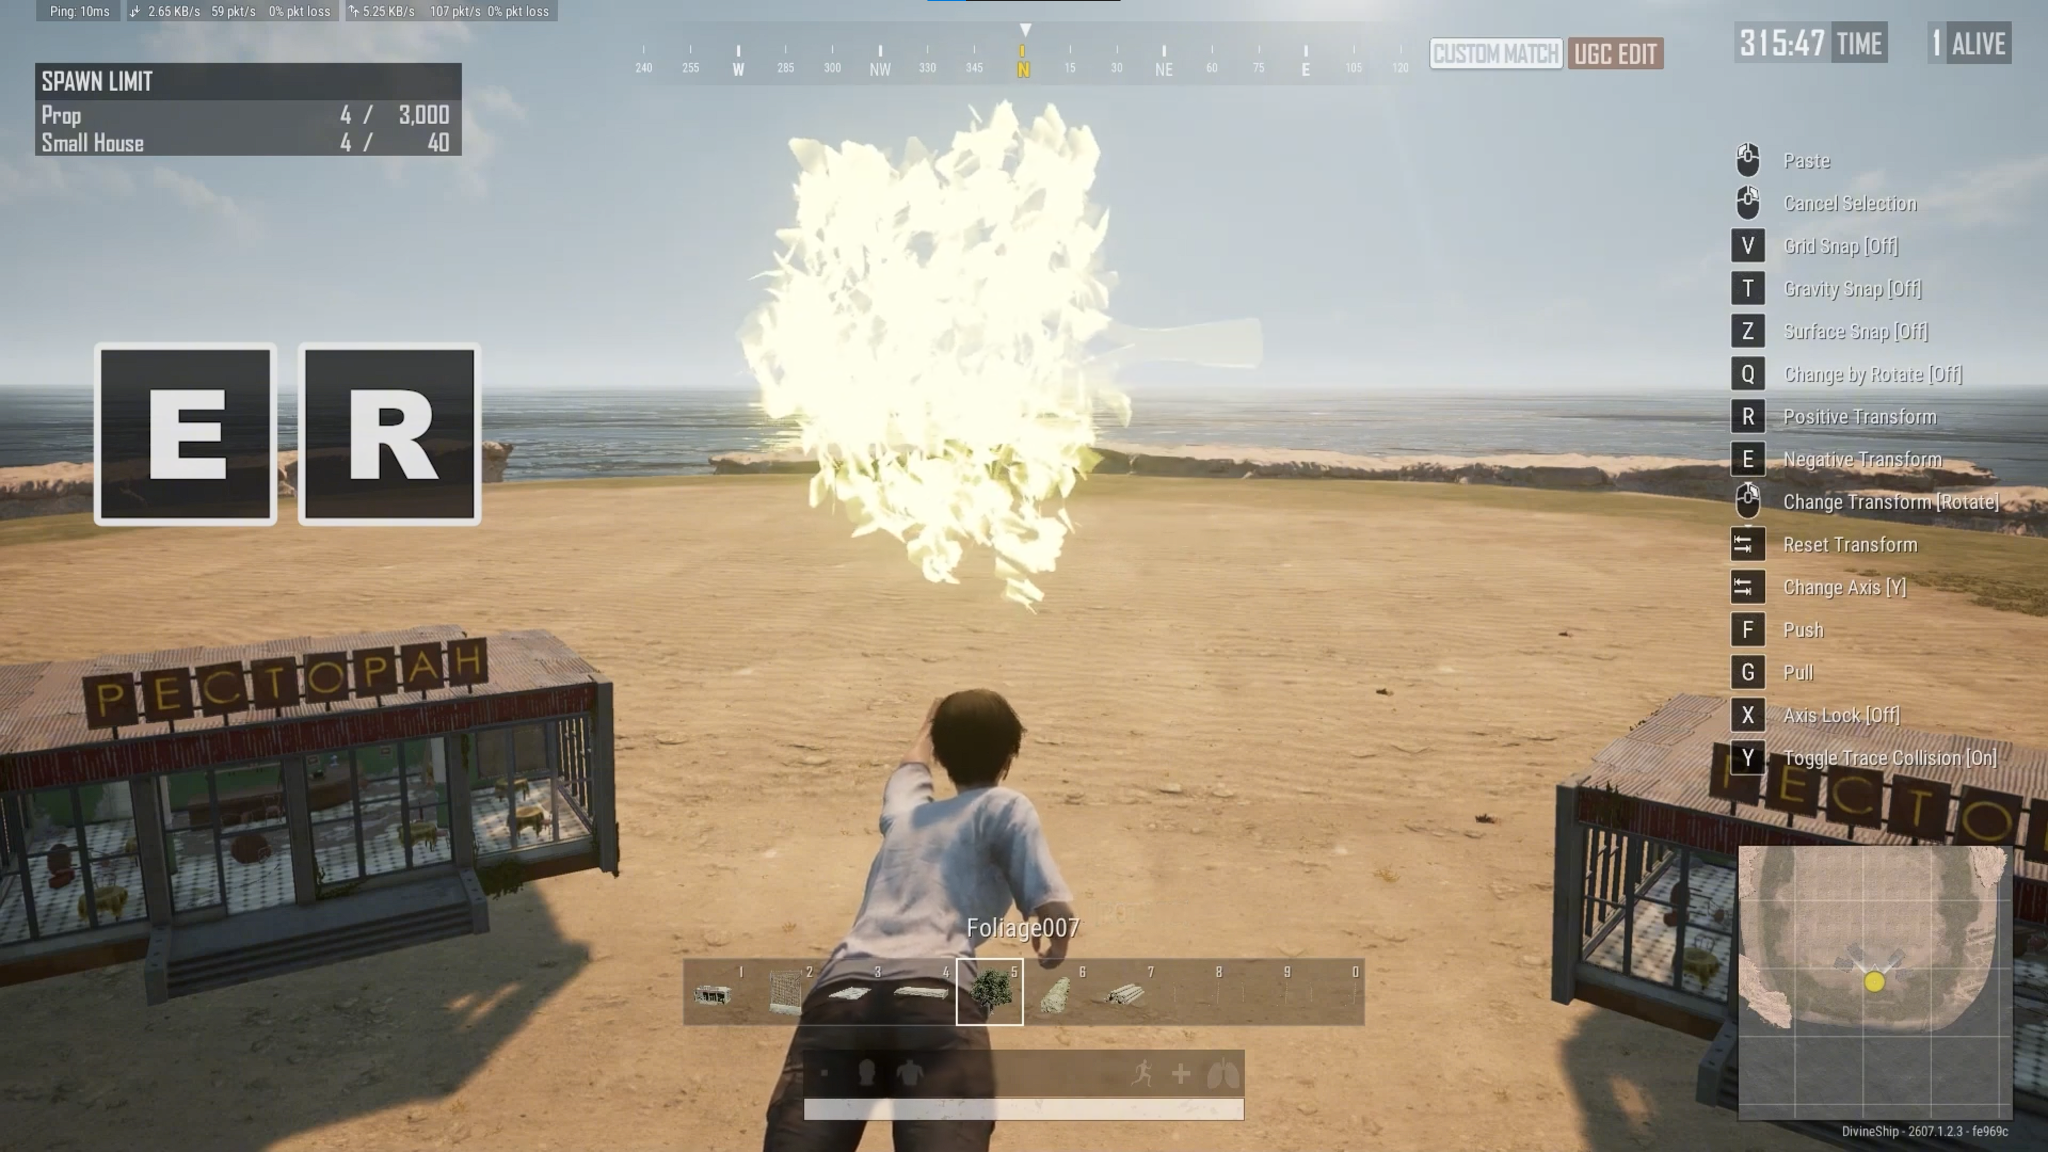
With an object selected, right-click to switch between "Rotation Mode" and "Scale Mode".
In "Rotation Mode":
- Press "E" or "R" to rotate the object.
- Press "Tab" to change its rotation axis.
- Hold "Tab" to reset the object to its original state.
In "Scale Mode":
- Right-click to switch modes.
- Use "E" and "R" to change the object's size.
Once you get used to jumping between the two modes, shaping objects becomes much quicker.
Using Gravity and Grid Snapping
For cleaner placement, PUBG provides convenient snapping controls:
- Press "T" to cycle Gravity Snap between "Off", "All", and "Landscape".
- Press "V" to change Grid Snap.
Tip: Larger grid values are useful while roughing out a structure, while smaller values give you more control during final alignment.
Building a Simple Floor and Walls
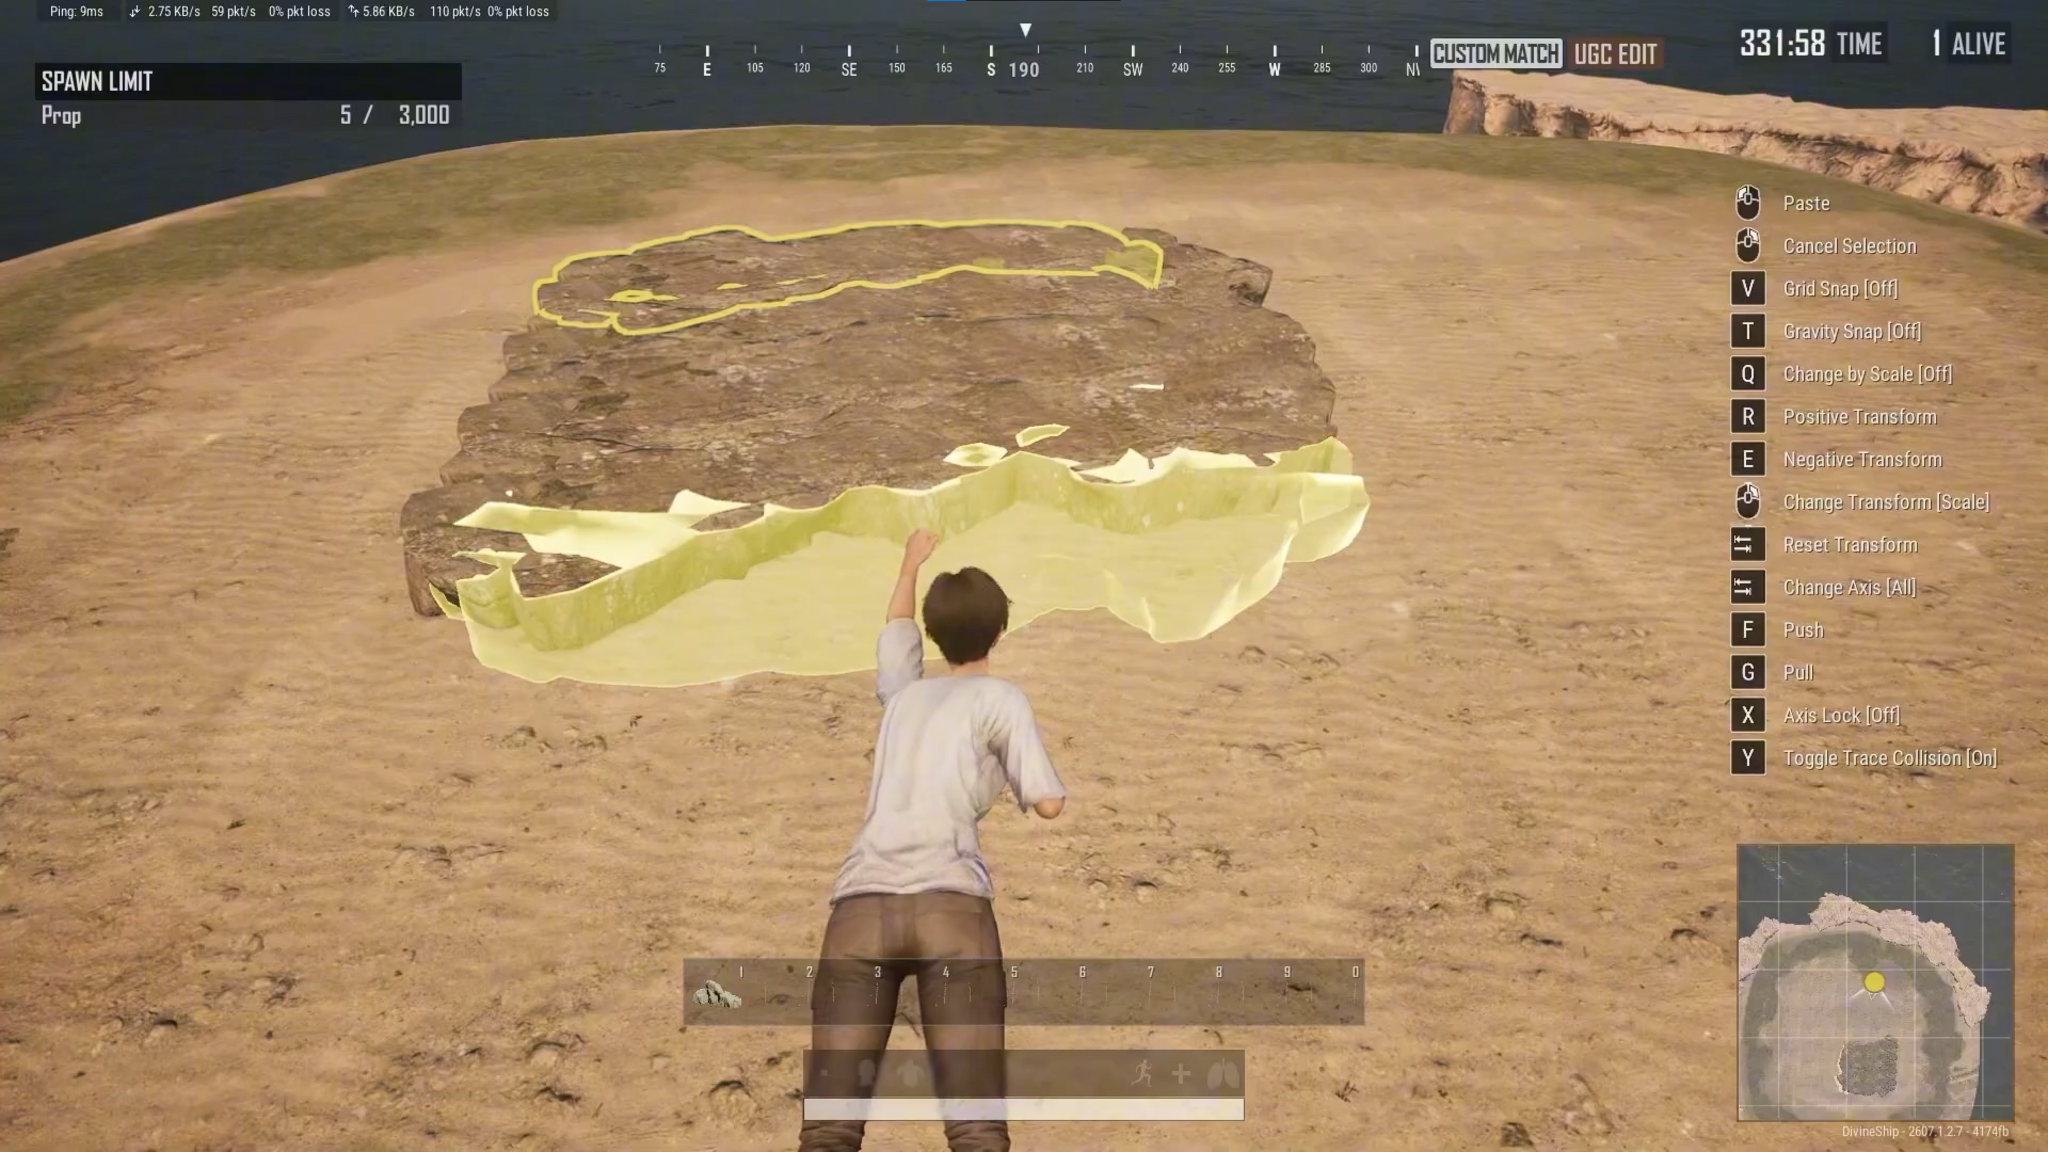
Here’s how ordinary props can be transformed into custom terrain.
- Press "P" to open the "Edit Manager".
- Assign an asset (e.g. "Foliage 040") to your hotbar.
- Enter "Rotate Mode".
- Press "Q" to set the rotation to 90°.
- Press "Tab" to change the axis to "X".
- Press "E" until the object's bottom faces upward.
- Right-click and switch to "Scale Mode".
- Press "R" to enlarge the prop.
- Left-click to duplicate and place it.
- Press "R" to select several objects.
- Hold the left mouse button to duplicate and place the selected objects together.
- Arrange them until you've created the amount of flat terrain you need.
You can then stack additional props vertically to create walls that prevent players from leaving the playable area. The same technique can be used to build an island or even expand existing terrain!
Learning the Rules, Teams, and Round Settings
With the map taking shape, it’s time to decide how the match itself actually works. This is where you set up things like round length, team sizes, friendly fire, respawns, and other rules that completely change the feel of your mode.
For more information or if you simply want to have a reference material playing on your second monitor, make sure to check the second part of our in-depth UGC guide starring the prolific creator MoxxyHaven:
Opening the Rule Settings
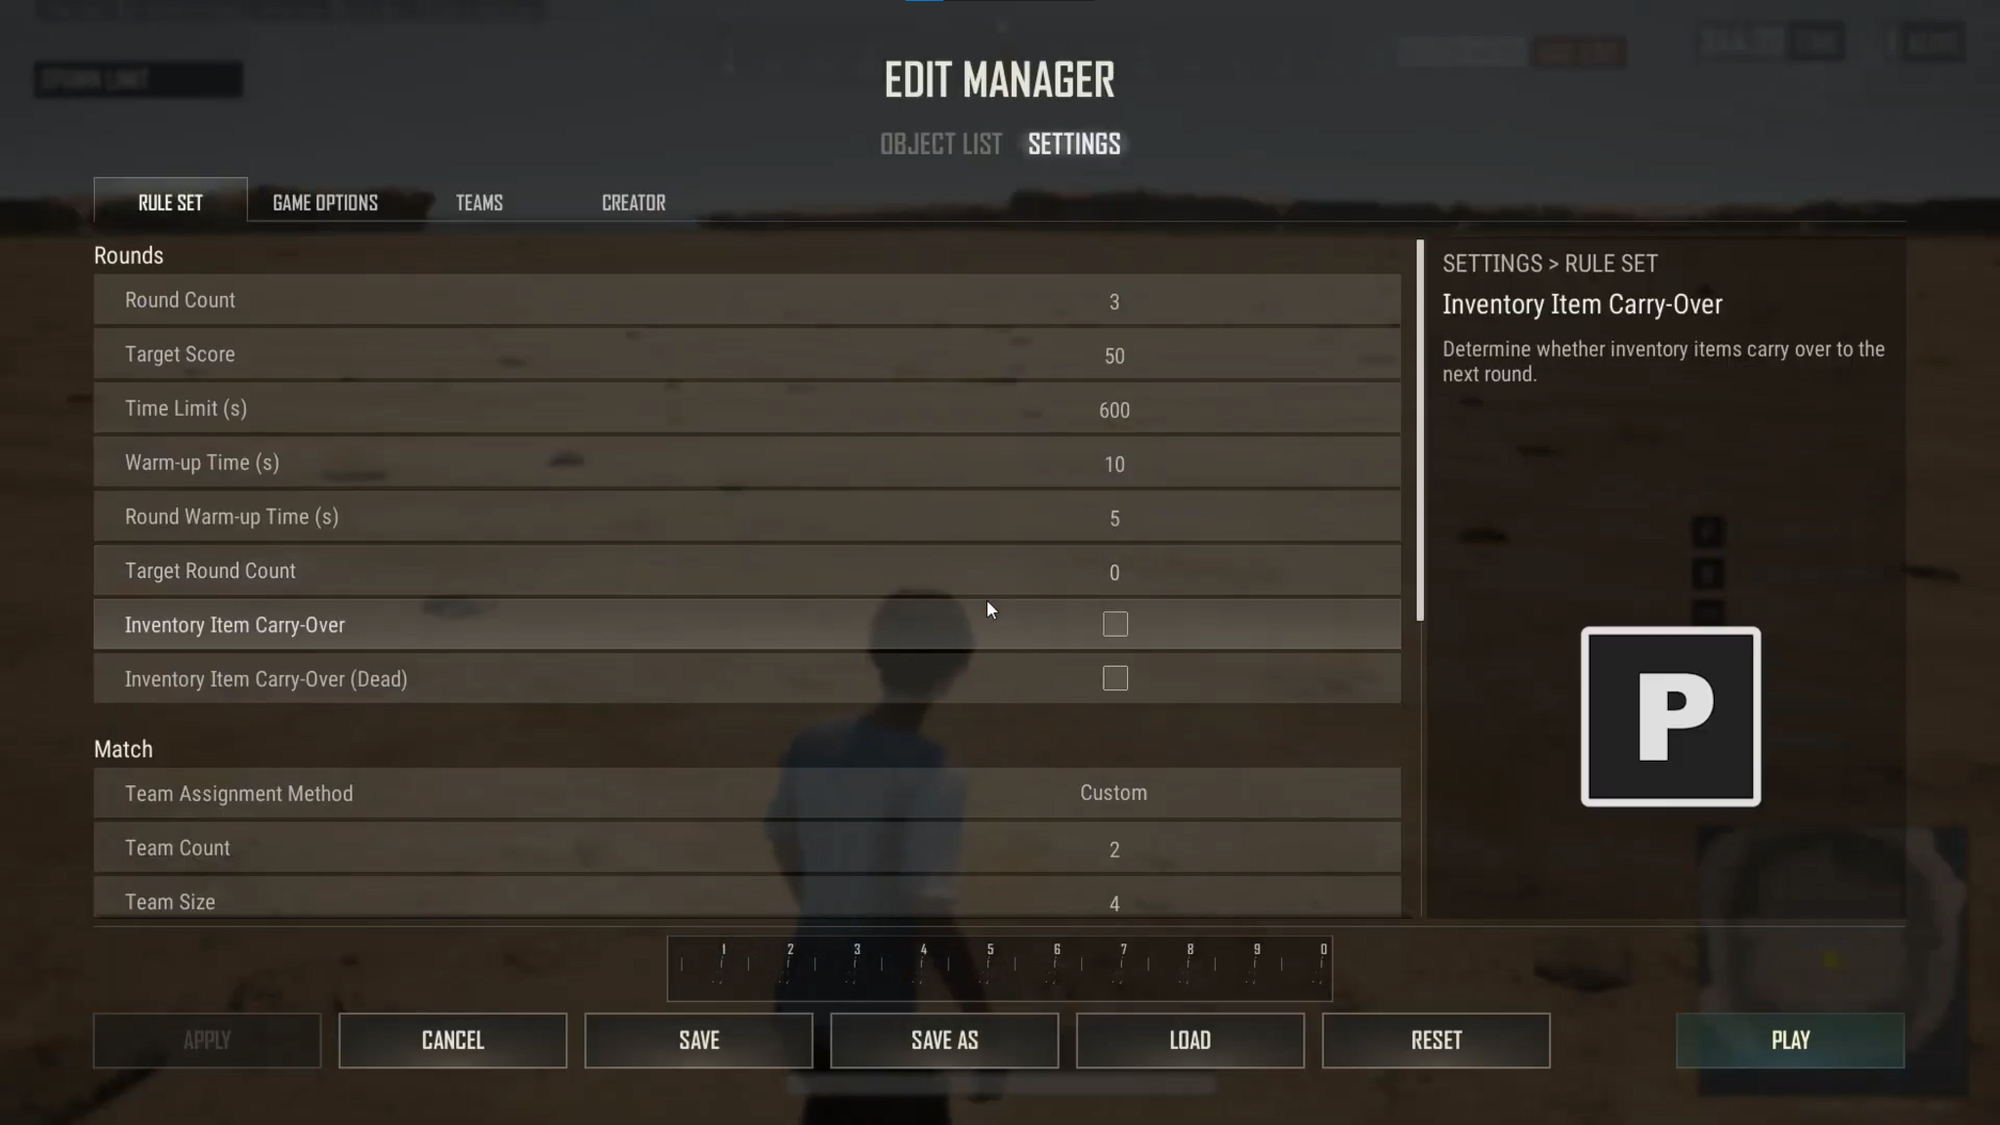
Press "P" to open the "Edit Manager", then select "Settings" at the top. A round is simply one unit of gameplay that starts with the match and ends when its configured condition is met. From here, you can control both the overall match structure and the behavior of individual rounds.
Configuring Your Rounds
Set the values appropriate for your mode, including:
- Number of rounds.
- Points required to win.
- Round time limit.
- Initial warm-up time.
- Warm-up time between subsequent rounds.
- Target round count required to win the match.
You can also choose whether players keep their inventory after a round ends or after they die. Note that there’s no single correct setup here – a quick arena match might use short rounds and fast resets, while a slower survival mode could stretch things out for much longer.
Setting Up Teams
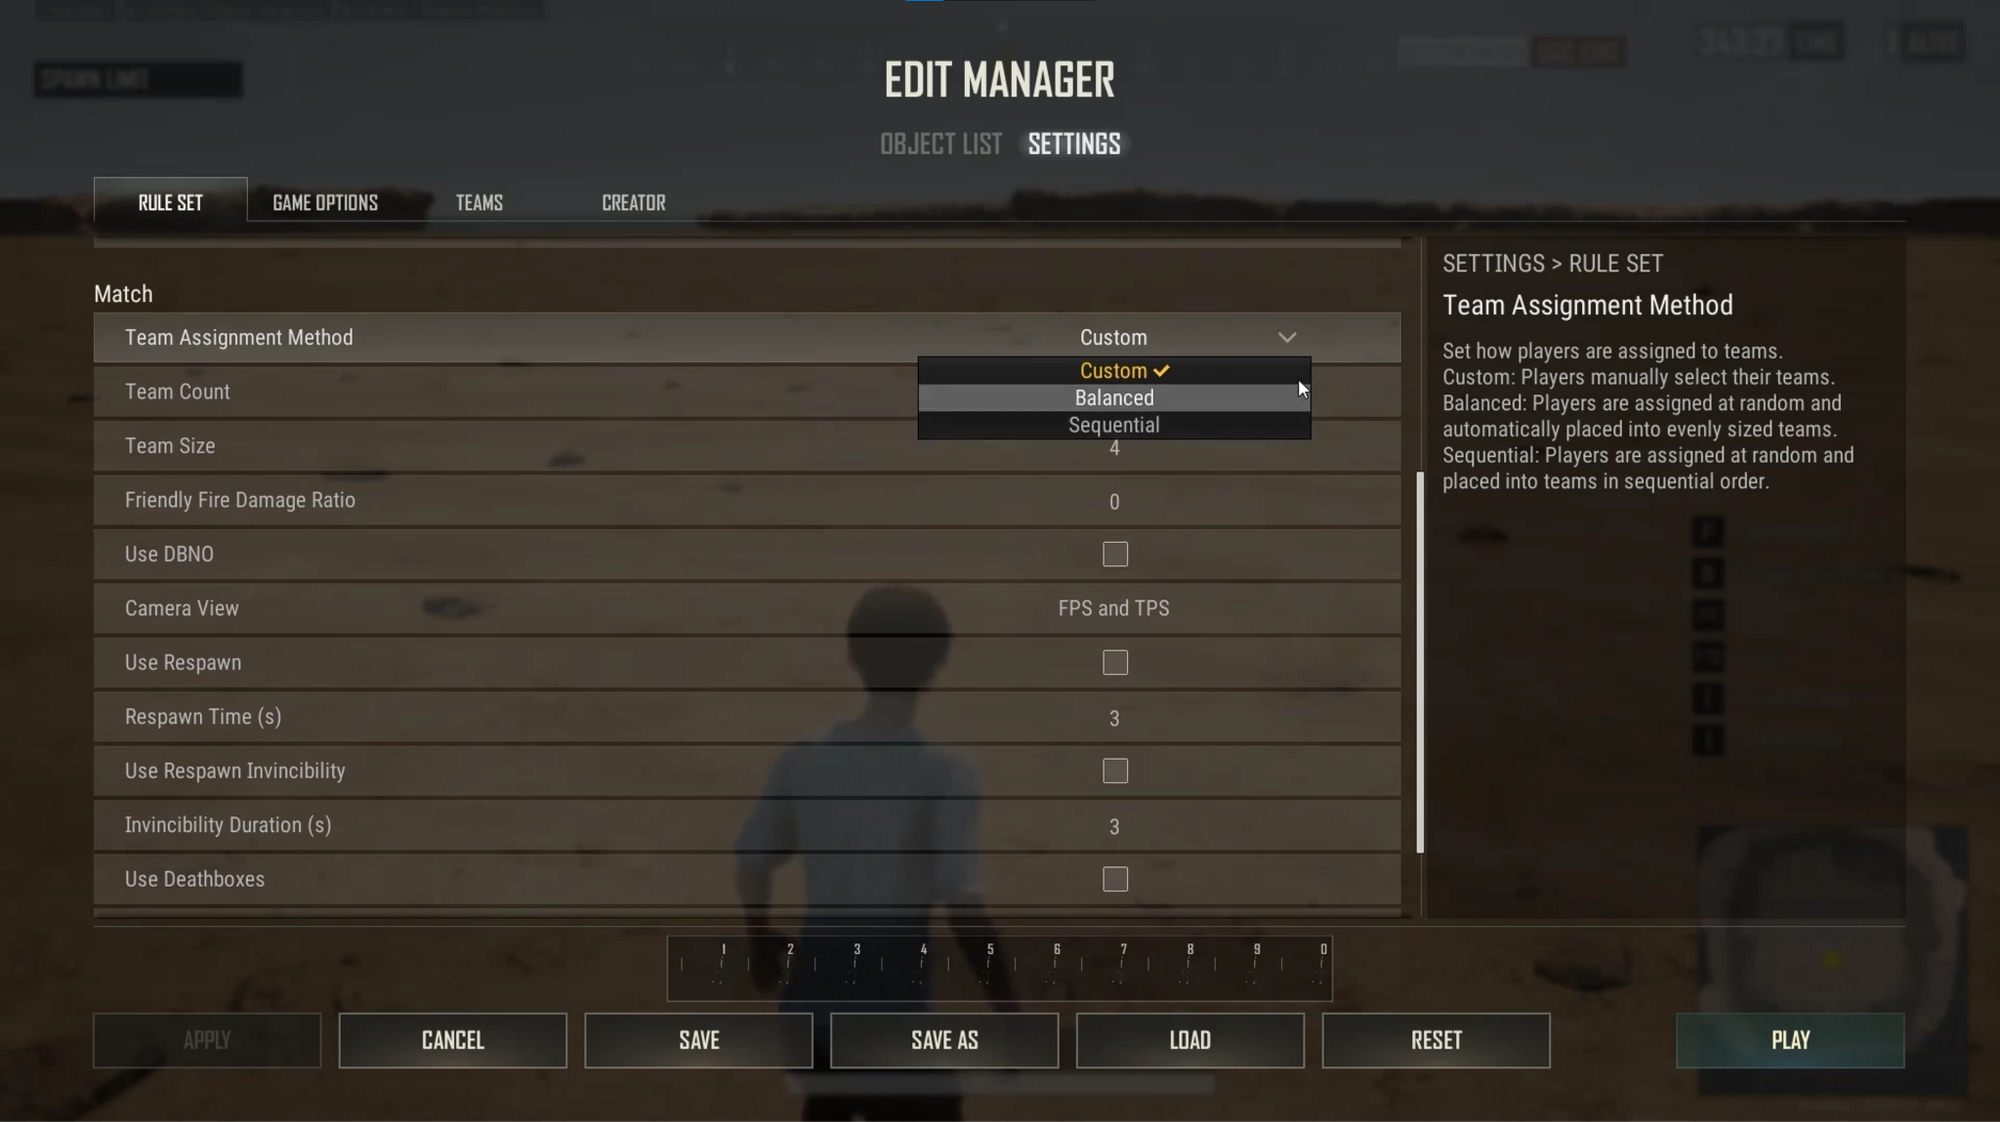
Next, choose how players enter teams. There are three available assignment methods:
- "Custom": Players choose their own team.
- "Balance": Players are randomly spread evenly across teams.
- "Sequential": Players are assigned one after another.
You can then set:
- "Team Count": How many teams exist.
- "Team Size": How many players can join each team.
Determining Combat and Respawning Behaviors
Now we’re getting somewhere! It’s from here that you can start shaping the actual combat rules. "Friendly Fire Damage Ratio" controls how much damage teammates can deal to one another. If you want to disable this feature, simply set its value to "0". You can also adjust:
- "DBNO": Whether defeated players die immediately or enter a downed state.
- "Camera View": First-person or third-person.
- "Respawn": Whether players can return after dying.
- "Respawn Time": How long they have to wait.
- "Respawn Invincibility": Whether returning players get temporary protection.
- "Invincibility Duration": How long that protection lasts.
- "Death Boxes": Whether players drop items when they die.
- "Death Box Duration": How long dropped items stay around.
- "Kill Feed Team Numbers": Whether team numbers appear in the kill feed.
As for which settings to choose, it all depends on your end goal. A fast arena shooter, for instance, might use instant respawns and no friendly fire, while a survival mode could remove respawns altogether.
Playing Around With Game Options
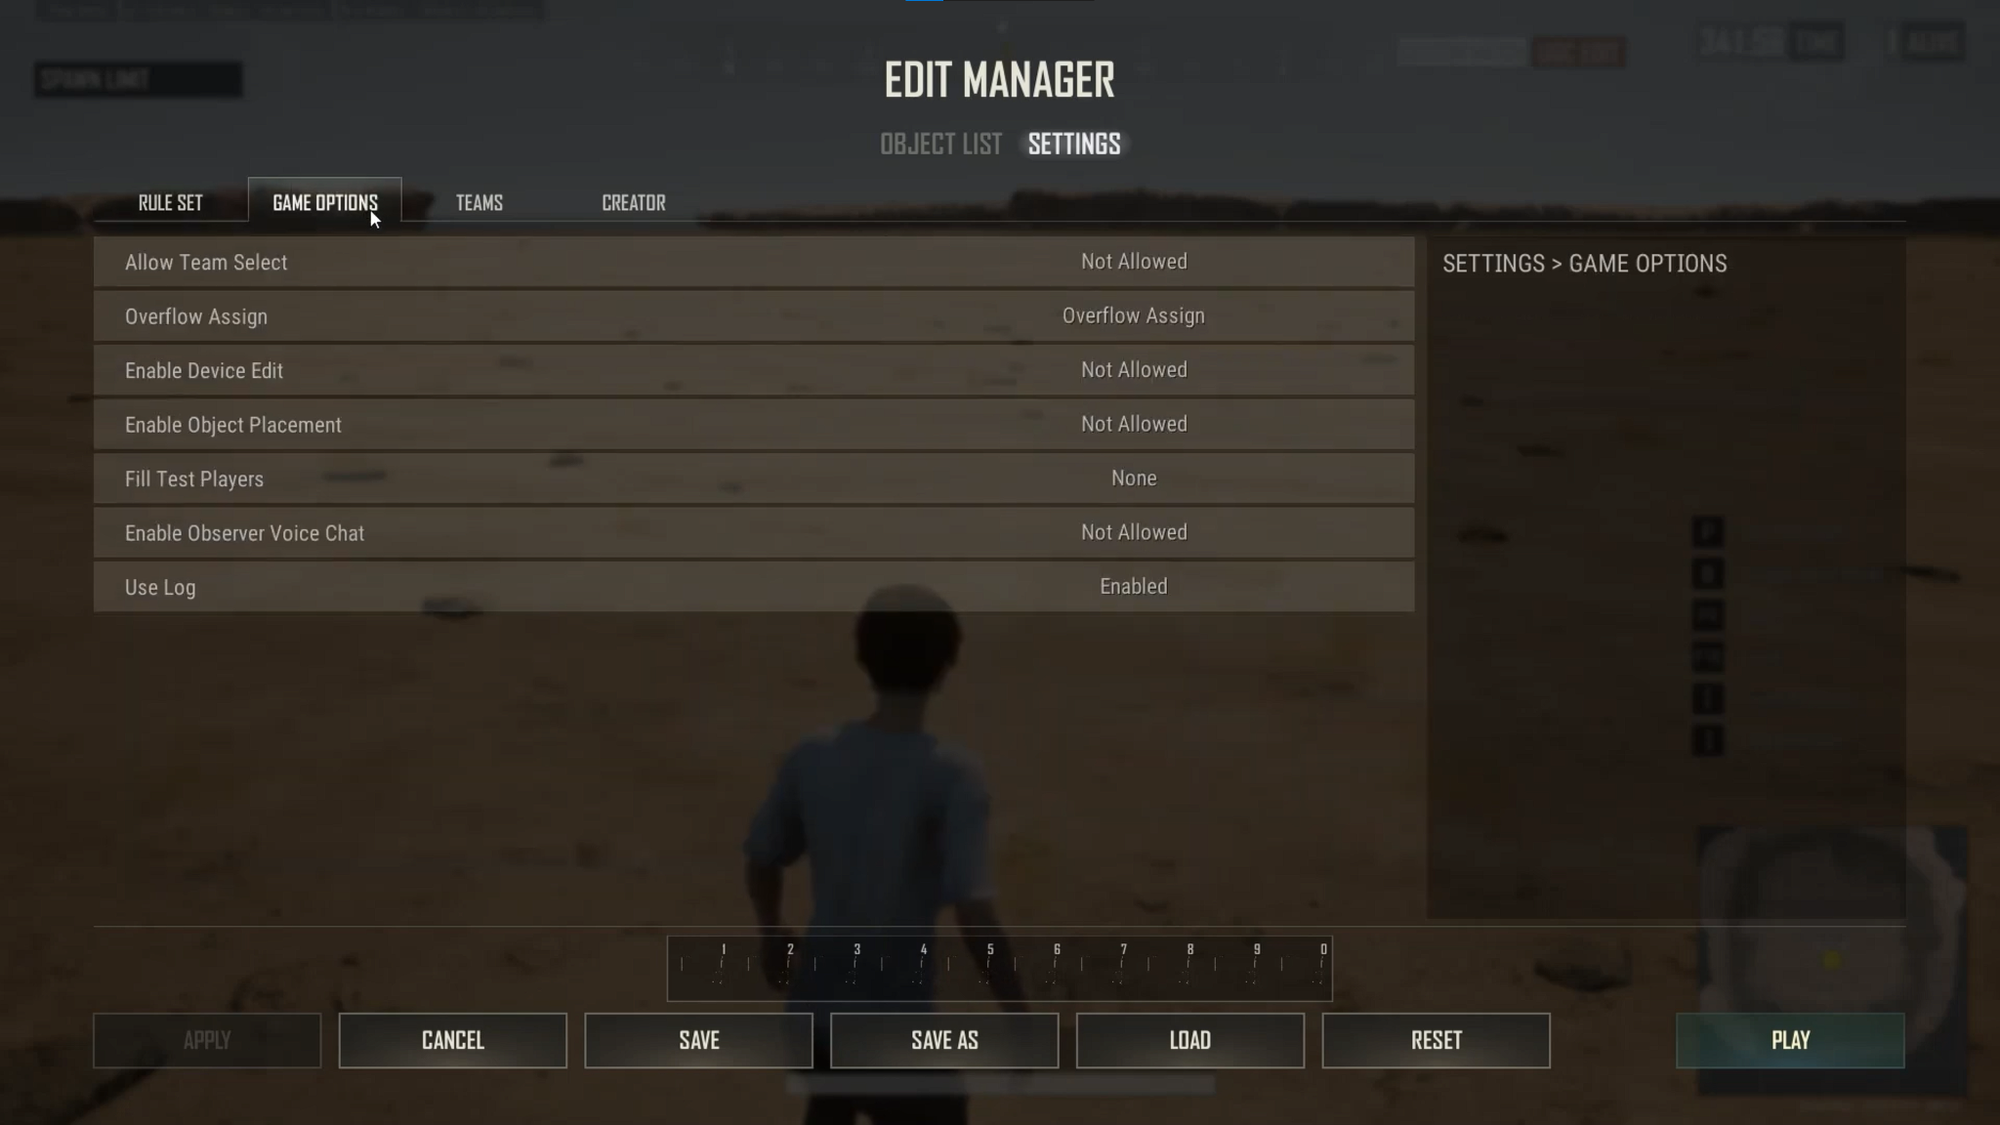
The "Game Options" section has several useful settings for both creators and testers. From here, you can:
- Let the host manually select teams.
- Enable teammate spectating.
- Use "Observer" for a free-roaming camera.
- Allow device editing during gameplay.
- Allow object placement during gameplay.
- Enable observer voice chat.
- Record object-placement and gameplay logs.
Assigning Players to Teams
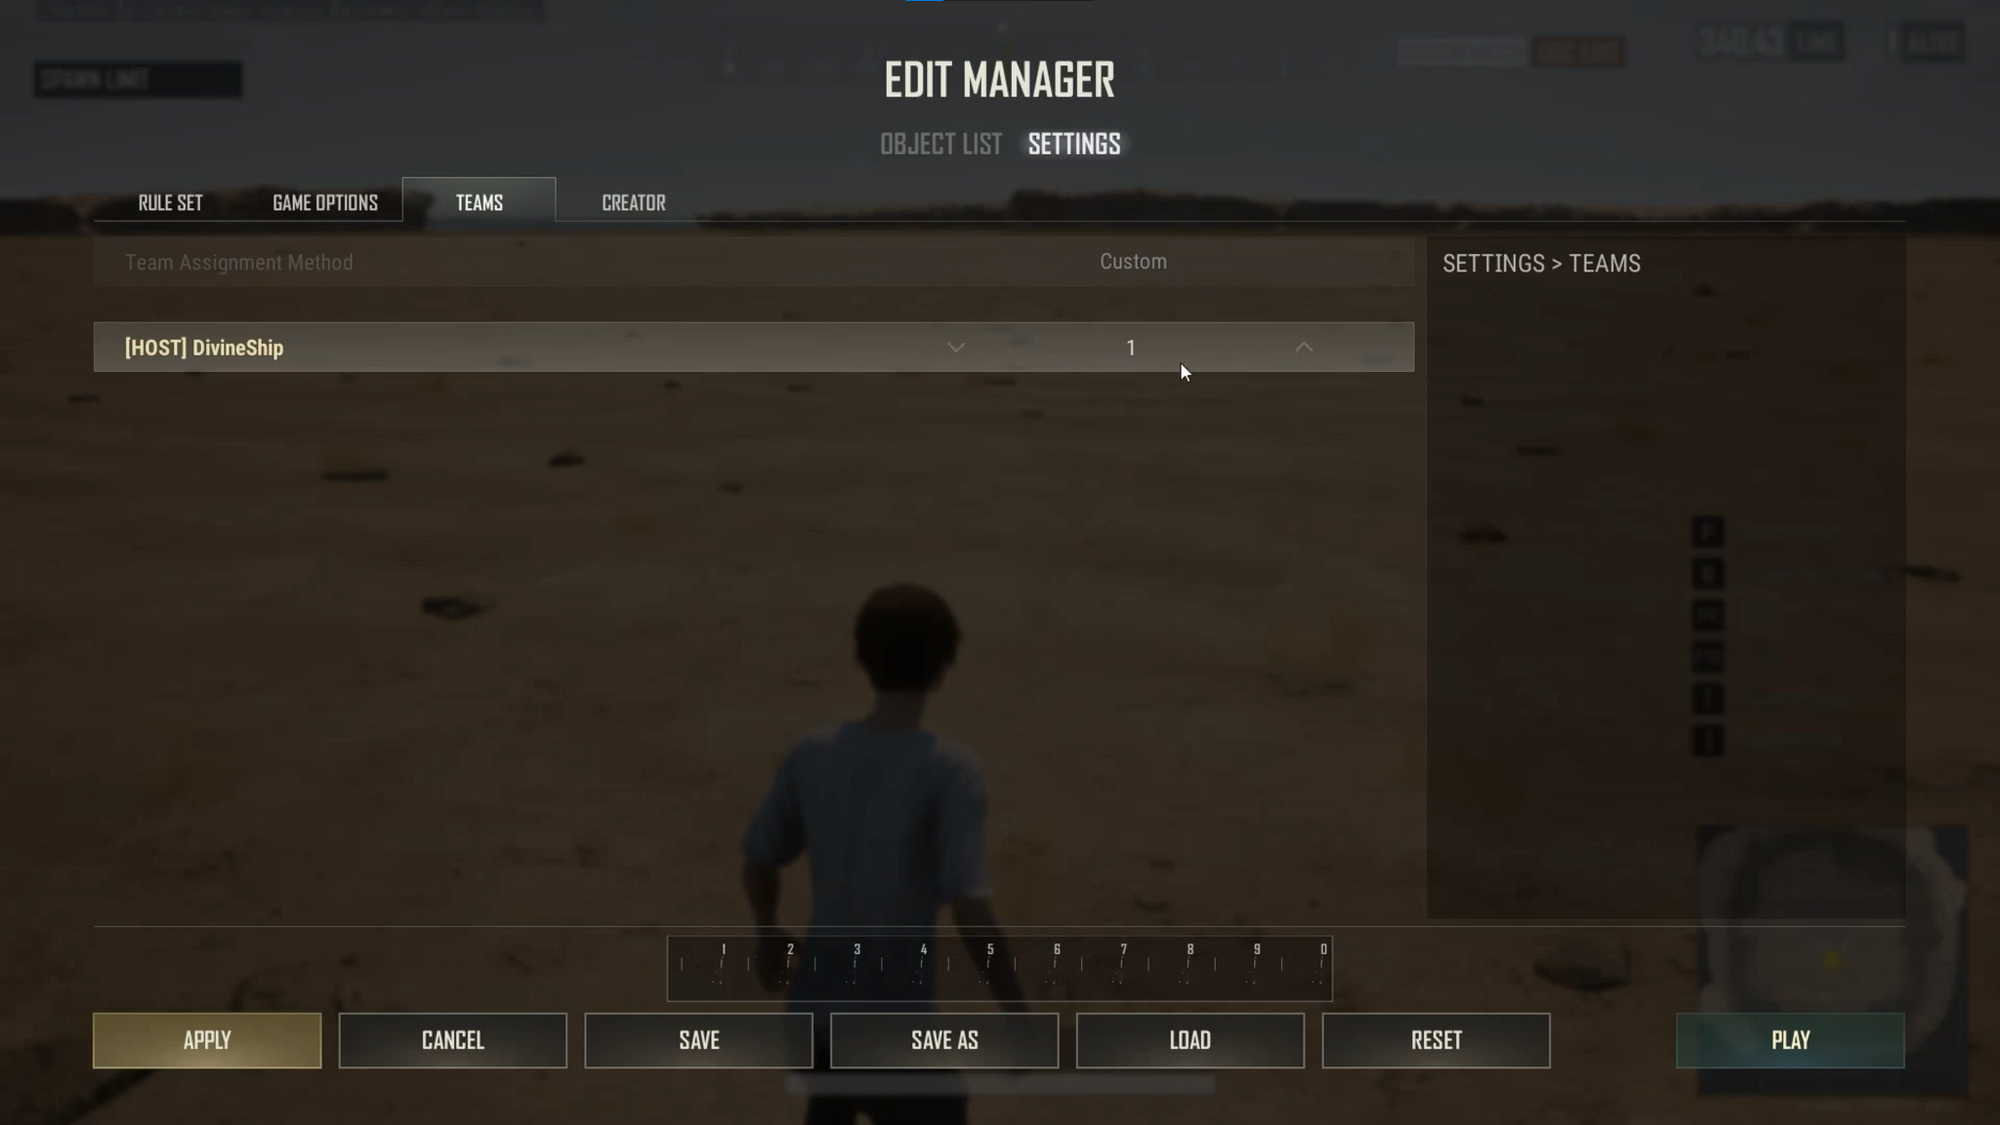
Open the "Teams" section if you need to manually change which team each player belongs to. If your test depends on specific players starting on specific teams, set this up before pressing "Play".
Completing Your Creator Settings
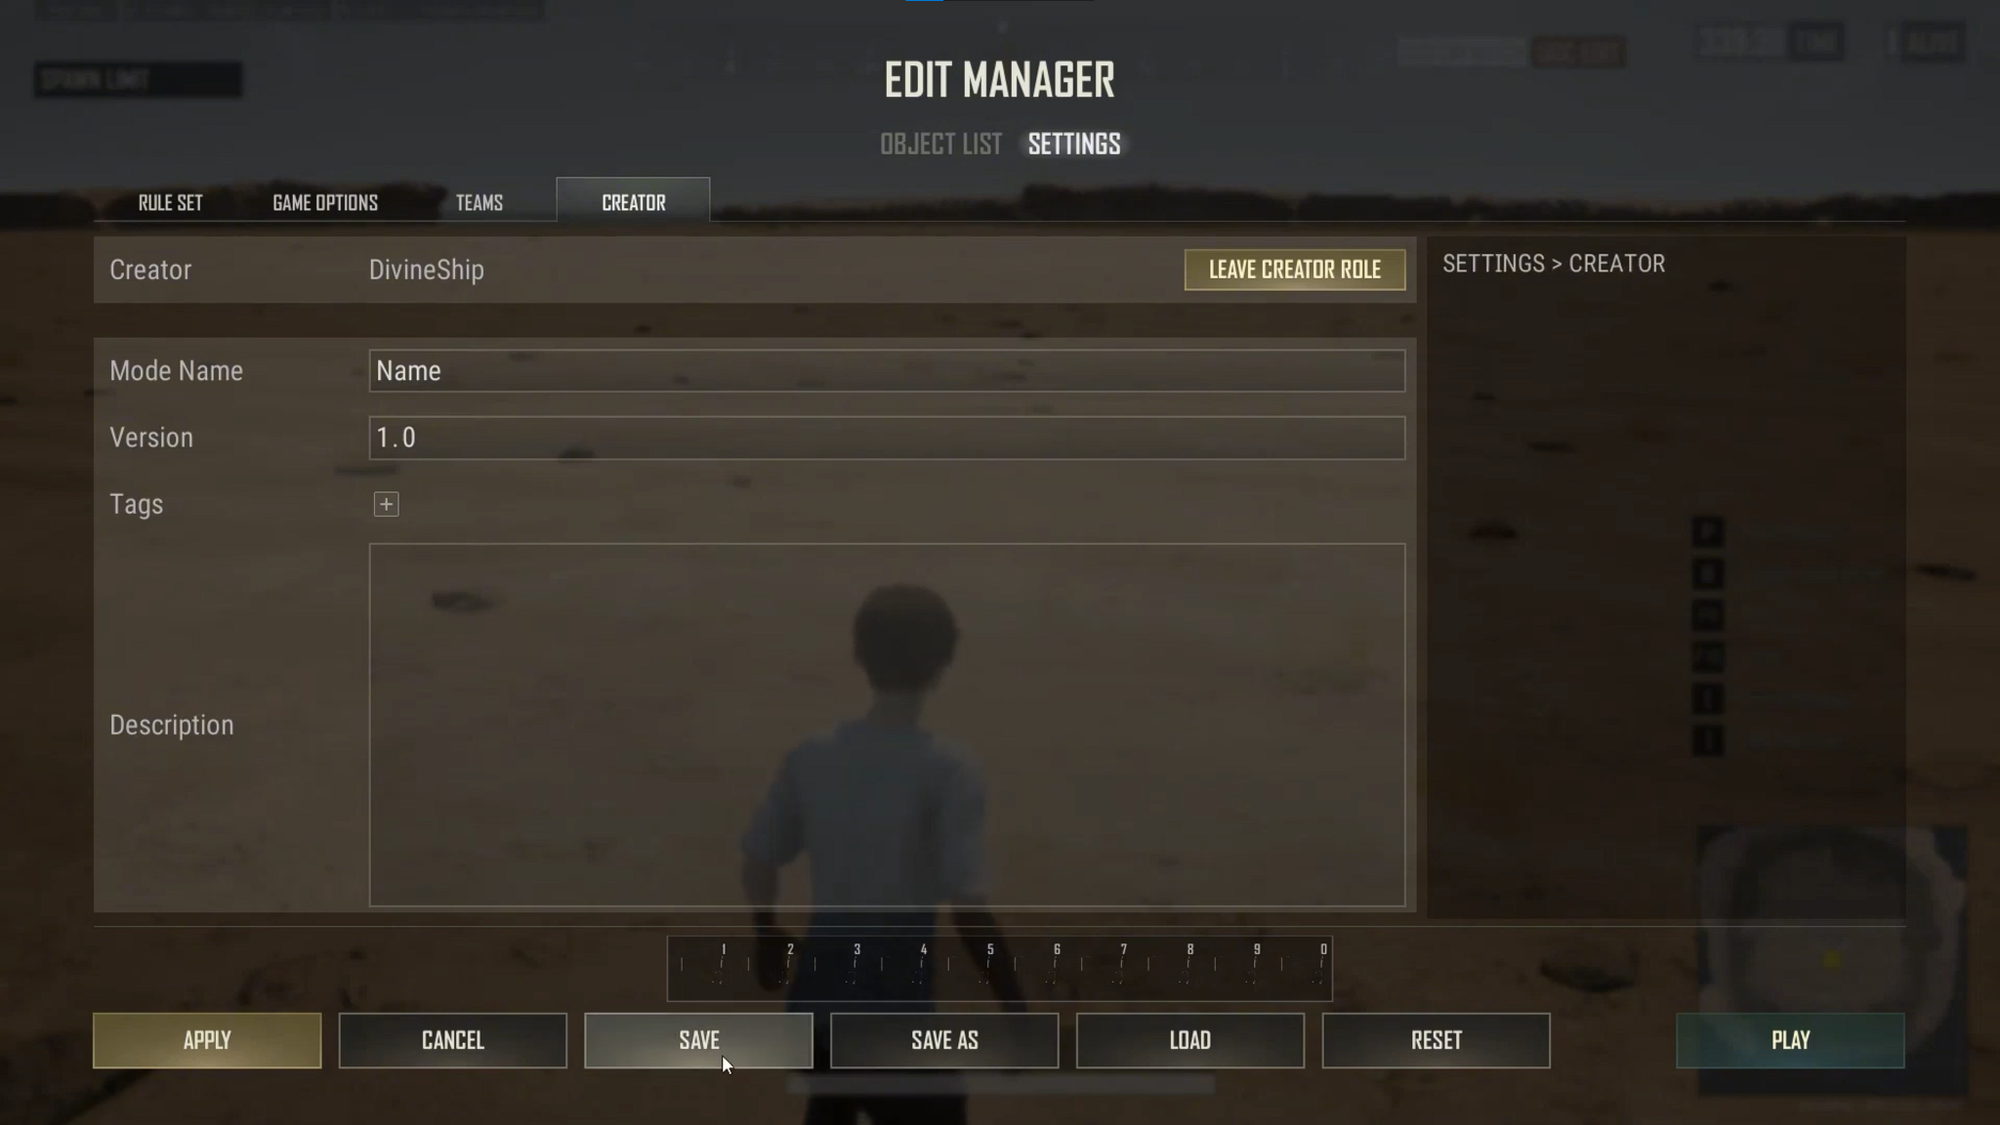
Before saving, give the mode a proper identity under "Creator Settings":
- "Creator Role": Leave this at "None" if you’re distributing the map under CC0, or select "Take Creator Role" if you want creator attribution.
- "Mode Name": Add the name of your mode.
- "Version": Increase this whenever you change and re-upload the project.
- "Tags": Pick the tags that best fit your mode.
- "Description": Give players a quick idea of what they’re getting into.
When everything looks right, simply click "Save".
Testing Your Mode
Click "Play" in the bottom-right corner to jump into your mode. We recommend doing this often rather than waiting until the whole thing is finished. In our humble experience, testing one mechanic at a time makes it much easier to figure out what went wrong if something suddenly stops behaving as expected.
Tinkering With Devices and Gameplay Logic
Objects build the map and settings define the rules. However, it’s with the so-called "Devices" where things start getting interactive. Now, it’s time that you learn how to connect devices and triggers to make things happen automatically during a match.
For a closer look at the game engine’s underlying logic alongside several clear-cut examples, don’t miss out on the final part of our UGC tutorial series for beginner mode creators:
What Are UGC Devices?
UGC Devices are tools that control what happens during a match. Instead of forming the physical map like regular objects, devices handle gameplay functions such as spawning players and items, awarding points, detecting events, or triggering actions. By connecting devices together, you can create simple chains of logic – for example, a round starting can trigger another device to spawn players or hand out equipment.
Opening the Device Menu
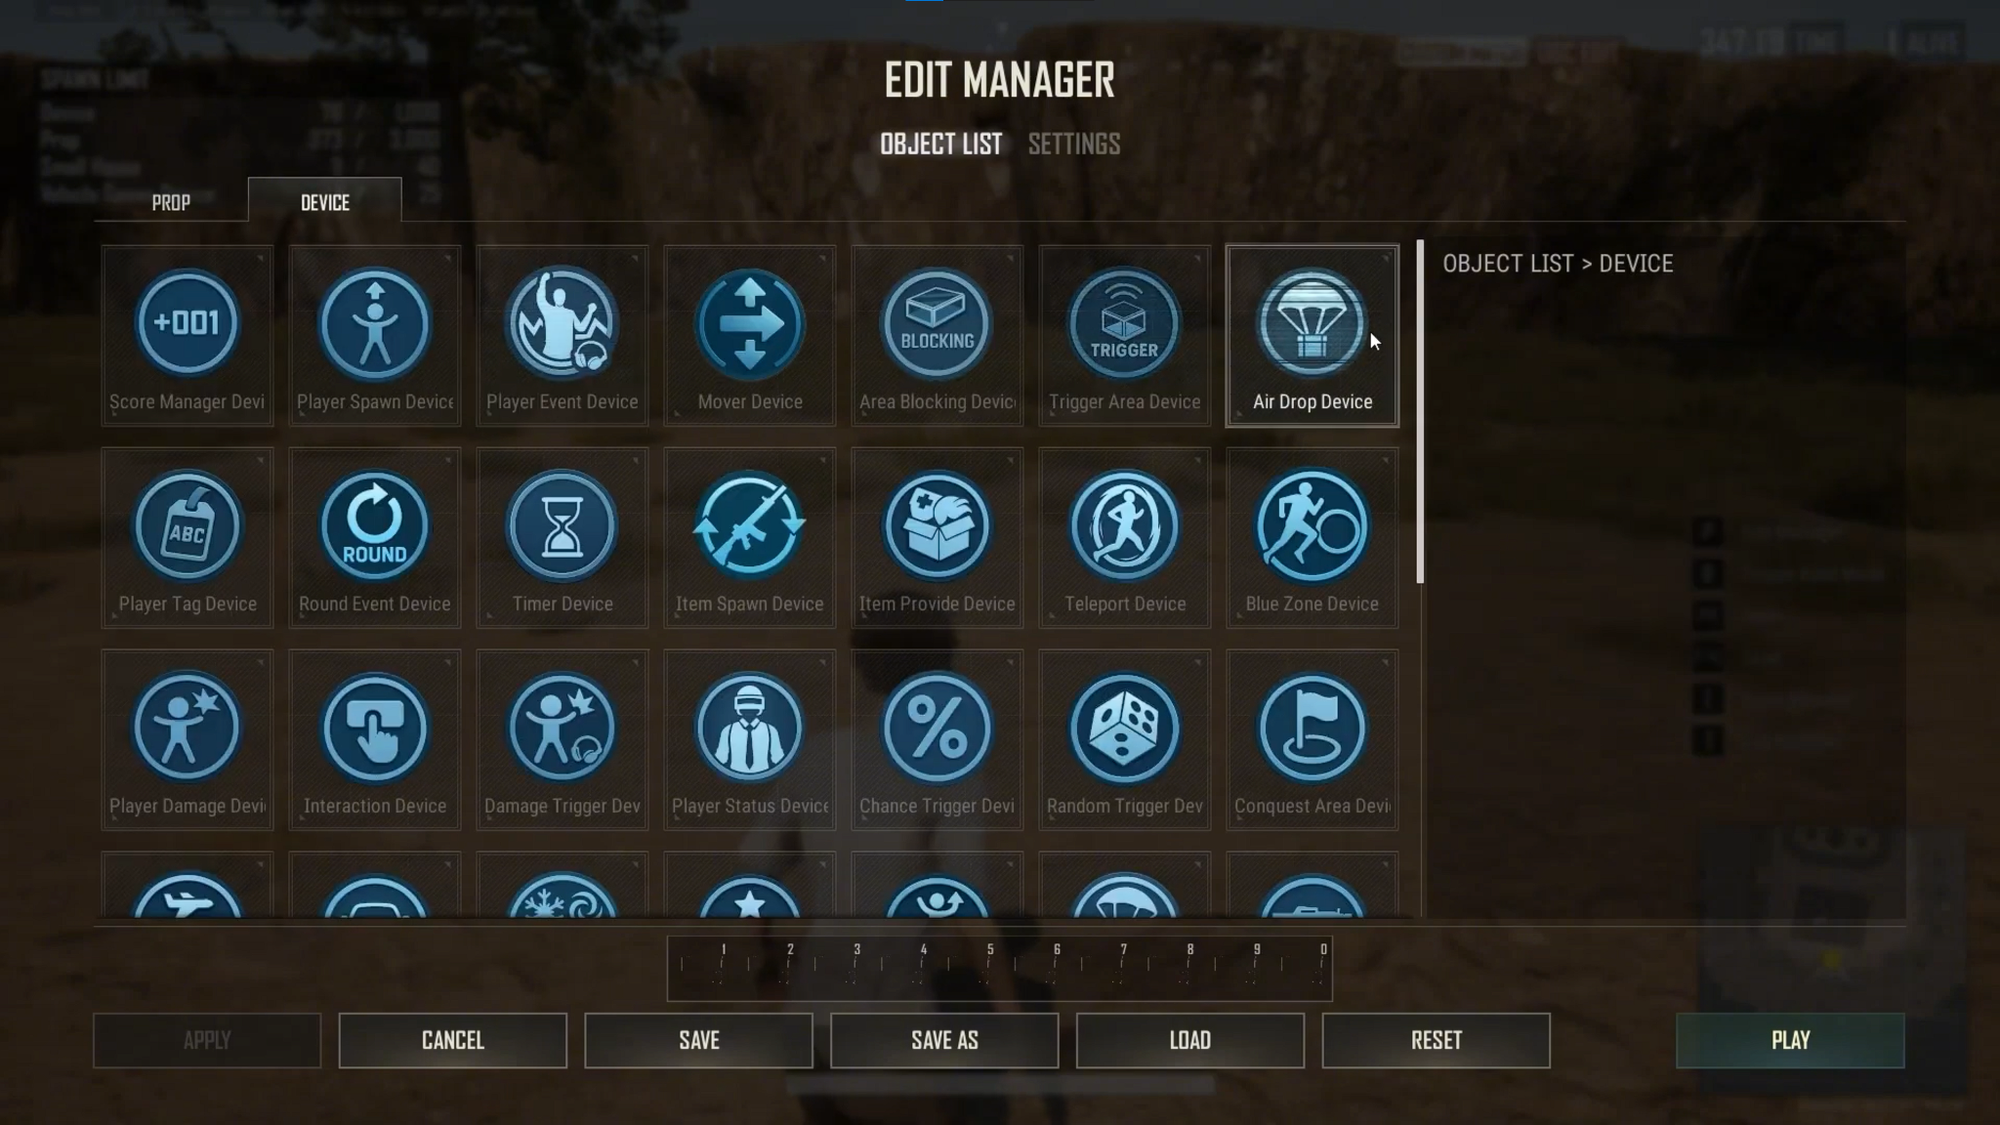
Press "P", then open the "Device" tab in the upper-left corner of the "Edit Manager". As with regular objects, assigning your most-used devices to the numbered hotbar will make the whole process quicker.
Creating a Round Event
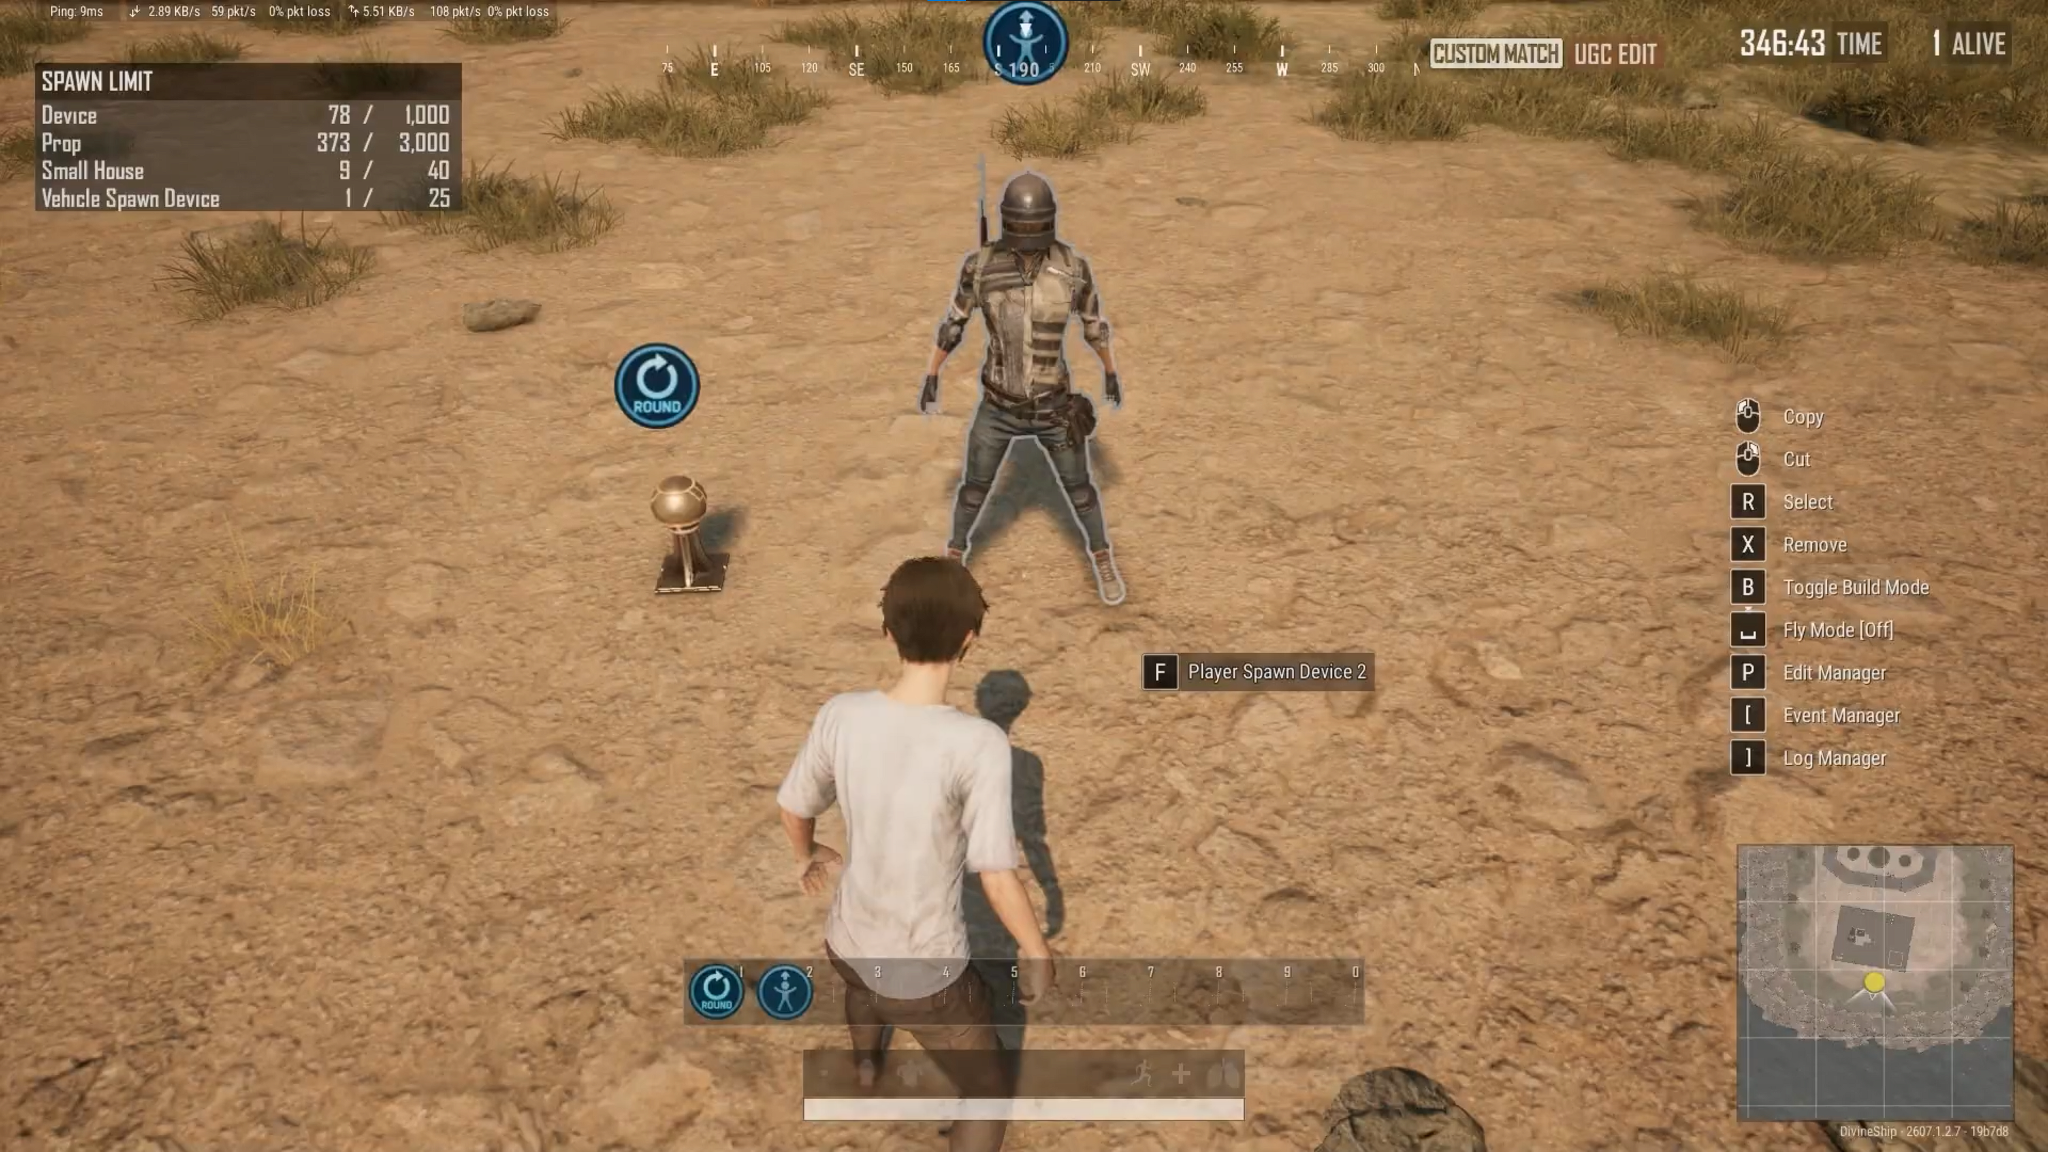
Start by placing:
- A "Round Event Device".
- A "Player Spawn Device".
The "Round Event Device" can trigger other devices whenever a round reaches a certain point.
Inside its settings:
- Configure "Send Round Event" to choose when the event fires.
- For general gameplay, we recommend choosing "Round Start After Spawn".
- Set "Application Scope" depending on if the event runs every round or only during specific ones.
- Click "Apply" whenever you make a change.
Next, open the "Trigger" tab. Adding another device under "On Condition Met" lets you choose what that device should do whenever the round event fires.
Configuring Player Spawns
Open the "Player Spawn Device" and set:
- The spawn delay.
- Which players should spawn there.
- The target player or team.
For team-vs-team modes, using "Selected Team" makes it easy to give each side its own spawn area.
If a team has more than four players, we recommend spreading out extra spawn devices so everyone doesn’t appear on top of one another.
Creating a Pre-Round Holding Area
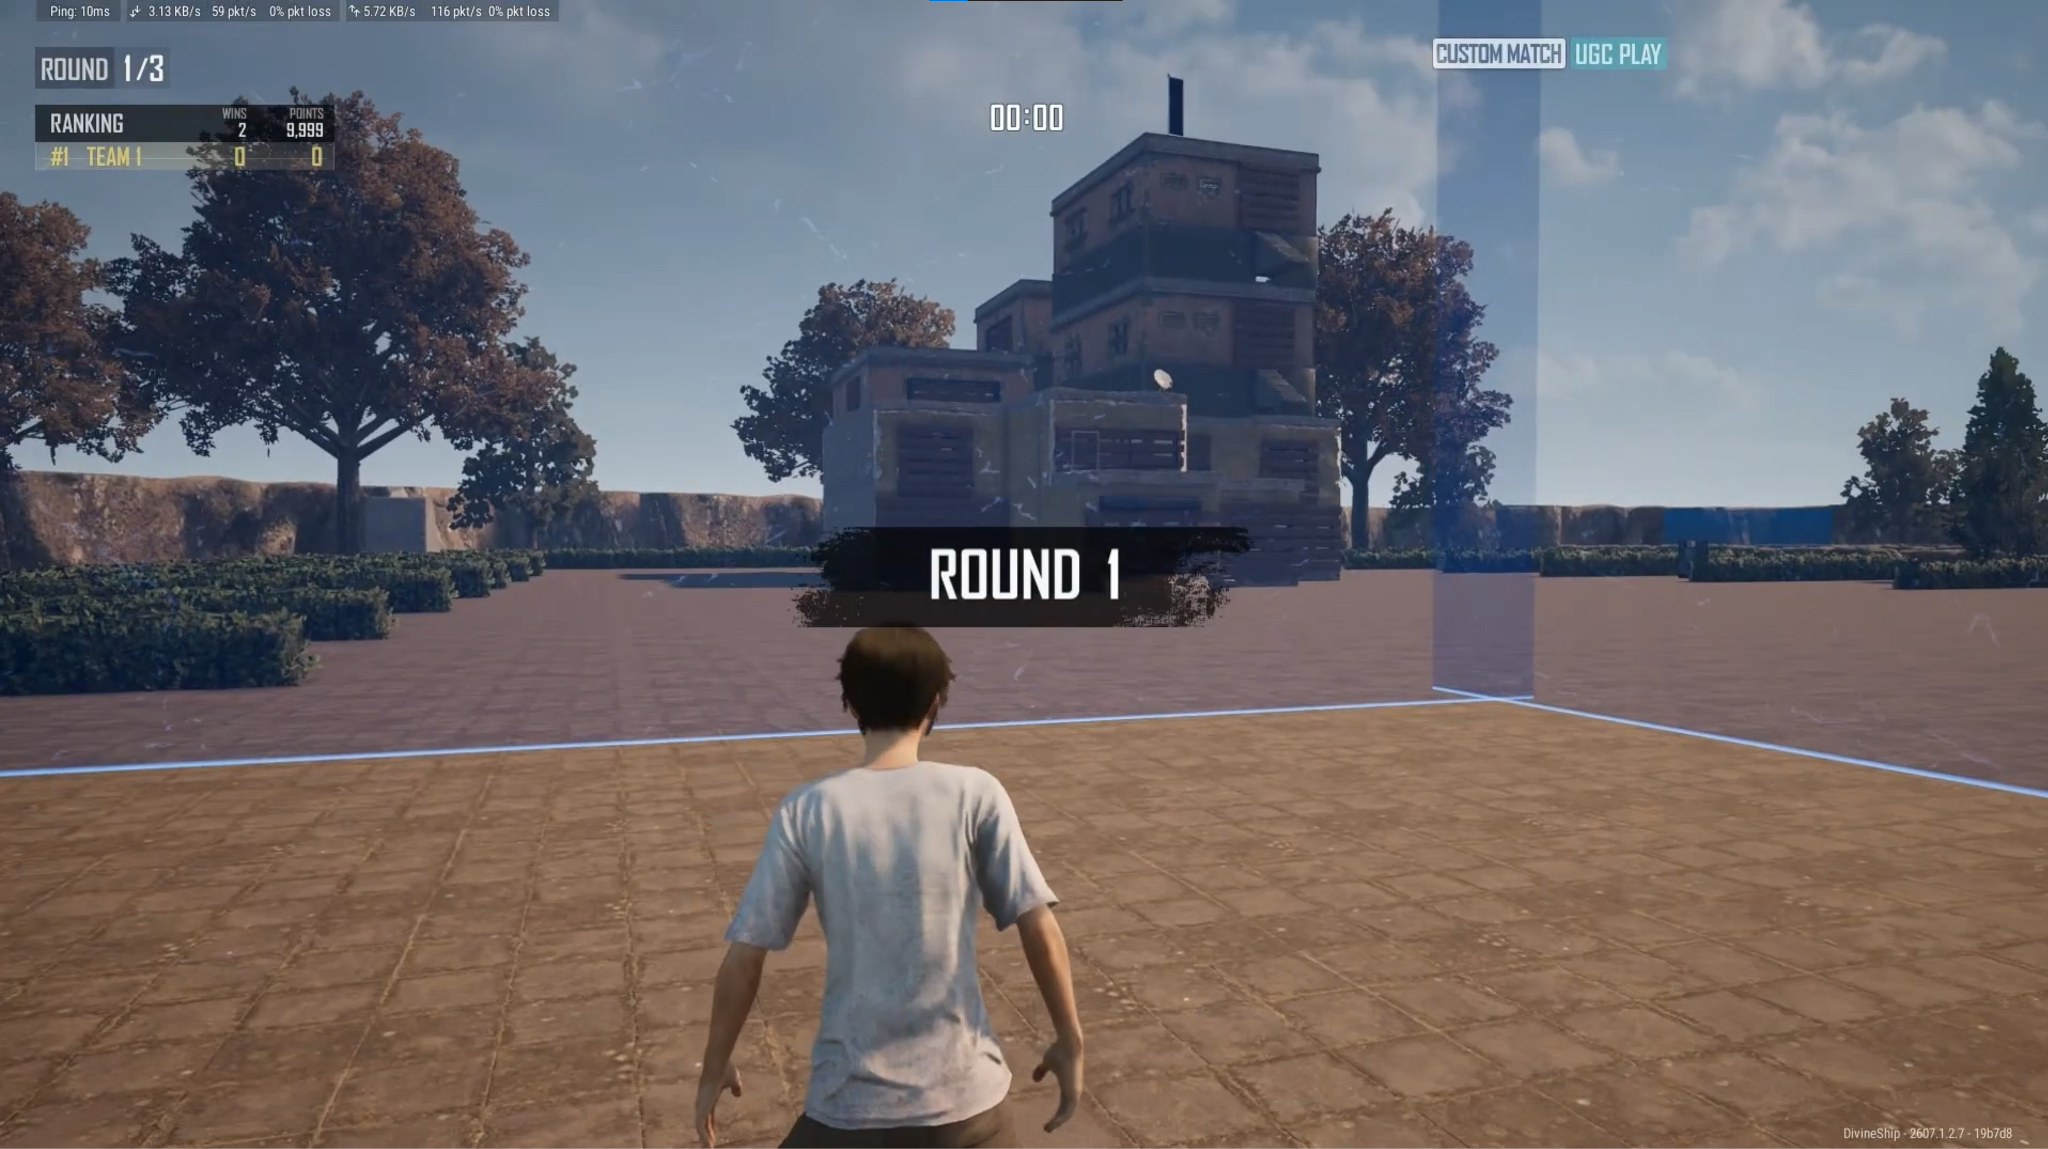
Want to keep players in place until the round starts? You can do that with a simple device setup:
- Place a "Player Spawn Device".
- Assign the correct team.
- Place an "Area Blocking Device" around the starting zone.
- Add more blocking devices if needed.
- Place a "Round Event Device".
- Configure its trigger to disable the "Area Blocking Device" when the round begins.
A barrier will then keep players in place before the match can begin.
Giving Players Starting Equipment
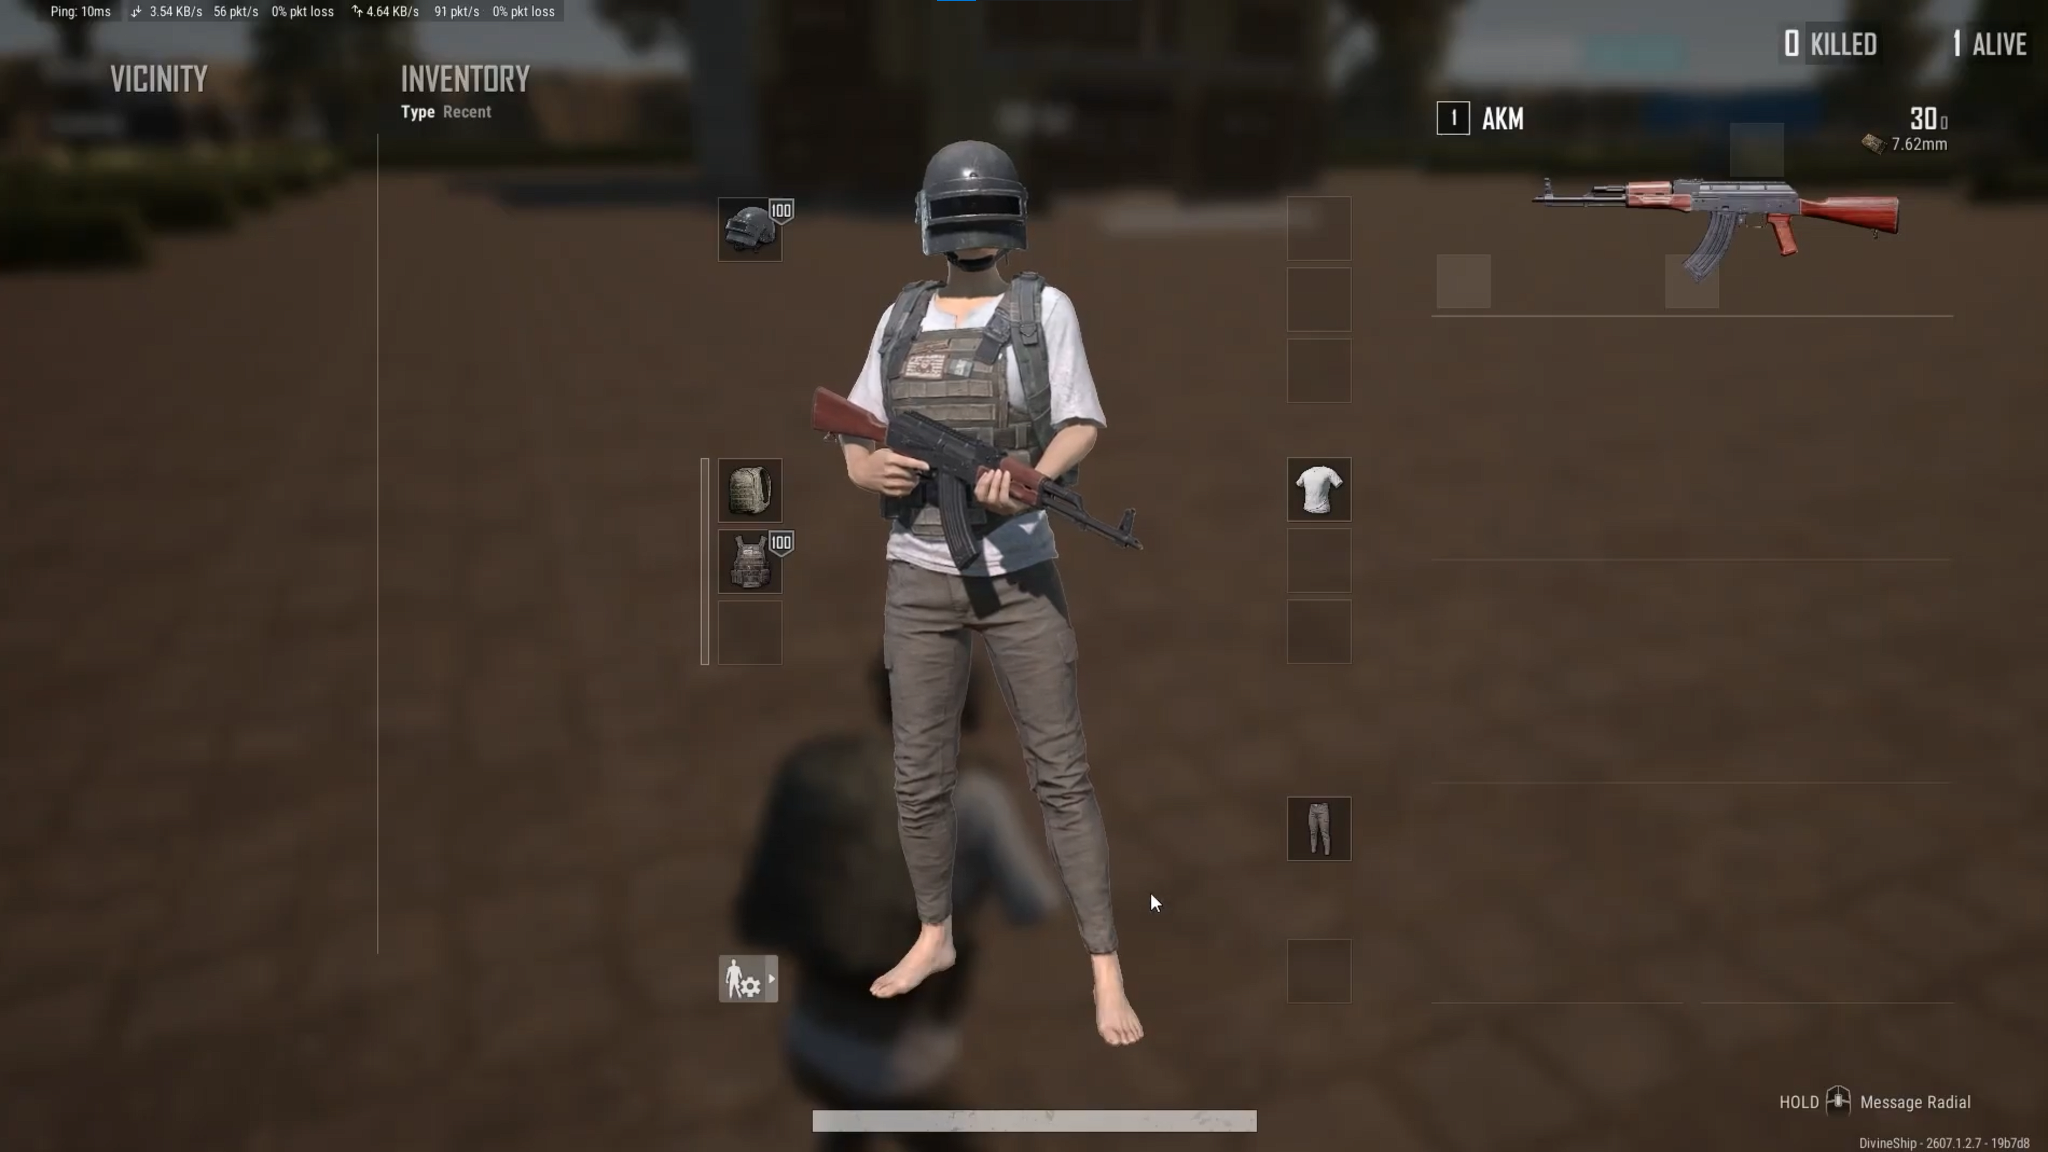
To automatically hand out gear at the beginning of a round:
- Place a "Round Event Device".
- Place an "Item Provide Device".
- Add the "Item Provide Device" under "On Condition Met".
- Choose "Provide Item".
- Open the "Item Provide Device".
- Set "Recipient" to the player or team you want.
- Fill its slots with the required equipment.
When the round starts, the selected players receive their gear automatically.
Spawning Items at Fixed Locations
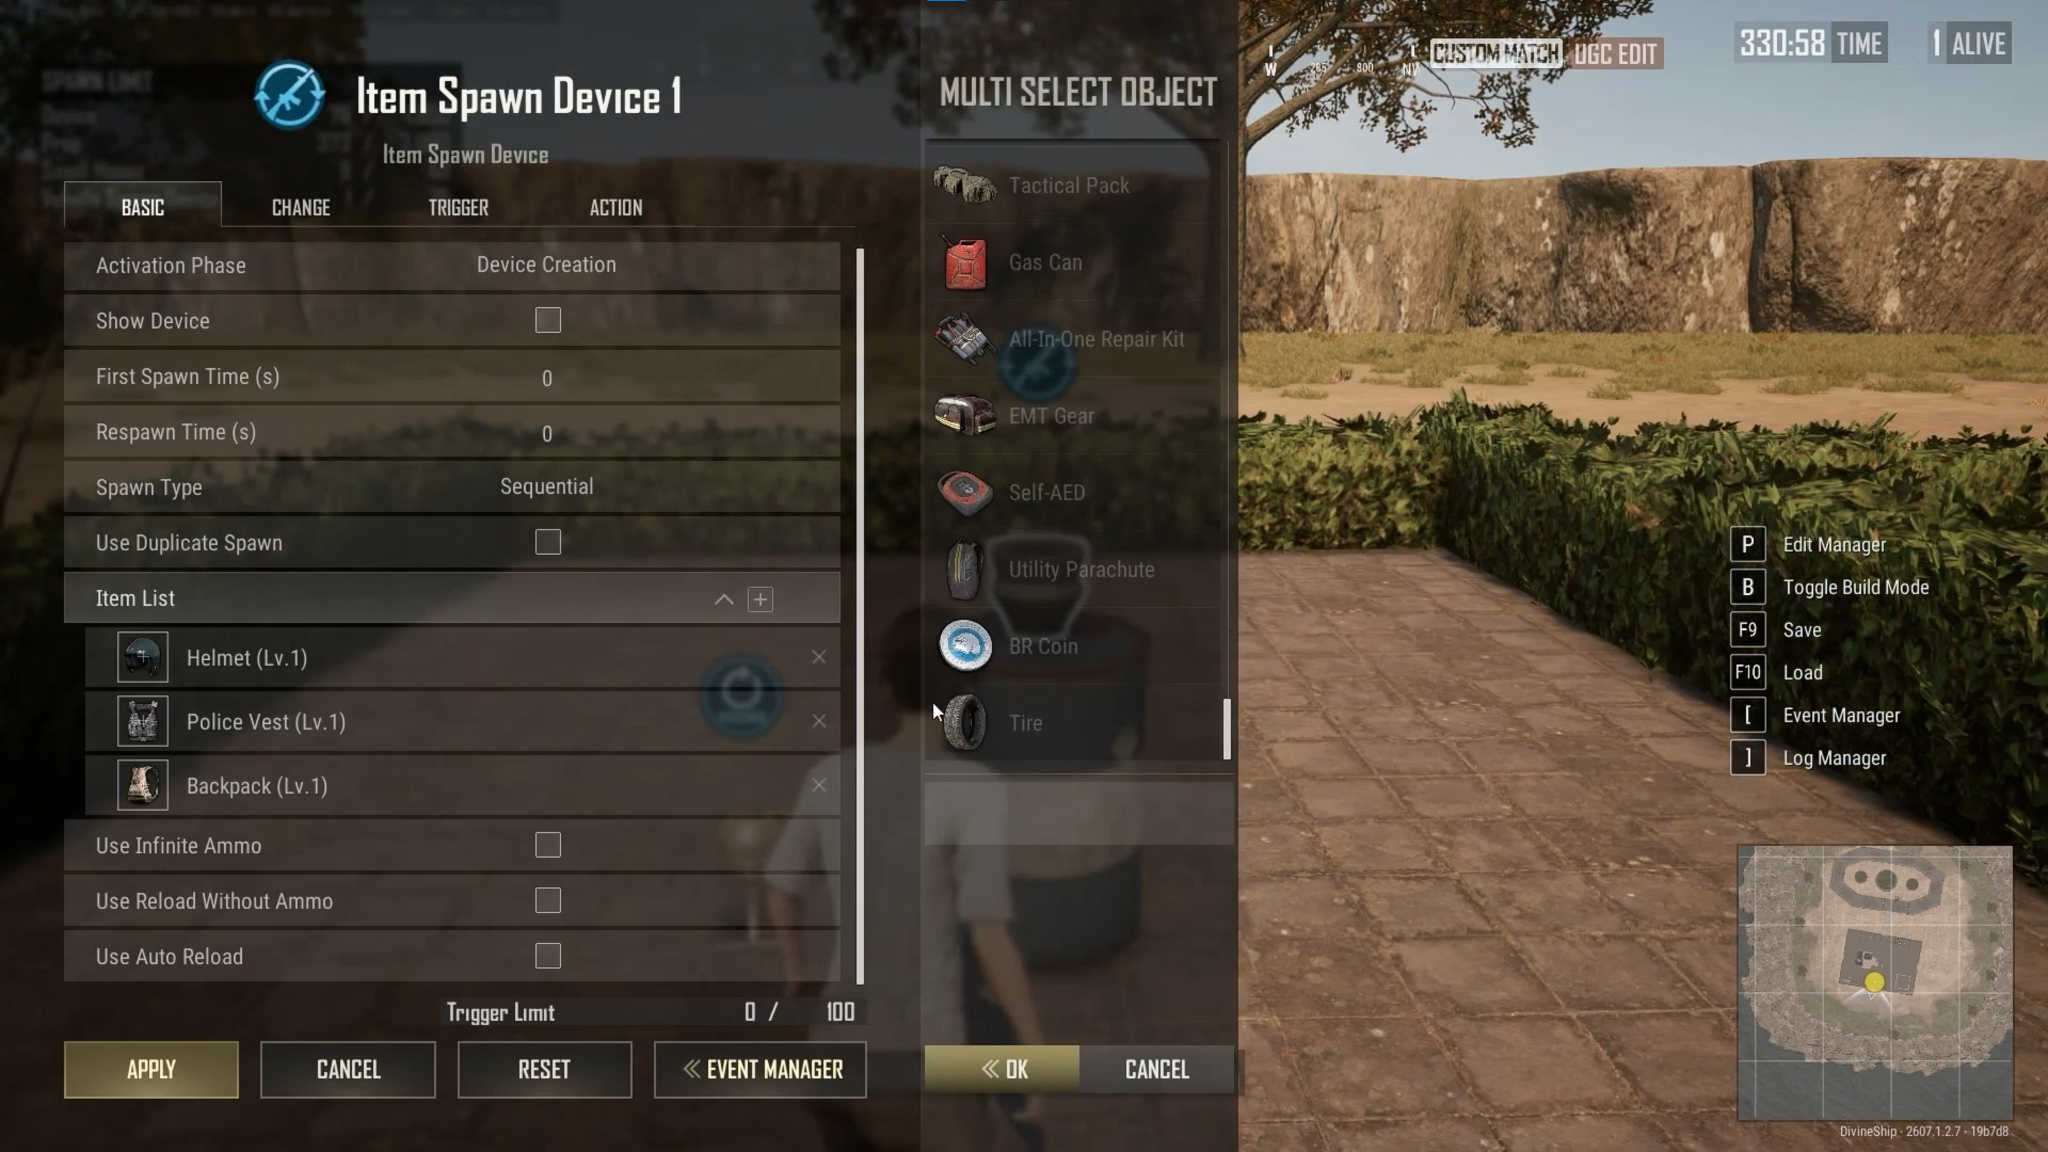
If you’d rather place pickups around the map:
- Place a "Round Event Device".
- Place an "Item Spawn Device".
- Connect the "Item Spawn Device" to the Round Event trigger.
- Select "Spawn Item".
- Add the items you want to its slots.
When the event fires, the items will appear wherever you have placed the device.
Awarding Points for Eliminations
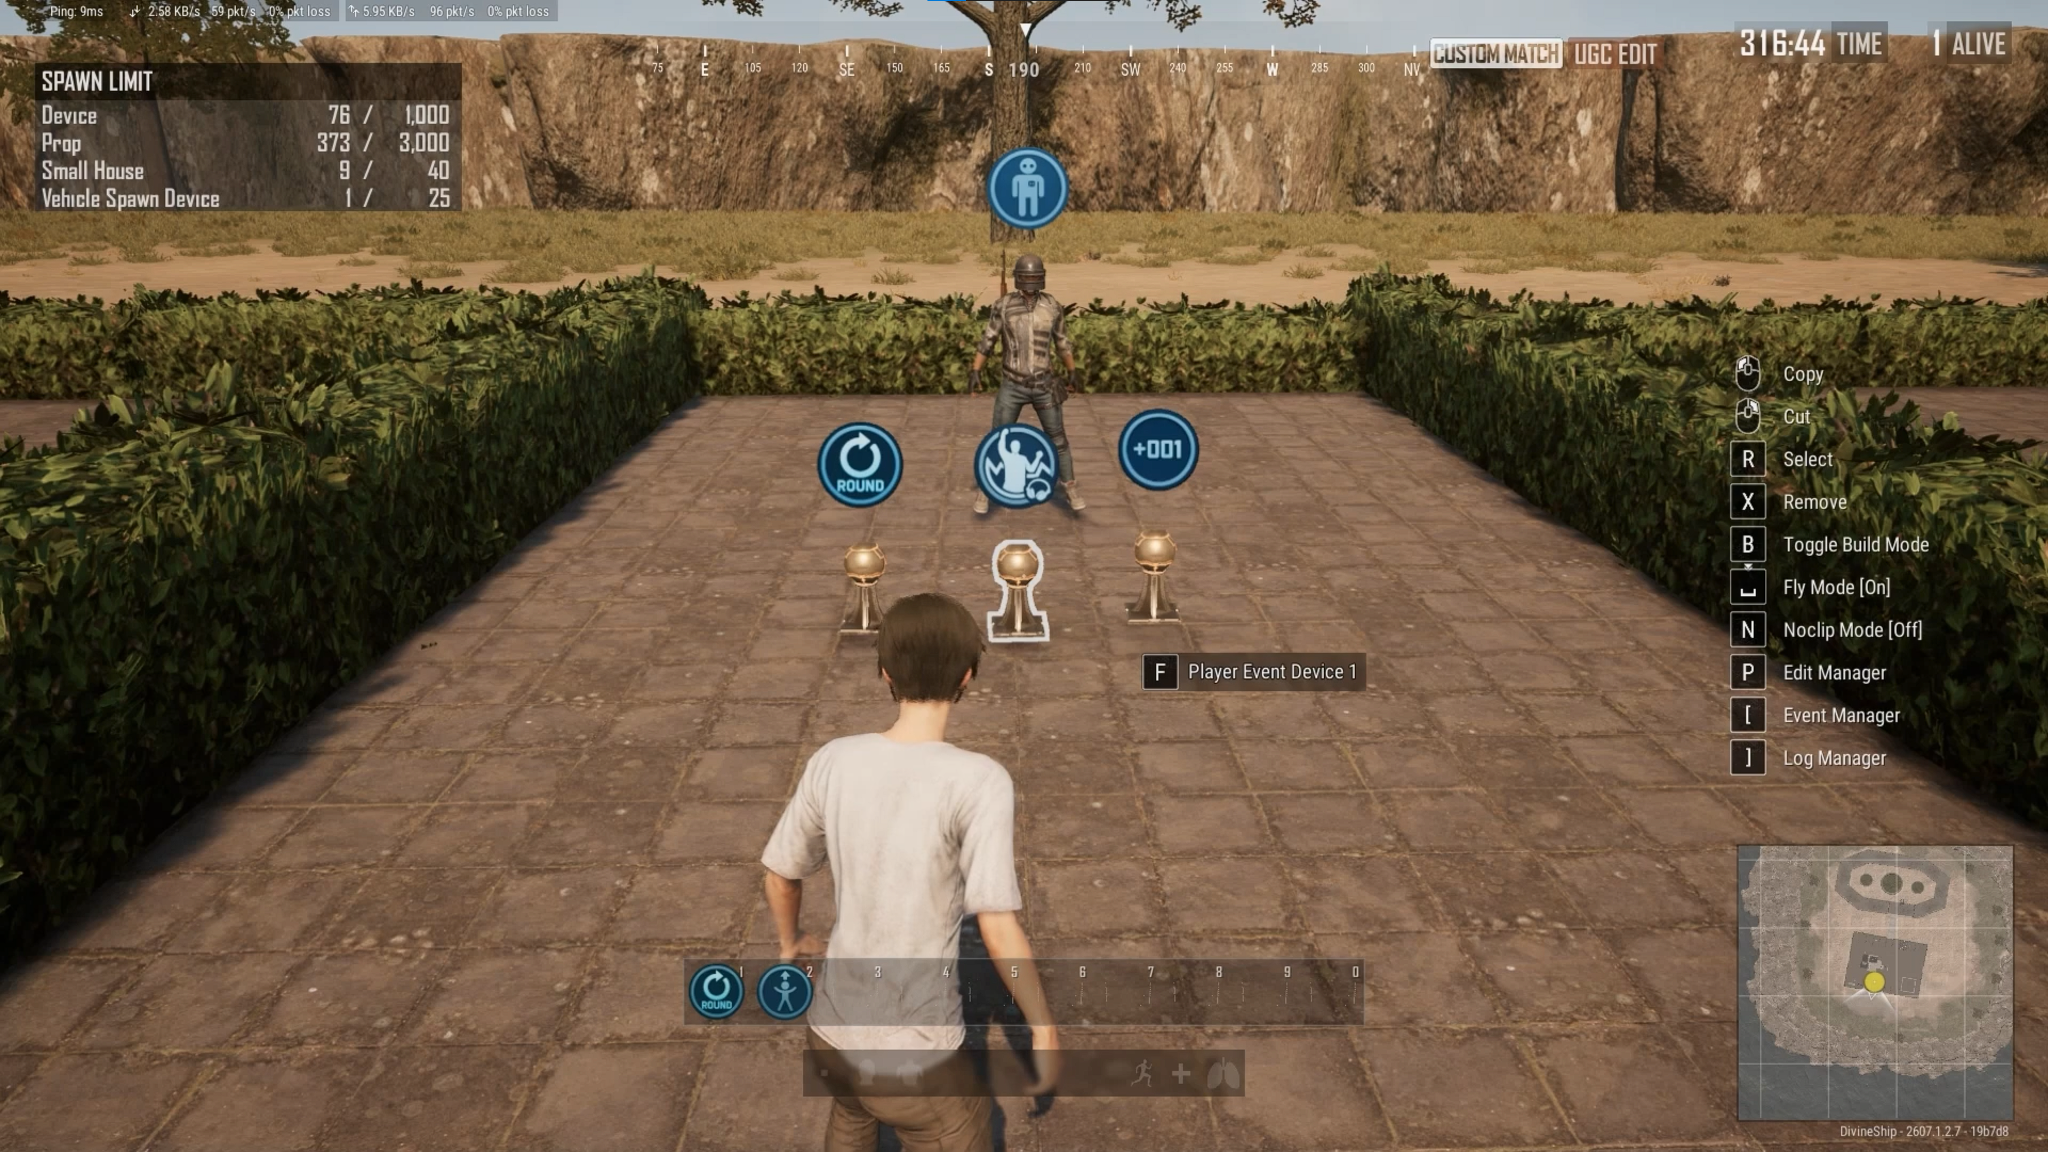
Finally, here’s a simple way for you to test PvP scoring with AI.
- Use an "AI Player Spawn Device" to create a test opponent.
- Place a "Player Event Device".
- Set the relevant action to "Enemy Kill".
- Connect a "Score Manager" to the Player Event.
- Set the trigger to "Change Score".
- Open the "Score Manager".
- Enter how many points the elimination should award.
Once everything is connected, eliminating an enemy triggers the event and updates the player’s score.
Now It's Your Turn!
You’ve got the basics down, so now it’s time to start experimenting. Build your map, set the rules, connect a few devices, and test things as you go. Keeping each change small makes problems much easier to spot when something doesn’t work.
From arenas and Gun Game to parkour, racing, PvE, and party games, there’s plenty you can do once you’re comfortable with the tools. Just remember the loop: build, test, tweak, repeat.
Have fun, and happy creating! And if you ever feel stuck on a step, you can always revisit MoxxyHaven’s excellent UGC tutorial series hosted over at CurseForge Academy.
Common Issues & Quick Fixes
My test bots spawn, but they don't fight or move normally
Make sure test players are enabled under "Settings" → "Game Options" → "Fill Test Players". Additionally, keep in mind that test bots may behave more like placeholders than full Battle Royale AI, so don’t assume every movement or combat behavior will work the same way as a normal match.
I deleted something accidentally, how do I undo my action?
Unfortunately, UGC Alpha doesn’t currently have a conventional "Undo" function. That makes regular saves especially important. If something major goes wrong, check whether an "Auto Save" exists from before the mistake and restore from there if possible.
My Vehicle Spawner has stopped producing vehicles
Check how many vehicles are already active before assuming your logic is broken. UGC Alpha has a 25-vehicle cap, so we recommend designing vehicle-heavy modes and races with that limit in mind.
How do I trigger a custom round ending?
UGC Alpha doesn’t currently provide a simple dedicated custom round-finish device, which can make more unusual win conditions tricky. Where possible, build your ending around existing score, time, or round conditions. More complicated setups may need indirect trigger logic to get the result you want.
I changed a device, but nothing happened
The first thing to check is whether you clicked "Apply". Get into the habit of applying your changes straight away, saving regularly, and testing the affected device before moving onto the next piece of logic.
My weapon setup is too restrictive
Try using the "Item Provide Device" game rule to give specific weapons directly to a player or team. If you want players to choose their gear instead, the "Item Spawn Device" game rule can place selectable equipment around the map.