Imagine setting out across the Palpagos Islands with a team of loyal Pals by your side. Every mountain hides a new adventure, every base can become a sprawling industrial empire, and every encounter offers another opportunity to shape your world.
With mods, you can take that adventure even further – whether you want to build without limits, improve performance, streamline everyday tasks, or completely transform how the game plays. The only catch is that not every Palworld mod installs the same way. Some work through Steam Workshop or CurseForge, while others require a few manual steps depending on how they're built.
Luckily, getting started is much easier than it sounds. In this beginner-friendly guide, we’ll explain all the different types of Palworld mods, show you how to install and remove each one safely, and help you choose the right installation method before you dive in.
What Are Palworld Mods?
A Palworld mod is a community-created add-on that changes or expands the game in some way. Some mods improve the user interface or graphics, while others add new gameplay features, enhance performance, or introduce entirely new mechanics. Because mods are built in different ways, they don't always install using the same method – which is exactly what this guide will help you understand.
Why Should You Mod Palworld?
Palworld already offers a huge sandbox of exploration, crafting, base building, and creature collecting, but mods let you tailor that experience to your own preferences. Whether you want to reduce repetitive tasks, unlock new building possibilities, improve performance, or simply make everyday gameplay more enjoyable, the game’s active community has created thousands of mods to help.
Some of the most popular reasons players install mods include:
- Reducing repetitive crafting, travel, and inventory management.
- Expanding building freedom with fewer placement restrictions and better base organization.
- Making breeding, Pal management, and stat evaluation more efficient.
- Displaying useful information that the vanilla interface hides or spreads across multiple menus.
- Rebalancing progression for solo, cooperative, or challenge playthroughs.
- Improving graphics, image quality, or overall game performance.
- Adding server administration, moderation, and multiplayer management tools.
Types of Available Palworld Mods
CurseForge currently offers 400+ Palworld mods spread across five main categories based on how they are installed:
- Patch Pak Mods: A list of mods that typically come as pre-packaged .pak archives.
- Blueprint Code Mods: A list of mods built using Unreal Engine Blueprints.
- Lua Code Mods: A list of mods built on the Lua programming language that also need a script loader such as RE-UE4SS to run.
- C++ Code Mods: A list of advanced mods that add or change core game features. They require tools such as UE4SS to work and are usually the most sensitive to game updates.
- Miscellaneous: This category includes mods that don't fit into the other installation types.
Under each main mod category, you can also browse useful subcategories to quickly find the mods you're looking for:
- Audio: Change or enhance music, sound effects, voice lines, and other in-game audio.
- Gameplay: Alter combat, crafting, progression, balance, and other core gameplay systems.
- Graphics: Improve or modify textures, lighting, visual effects, models, and environmental visuals.
- Pals: Change Pal appearance, stats, abilities, behavior, breeding, and spawning.
- Performance: Improve performance, optimize resource usage, and reduce lag or stuttering.
- Player: Customize your character's appearance, abilities, inventory, movement, and progression.
- Quality of Life: Streamline gameplay, reduce repetitive tasks, and improve overall convenience.
- Save Games: Find mods to easily modify and manage your saves.
- Server Mods: Add administration tools, multiplayer features, and server-side gameplay changes.
- Settings: Add, modify, or unlock additional game configuration options.
- UI: Improve or customize the HUD, menus, notifications, and other interface elements.
- Utilities: A variety of tools for modding, debugging, compatibility, and game management.
How to Install Palworld Mods
To begin modding the game, ensure that you own a licensed Palworld copy from a reputable store front, such as Steam or Microsoft Store. Next, you’ll need to carefully follow the manual installation steps that are different for each mod type. Alternatively, you can also install the CurseForge application, which can then automate everything for you and make the whole process much easier and intuitive.
Additional Checklist for Game Completionists
In addition to all of the above, we also highly recommend that you take a few minutes to prepare your game. These quick checks can help you avoid nerve-wracking compatibility issues, protect your save data, and make troubleshooting much easier if something goes wrong:
- Confirm that the game already works before modding it.
- Check the exact Palworld version as shown by the game or store client.
- Visit the official mod page to read its description and check for required dependencies.
- Install only one unfamiliar project at a time, then launch and test before adding another.
- Keep the downloaded archive and note its file version to restore it later on if needed.
Pro Tip: Make sure to also save your world or server BEFORE using mods. That way, if a mod causes issues, you can simply uninstall it and resume your game from where you left off.
Installing Mods Through Steam Workshop
Steam Workshop is one of the easiest ways to install supported Palworld mods because Steam automatically downloads and updates them for you. Here are the installation steps:
- Open Steam and select Palworld from your library.
- Open the "Workshop" page.
- Choose a mod and carefully read its description, version compatibility, and dependencies.
- Click "Subscribe".
- Launch Palworld, go to "Options", and enable the mod from the "Mod Management" menu.
- Restart the game and test the mod in a new or backup world.
Installing Palworld Mods with CurseForge
STEP 1: Install the CurseForge Launcher
- Go to our download page and press "Get CurseForge App".
- Download either the standalone or the Overwolf version.
- Run the downloaded installer and complete the setup.
- Launch the CurseForge app and check to see that it auto‑detected Palworld.
- If Palworld is not auto-detected, check if you need to update the app, restart your PC, or reinstall the CurseForge app.
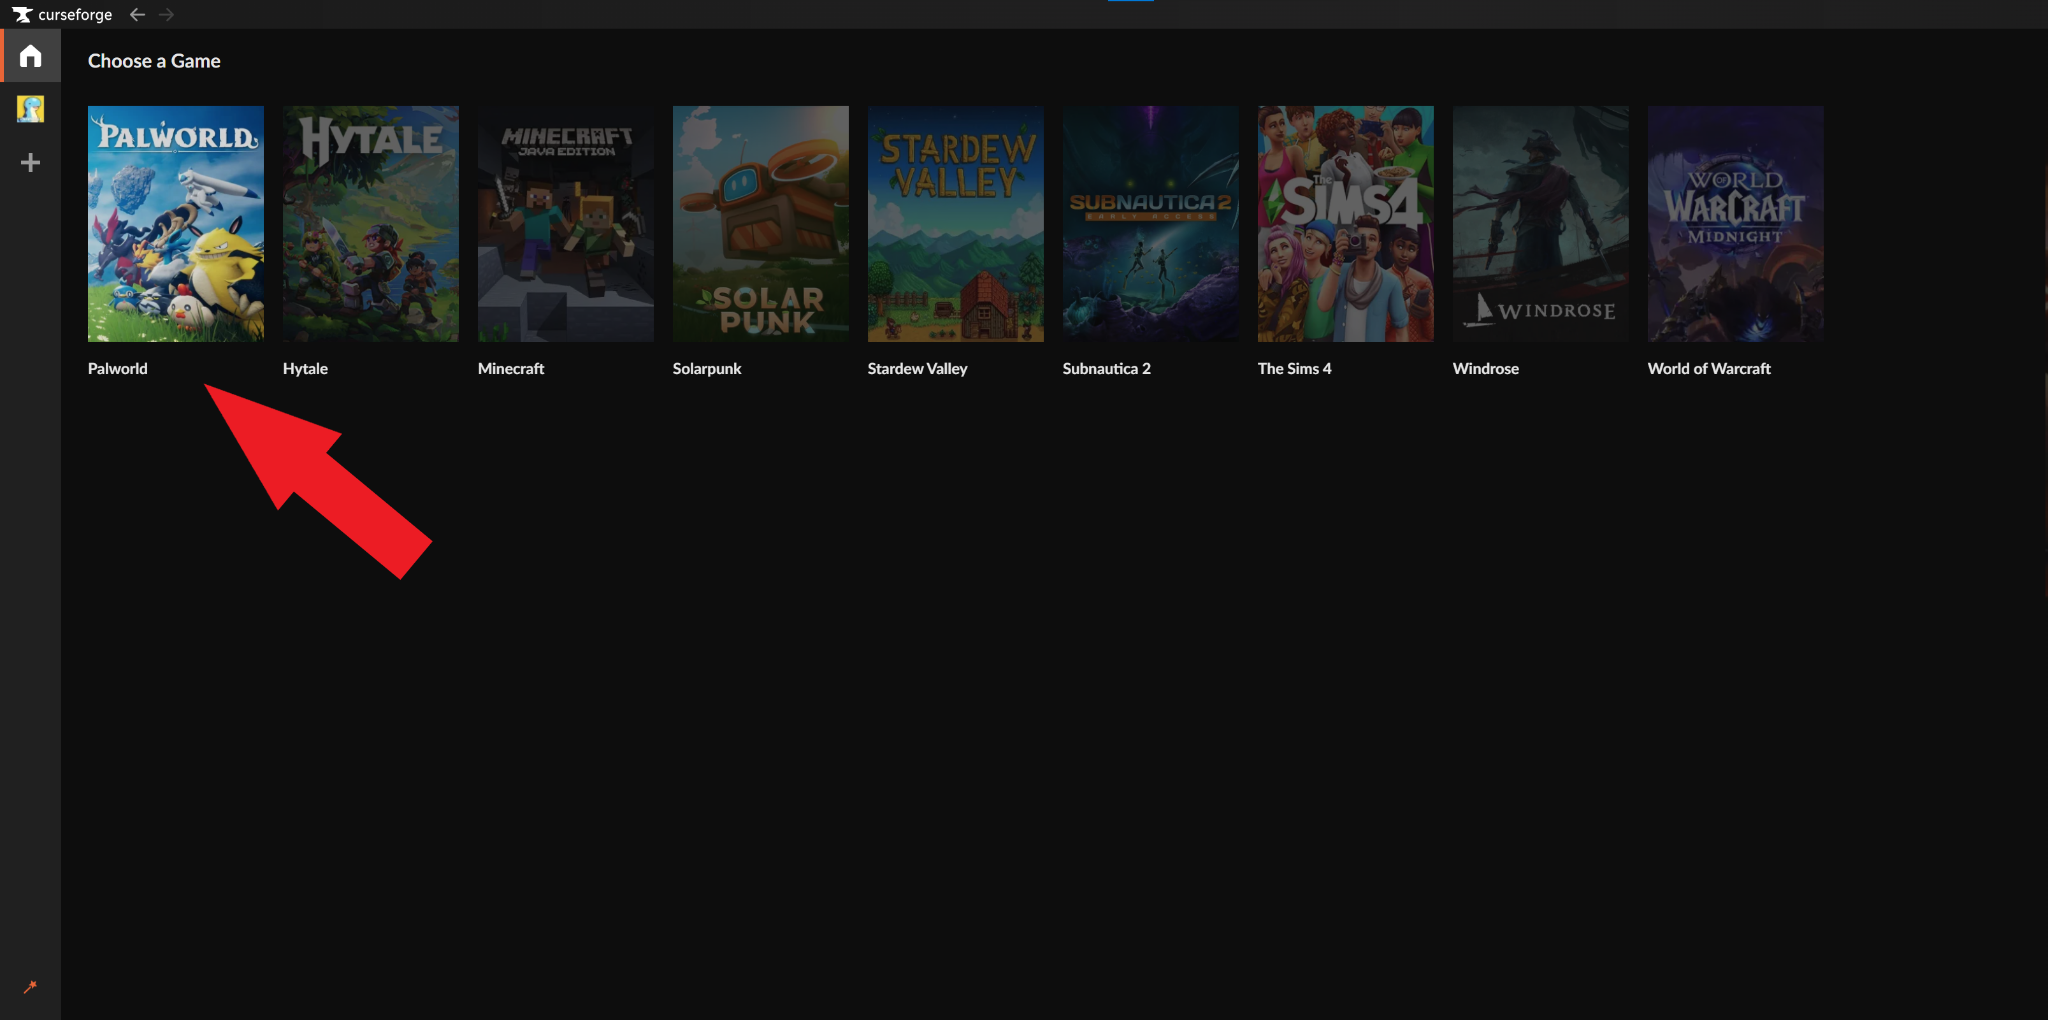
STEP 2: Install Mods for Palworld
- Click on Palworld from within CurseForge to open the mod browser.
- Click on either the "Discover" or "Browse" tabs to search for mods.
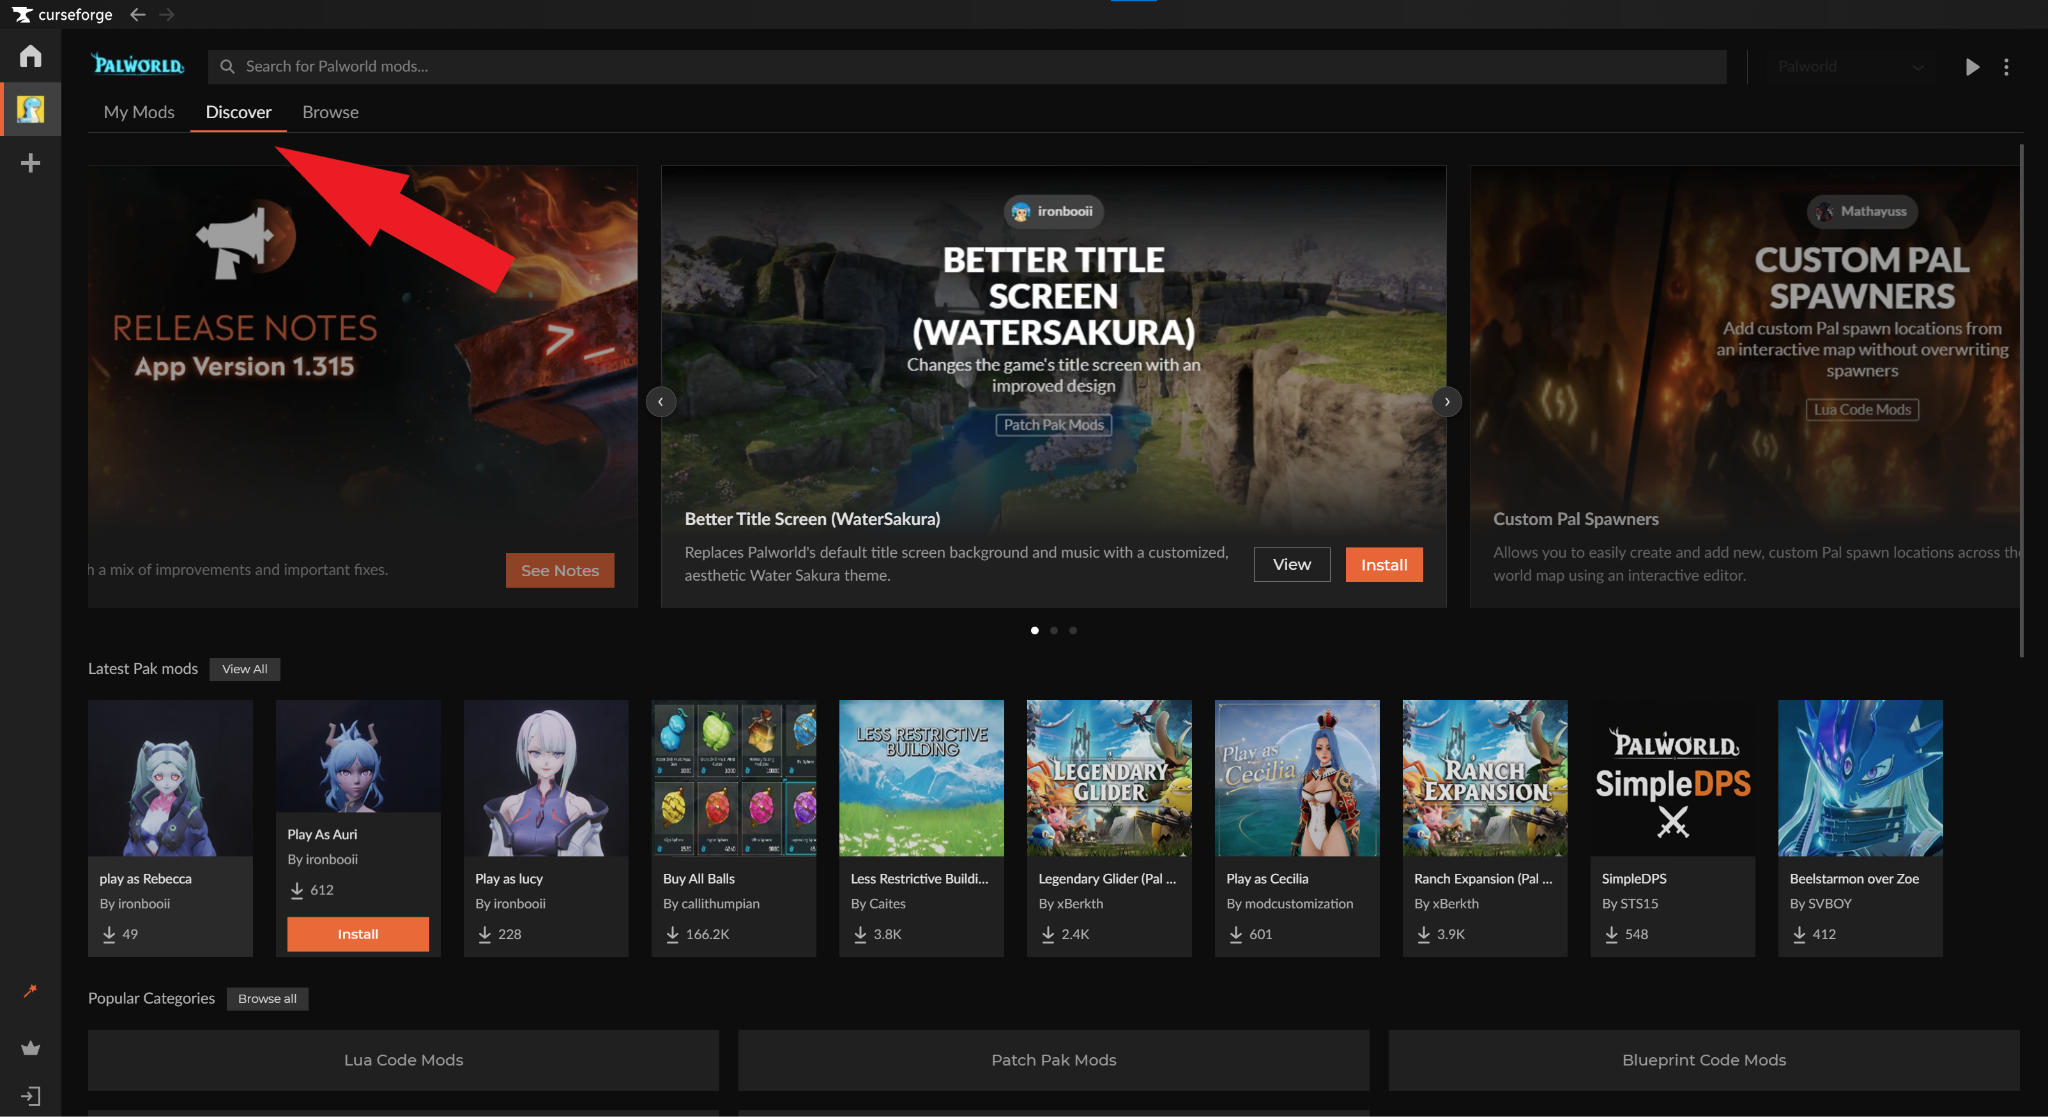
- Highlight a mod and click "Install" to add it to the core Palworld game.
- You can manage your installed Palworld mods from "Palworld" → "My Mods".
STEP 3: Launch Palworld
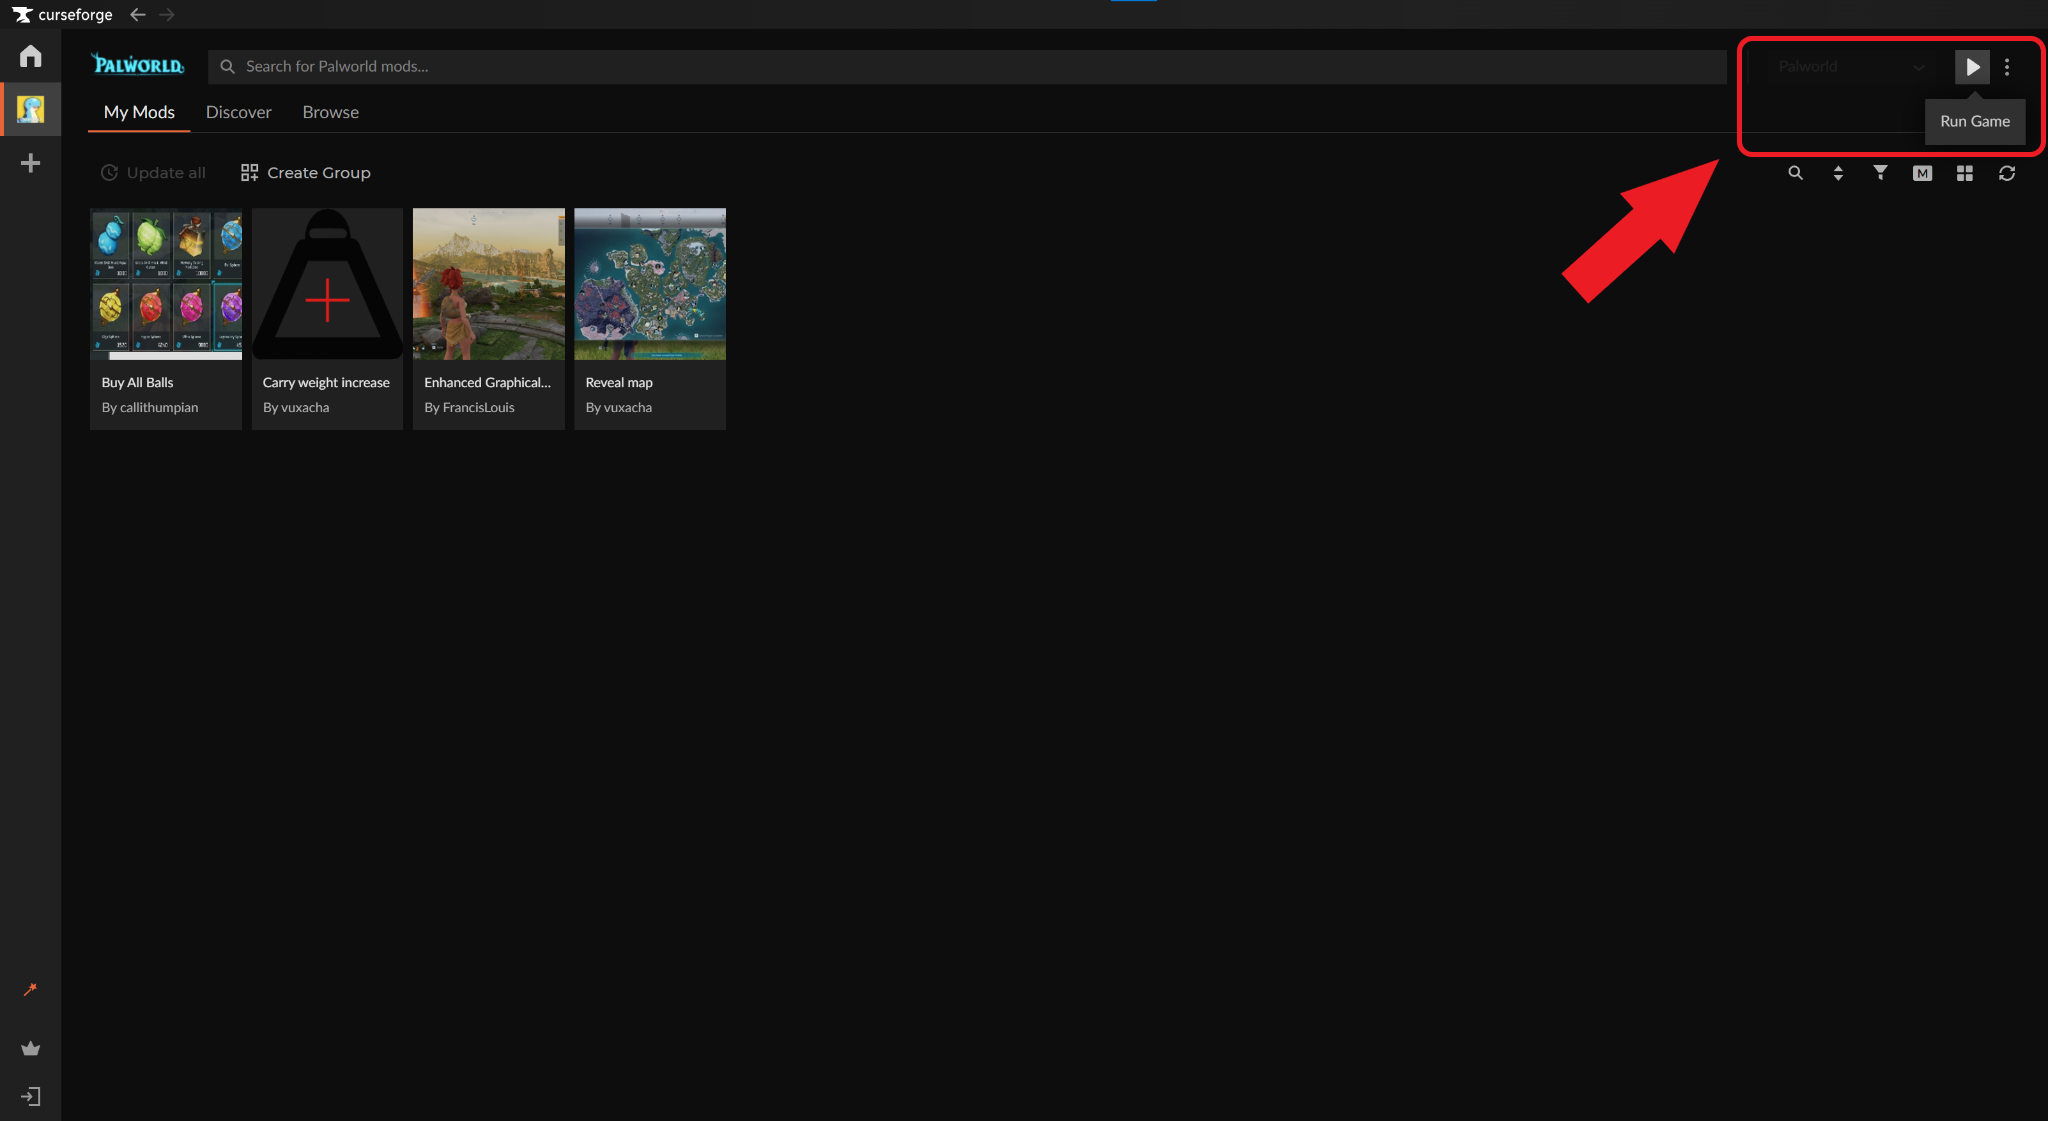
You can launch the game in one of two ways, depending on your preferences:
- CurseForge app: Click on "Palworld" → "Run Game".
- Official store launcher: Double-click on the created Palworld desktop icon or start it from within your official store launcher.
STEP 4: Check That Your Mods Work In-Game
- Note down all the changes that your mod(s) are making to your game.
- Load up a new or an existing world.
- Manually verify that each change has taken effect.
Installing Palworld Mods Manually
Different mod types require different installation methods. Before downloading anything manually, identify which mod category you're installing, then follow the matching instructions below. For your convenience, we’ve also included a comparison table summarizing the difficulty, update process, and potential risks for each installation method that we'll discuss in more detail shortly.
| Method | Best For | Difficulty | Updates & Removal | Risks & Limitations |
|---|---|---|---|---|
| Patch Pak mods | Gameplay, graphics, and asset mods. | Moderate | Simply delete the installed files. | Make sure to install them in the correct folder. |
| Blueprint Code mods | Advanced gameplay features. | Moderate | Remove the mod folder and any required dependencies. | Follow the author’s folder structure carefully. |
| Lua Code mods | UI, gameplay, and automation mods. | High | Disable the mod and remove its files. | Requires UE4SS and compatible versions. |
| C++ Code mods | Deep gameplay and engine changes. | High | Remove the installed files carefully. | Most likely to break after game updates. |
| “Engine.ini” tweaks | Graphics and performance settings. | Moderate | Undo your changes or restore a backup. | Difficult to revert back changes if you don’t have a backup. |
What Is UE4SS (and Do You Need It)?
UE4SS is a mod loader required by many Palworld mods built with Lua or C++. Unlike simpler mod types, it uses its own setup and must be installed directly into Palworld’s "Win64" folder before compatible mods can run. If the mod you want to install lists UE4SS as a dependency, you’ll need to install the required version first and launch the game once to generate the necessary files and folders.
Below, we’ve outlined the steps to installing UE4SS should you need it:
- Download UE4SS and unzip it.
- Navigate to your Palworld game directory. On Steam: Right click on game in Steam → "Manage" → "Browse Local Files".
- Navigate to the Win64 folder (Steam) in your Palworld game directory: "...\Pal\Binaries\Win64\".
- Move the contents of the unzipped UE4SS folder into the "Win64" folder.
- Run the game once and then close it. This is to automatically generate any necessary files/folders.
Installing Patch Pak Mods
Patch Pak mods usually contain a .pak file or a matching .pak, .utoc, and .ucas file set. Make sure to copy all of these files together, otherwise your mod won’t work. And here are the installation steps:
- Download the version that matches your Palworld build.
- Extract the archive.
- Navigate to "Pal\Content\Paks".
- Copy the files into the folder specified by the author (commonly "~mods").
- Launch the game and verify that the mod works.
Installing Blueprint Code Mods
Blueprint Code mods can include LogicMods, UE4SS components, or multiple packages. For best results, make sure to follow the folder structure provided by the author. And here are the installation steps:
- Extract the archive.
- Install any required dependencies first.
- Copy each file into the folder specified by the mod author.
- Restart Palworld.
- Test the mod.
Installing Lua Mods
Lua Code mods require UE4SS, and both the loader and the mod must support your current game version.
- Install the recommended version of UE4SS.
- Launch Palworld once to confirm UE4SS loads correctly.
- Copy the Lua mod into the "UE4SS Mods" folder.
- Enable the mod in "mods.txt" if required (change value from "0" to "1").
- Restart the game.
Installing C++ Mods
C++ Code mods interact directly with the game engine, making them the most version-sensitive installation method.
- Back up your save and "Win64" folder.
- Install the required version of UE4SS.
- Copy the mod into the location specified by the author.
- Install any listed runtime dependencies.
- Launch the game and verify that everything loads correctly.
Installing "Engine.ini" Tweaks
"Engine.ini" tweaks modify graphics, performance, and rendering settings by editing configuration files rather than installing traditional mods.
- Locate your active "Engine.ini" file inside your Palworld installation folder.
- Create a backup of the file.
- Add only the settings recommended by the mod author.
- Save the file.
- Launch Palworld and compare the results.
Deleting Your Palworld Mods
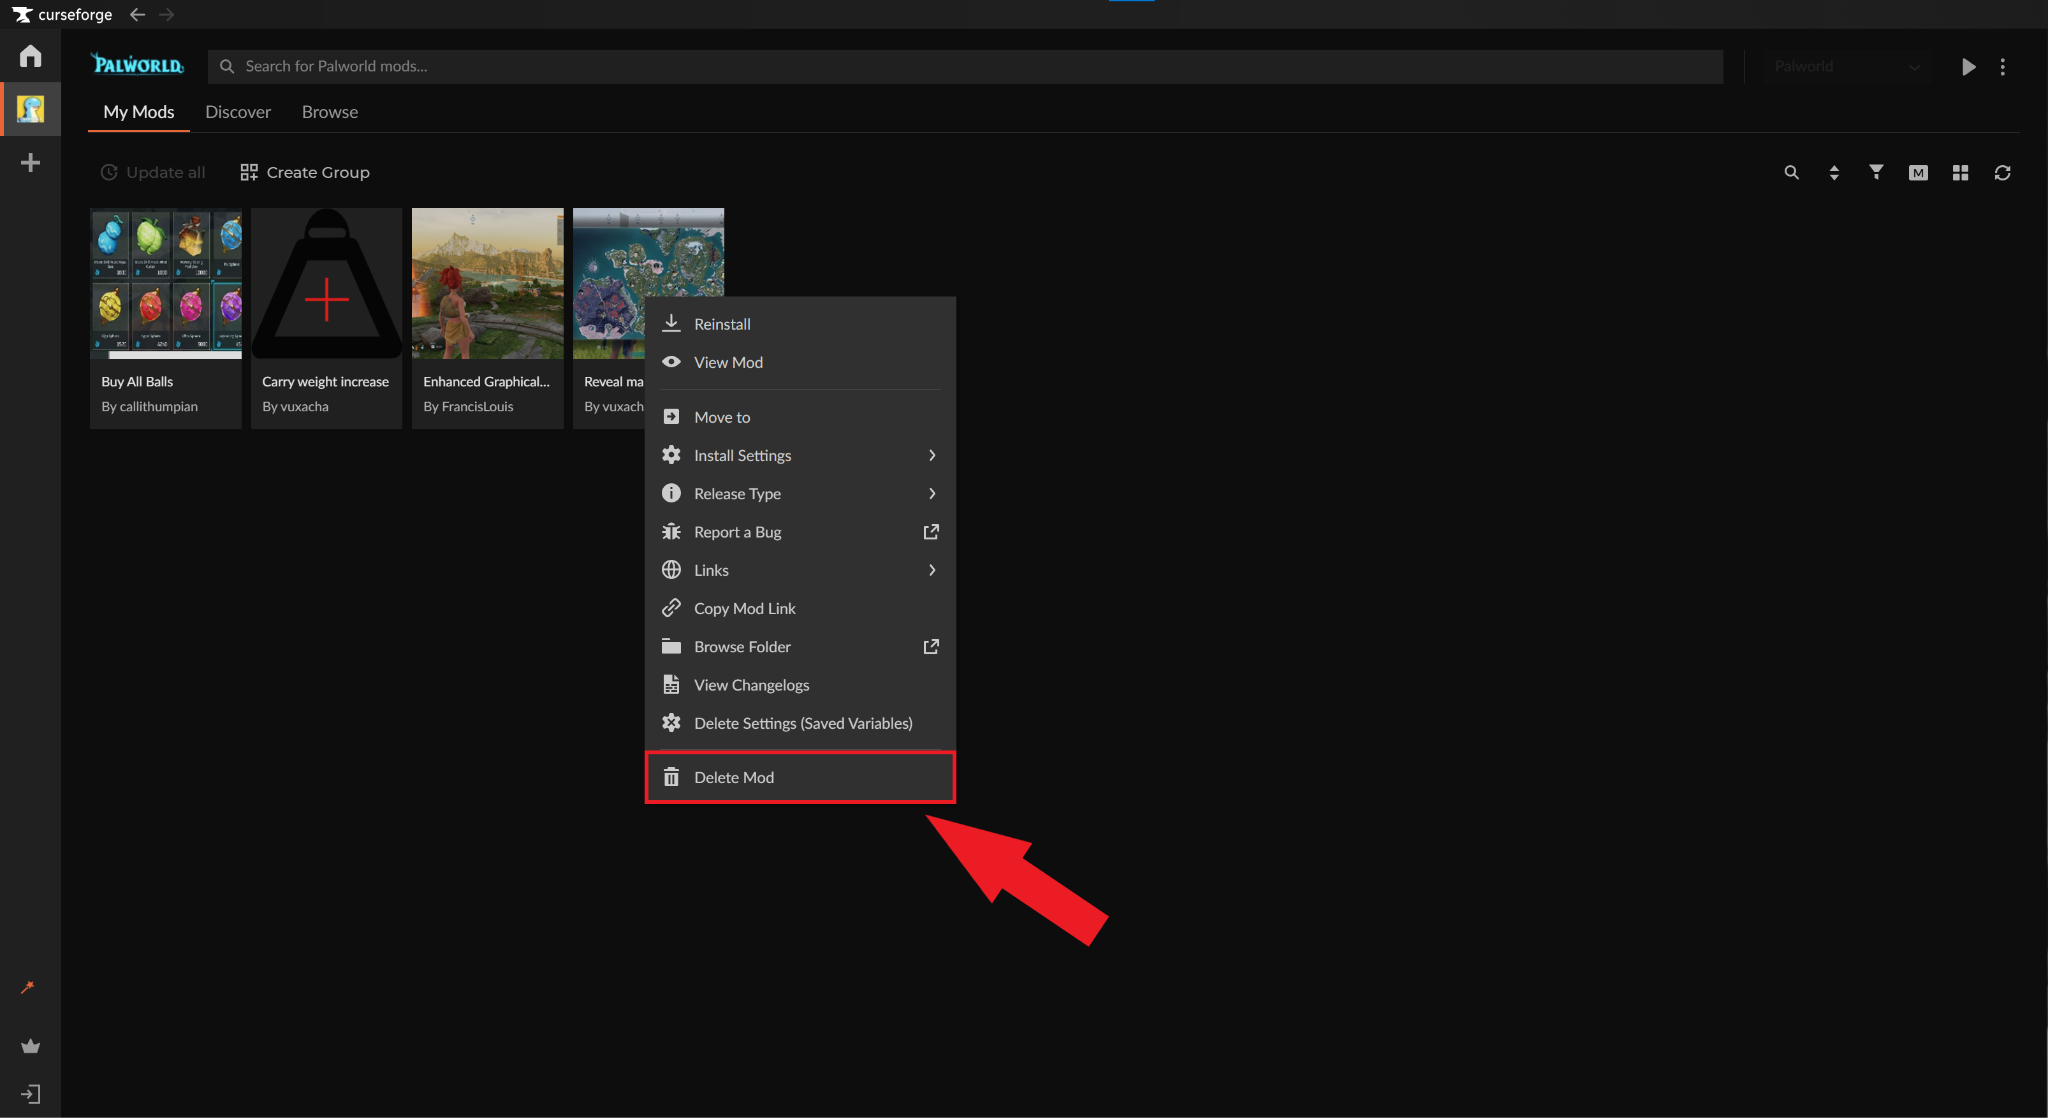
Sometimes, a mod may not work as expected, break the game, or interfere with other mods – and that’s okay. To quickly delete a mod using CurseForge:
- Go to "Palworld" → "My Mods".
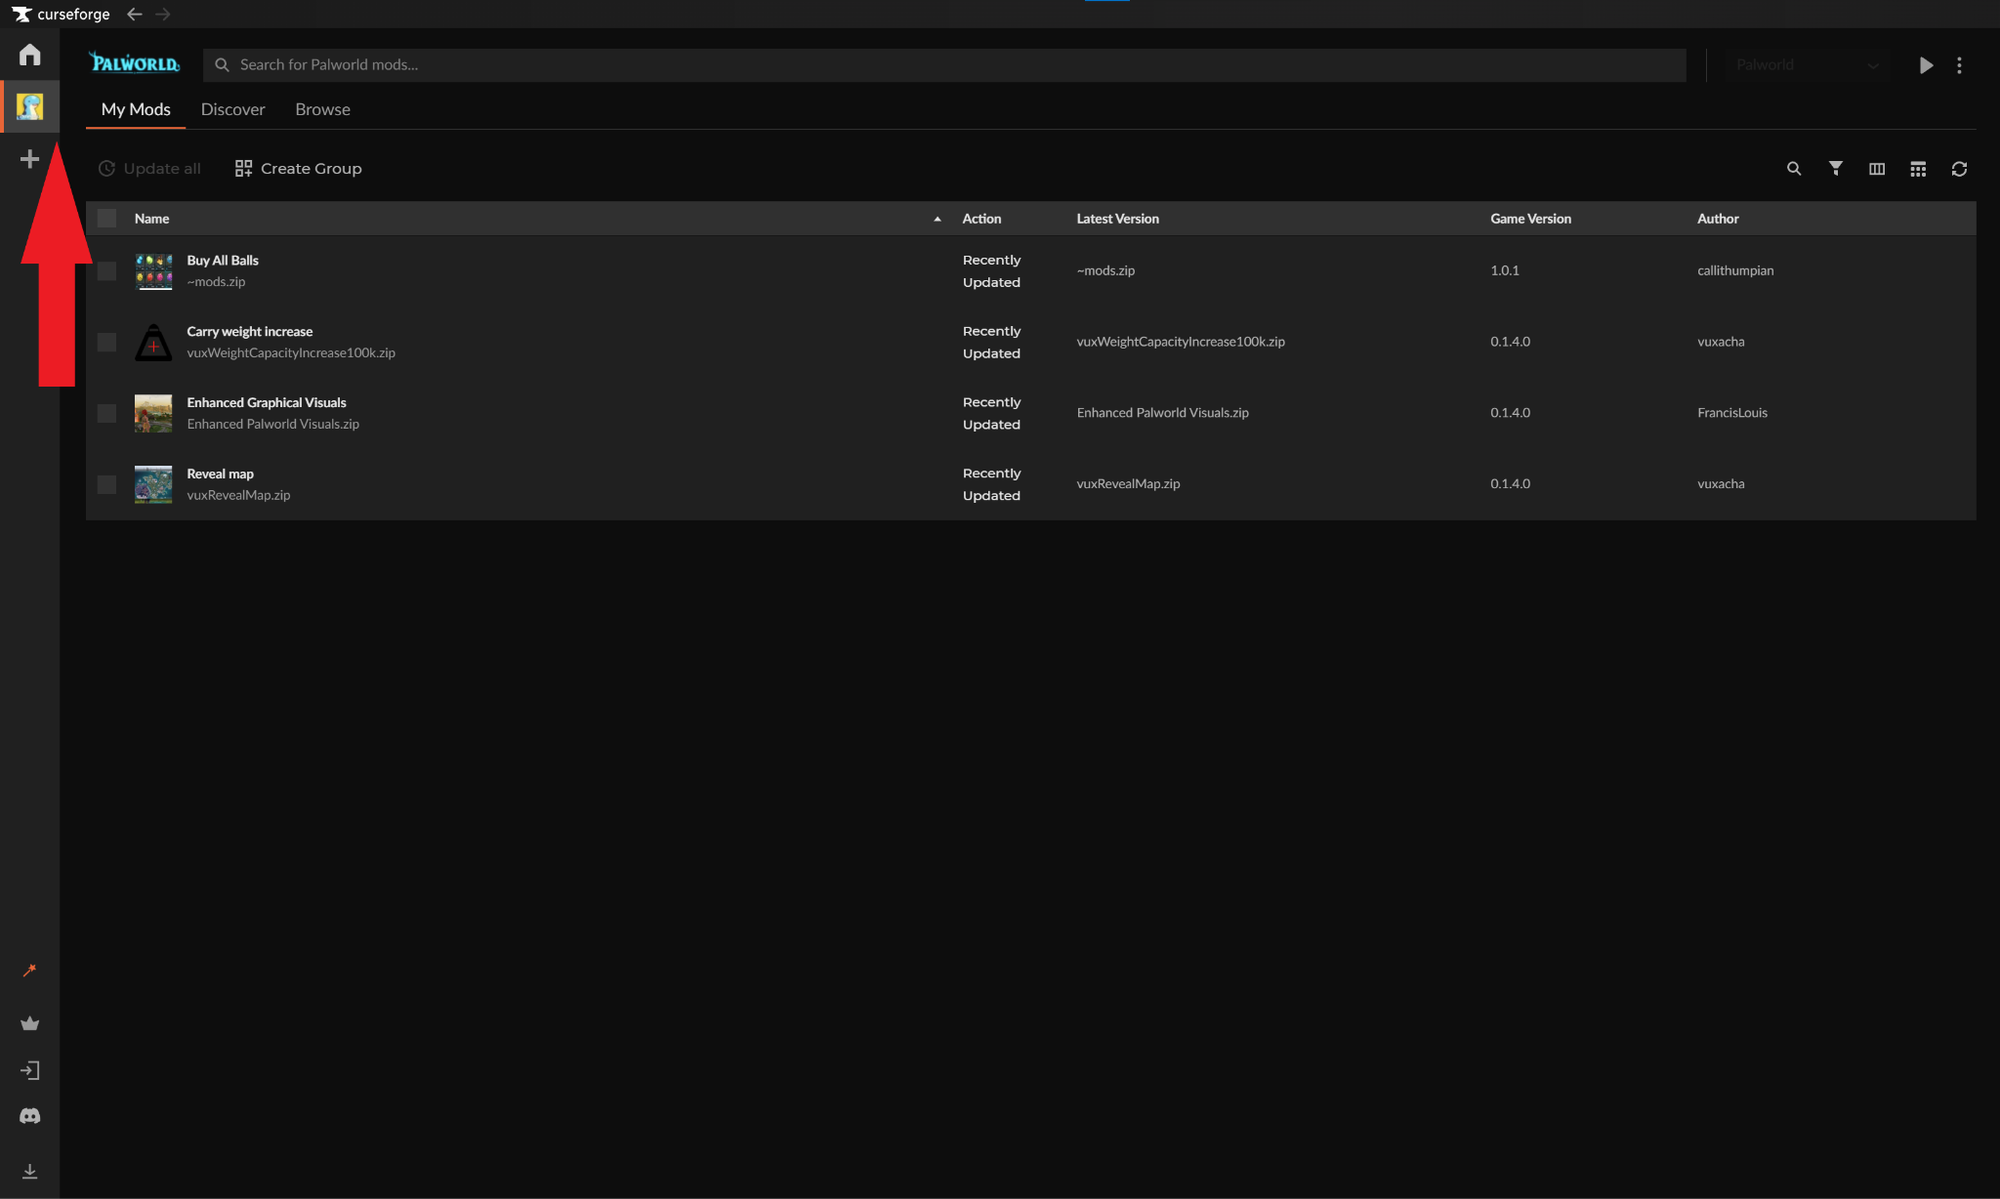
- Right-click the mod you want to remove.
- Click "Delete Mod" to remove its associated files from your mods folder.
Removing a Steam Workshop Mod
- Open "Options" → "Mod Management" in Palworld.
- Disable the mod and save your changes.
To completely remove the subscription:
- Select "Open Steam Workshop".
- On the Workshop page, go to "Your Items" → "Subscribed Items".
- Hover over the mod you want to remove and click "Unsubscribe".
Removing a Manually Installed Mod
- Close Palworld and back up the affected save.
- Move only that mod's files to a temporary backup folder. Keep matching ".pak", ".ucas", and ".utoc" files together to avoid issues.
- For a Lua or C++ mod, remove its own folder but keep UE4SS if another active mod still requires it. For "Engine.ini" mods, either manually revert your changes to the file or overwrite it with a backed up version.
Top Mods by Community Downloads
Once you've learned how to install every major mod type, the next step is choosing which ones to try. Below are some of the most-downloaded Palworld mods from the community, spanning multiple categories and installation methods.
And in case you're looking for even more options, make sure to visit our Palworld Mods section for the latest additions and updated download rankings.

1. Better Night Light
2. Fast travel from anywhere
3. Buy All Balls

4. Less Restrictive Building
5. Max Level Increased
6. Extended Base Range
7. Cake Fast Breed Farm
8. Creative Menu