Palworld mods can reshape almost every part of your adventure, from small interface improvements to new balance rules and server features. However, Palworld does not use one universal mods folder: Steam Workshop items, manual Patch Pak files, Blueprint projects, and UE4SS mods each use a different location.
If all of this sounds way too confusing, we’re here for you! In this guide, we will cover the proper Windows Steam paths, the safest installation methods, and the most common fixes when a mod does not load no matter what you try.
The Palworld Mods Folder Locations at a Glance
For a standard Steam installation on Windows, Palworld usually starts in "C:\Program Files (x86)\Steam\steamapps\common\Palworld". The folder you need inside it depends on how the mod is packaged and installed.
| Purpose | Typical Folder | What It’s For |
|---|---|---|
| Main game folder | “<Steam library>\steamapps\common\Palworld” | Starting point for every manual path below. |
| Official mod-loader files | “<Palworld game folder>\Mods” | Contains “PalModSettings.ini” and files managed by Palworld’s official loader. |
| Steam Workshop downloads | “<Steam library>\steamapps\workshop\content\1623730” | Stores subscribed Workshop items. Palworld deploys enabled items when it starts. |
| Manual Patch PAK mods | “<Palworld game folder>\Pal\Content\Paks\~mods” | A common manual destination, although some projects specify the base Paks folder instead. |
| Manual LogicMods | “<Palworld game folder>\Pal\Content\Paks\LogicMods” | Use only when the project’s instructions specify this folder. |
| Manual UE4SS mods | “<Palworld game folder>\Pal\Binaries\Win64\Mods” | Standard location for a basic UE4SS installation. Custom or hosted setups may use Win64\ue4ss\Mods instead. |
The "~mods" and "LogicMods" folders may not exist in a clean installation. We therefore recommend creating one manually only when a mod's current instructions specify it. Steam and Palworld manage Workshop files automatically, so you do not typically need to move subscribed Workshop folders into a manual mod location.
The Fastest Way to Open Palworld's Game Folder
- Open Steam and select "Library".
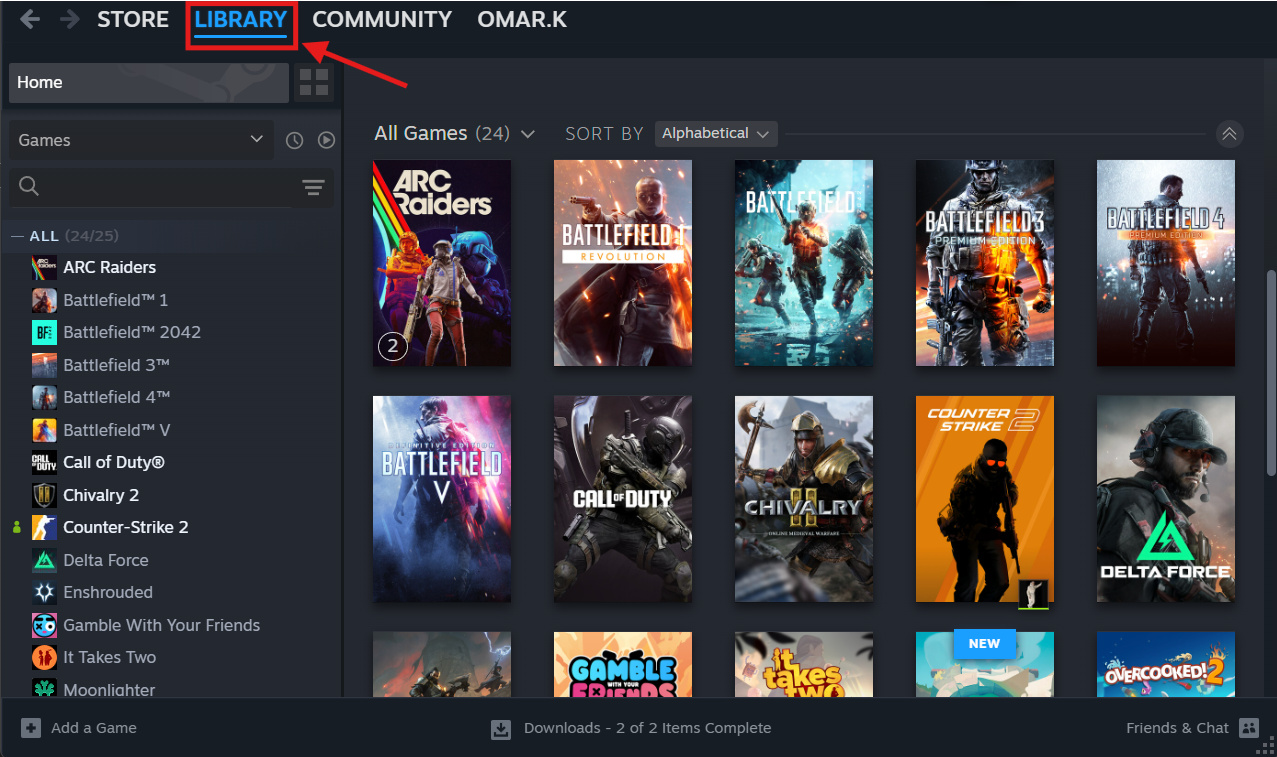
- Right-click "Palworld" in your game list.
- Select "Manage", then "Browse local files".
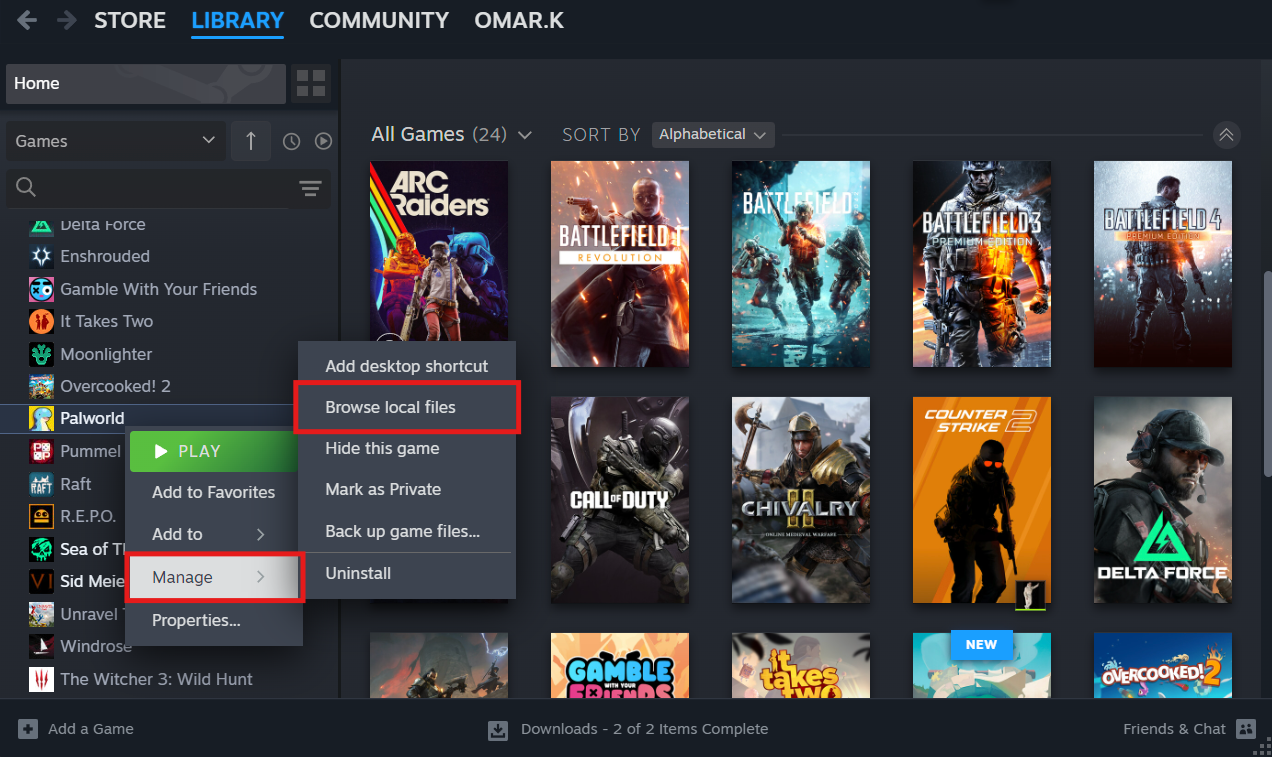
- Open the subfolder required by the mod, such as "Pal\Content\Paks\~mods" or "Pal\Binaries\Win64\Mods".
This route works even when Palworld is installed in a custom Steam library or on a different drive.
Finding Palworld in the CurseForge App
The CurseForge app currently supports the Windows Steam version of Palworld.
- Open the CurseForge app and look for "Palworld" in the game list.
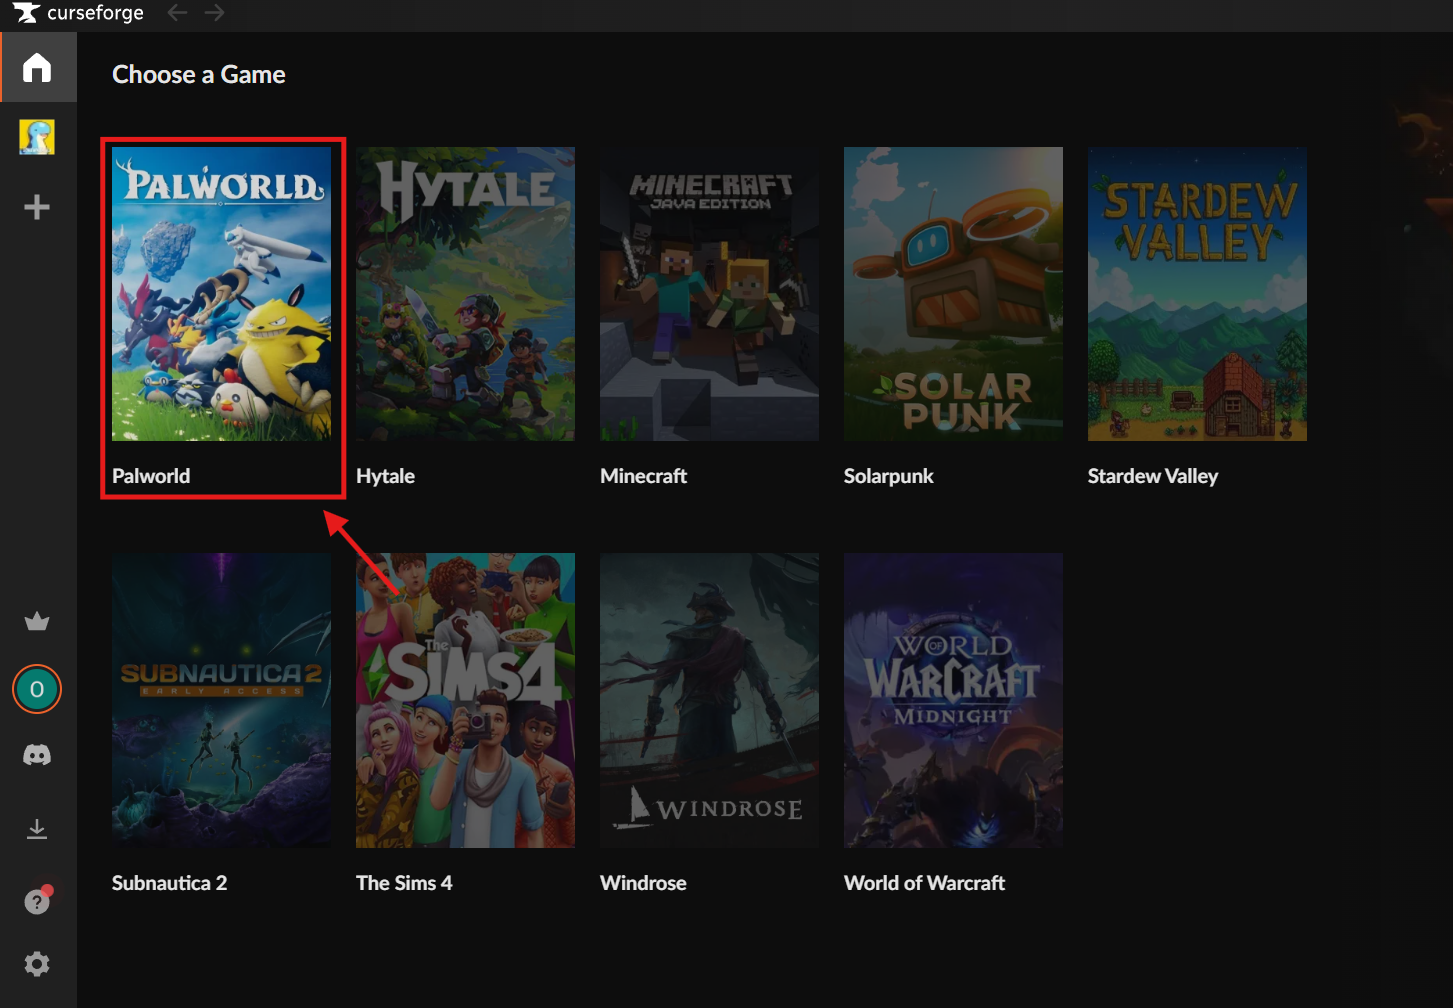
- If Palworld is missing, open "Settings".
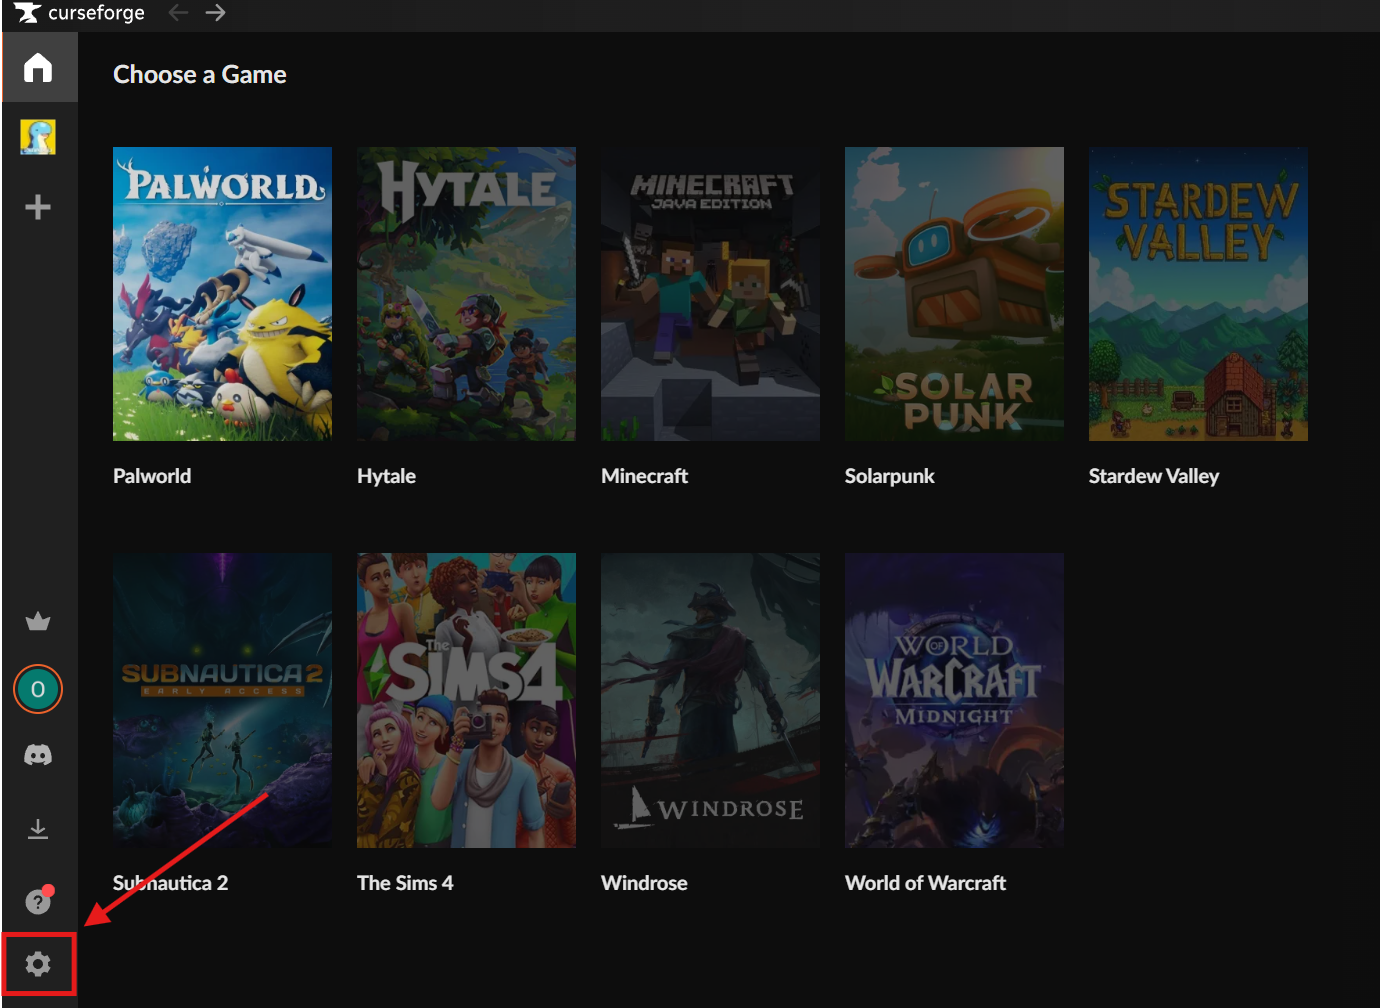
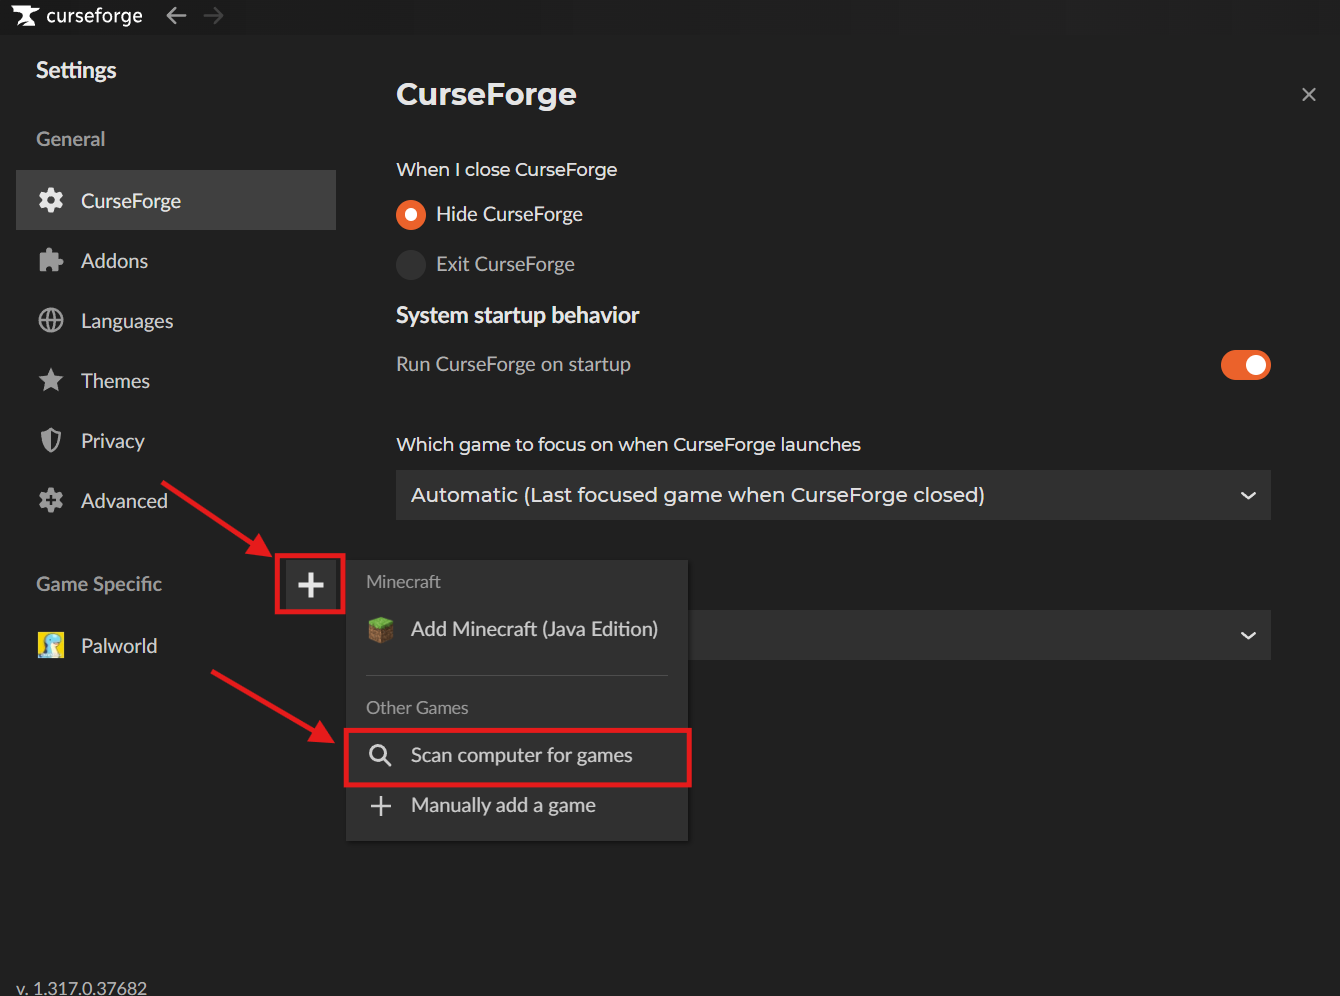
- Select the "+" button, then choose "Scan computer for games".
- If the scan still misses it, choose "Manually add a game" and select the Palworld game folder that Steam opened for you.
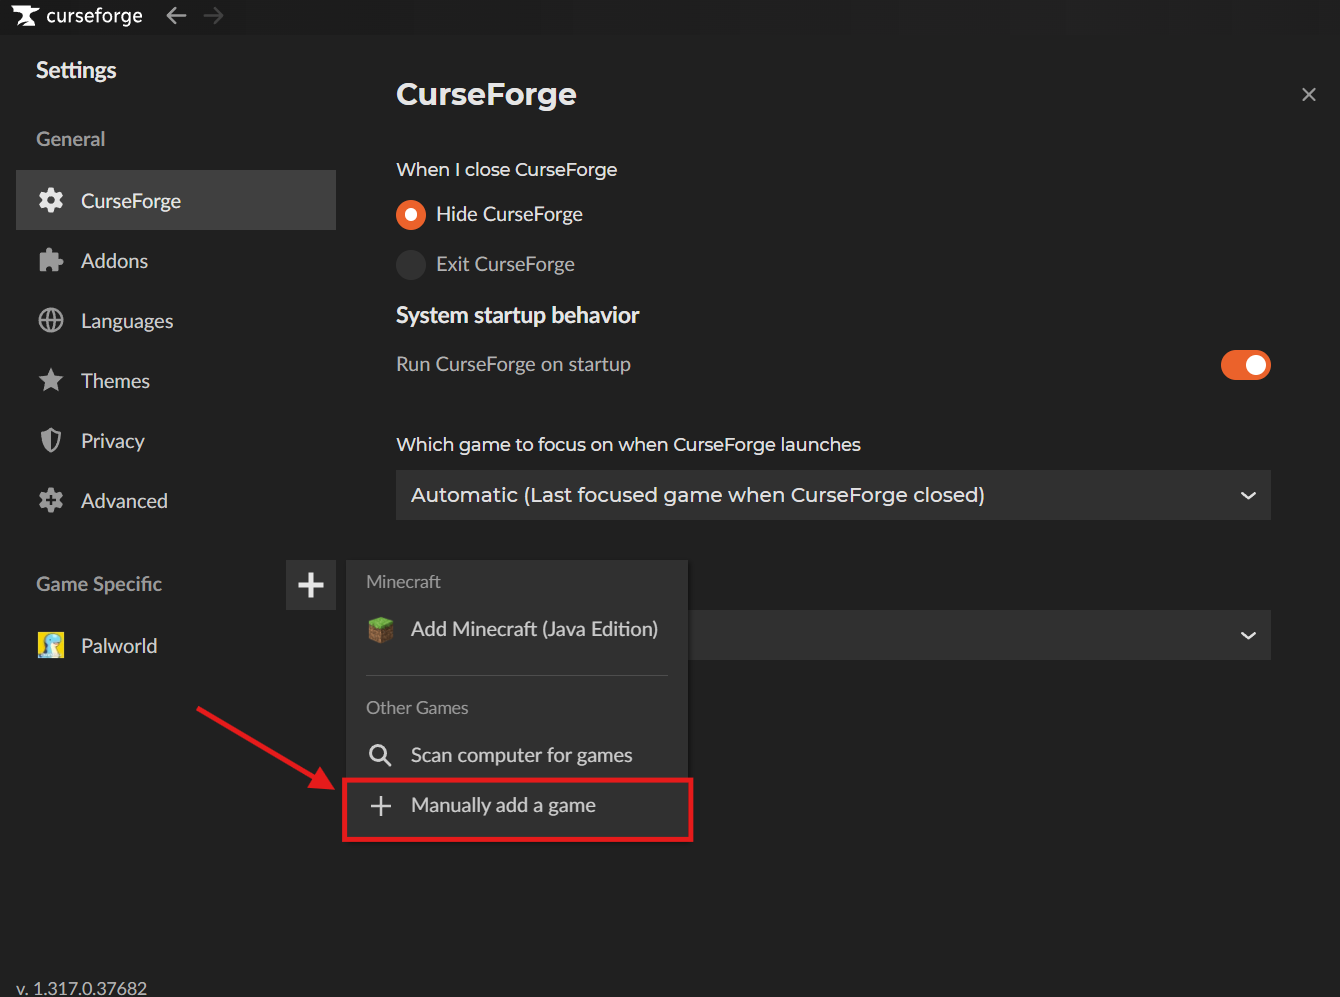
Once the app recognizes Palworld, it handles file placement for projects installed through the app.
Before Installing or Moving a Palworld Mod
Make sure to check the following information on the project page:
- The supported Palworld version and the date of the latest file.
- The mod type. CurseForge uses "Patch Pak Mods", "Blueprint Code Mods", "Lua Code Mods", and "C++ Code Mods". The category helps identify the format, but the project's instructions determine the destination.
- Any required loader, framework, dependency, or load-order rule.
- Whether it belongs on the client, the dedicated server, or both.
- Whether the creator recommends a new world or provides removal instructions.
Note: We generally recommend using only one installation method for each mod as installing the same project through Steam Workshop, the CurseForge app, and a manual folder can create conflicting duplicates. Another good rule of thumb is to always close Palworld before moving manual files to avoid issues.
Tip: Don’t forget to also back up your saves before testing: press "Windows" + "R", enter "%LOCALAPPDATA%\Pal\Saved\SaveGames", then copy your Steam ID folder to a safe location.
How to Install Palworld Mods
Installing with the CurseForge App
Select "Palworld" in the CurseForge app, find a compatible project under "Discover" or "Browse", and select "Install". The app handles file placement. If a project provides only a download or special instructions, use the appropriate manual folder instead.
Installing from Steam Workshop
Open the Palworld Workshop, check the mod's requirements, and select "Subscribe". In Palworld, open "Options" → "Mod Management", enable the mod, and save your changes.
Steam manages Workshop files automatically, so make sure not to move them into a manual mod folder.
Installing Palworld Mods Manually
- Download a compatible file from its CurseForge project page, read its instructions, and close Palworld.
- Install it according to its mod type:
- Patch Pak: Use the destination specified by the creator, usually "Pal\Content\Paks~mods" or "Pal\Content\Paks". Keep matching ".pak", ".ucas", and ".utoc" files together to avoid any conflicts.
- Blueprint Code: Use "Pal\Content\Paks\LogicMods" only when the project specifies it.
- Lua or C++: Install the required Palworld-compatible UE4SS version, then copy the mod into its active "Mods" directory, usually "Pal\Binaries\Win64\Mods" or "Pal\Binaries\Win64\ue4ss\Mods".
- Install any dependencies, preserve the archive's folder structure, and test one new mod at a time.
Important: Avoid duplicate folders such as "~mods\~mods" or "Mods\Mods". If the archive already contains "~mods" or "Mods", copy its contents into the corresponding existing folder.
Common Issues and Quick Fixes
The folder does not exist
The "~mods" and "LogicMods" folders may not exist until a manual project requires them. We therefore recommend creating a named folder only when the project's current instructions explicitly mention this. Workshop and UE4SS folders are normally created by their respective systems or installers.
A manual mod does not appear
Confirm that the mod supports your Palworld version and that you used the folder named by the project. Extract the archive if required, preserve its internal structure, install dependencies, and remove duplicate copies from other mod locations.
Palworld crashes after installing a mod
Move the newest mod out of its folder and launch Palworld again. If the crash continues, remove recognized legacy loaders and mod files, then open Steam's "Library", right-click "Palworld", and select "Properties", "Installed Files", and "Verify integrity of game files". Launch once without mods, then restore only current versions one at a time.
Frequently Asked Questions
Why does Palworld have several mods folders?
Palworld supports more than one mod format and installation method. The official Workshop loader, manual PAK files, LogicMods, UE4SS scripts, and server packages each use a folder designed for that system. However, the project's file type and instructions determine the correct destination.
Can I create the mods folder manually?
Yes, you can create "~mods" or "LogicMods" when a manual project explicitly needs it, but make sure to let Steam and Palworld manage subscribed Workshop content for you instead of inventing your own folders or manually moving files.
How can I tell which Palworld mod type I downloaded?
Check its CurseForge category, file contents, and installation section. A Patch PAK project normally includes ".pak" and sometimes matching ".ucas" and ".utoc" files. Lua and C++ projects normally name UE4SS as a requirement, while official Workshop packages include "Info.json".