Your Minecraft skin is the appearance other players see and one of the easiest ways to personalize Java Edition. Changing it only takes a few steps, and the new Skins tab in the CurseForge app gives you another place to upload, browse, and preview designs.
In this guide, we will cover both official ways to change a Java skin, explain how the player models work, show how CurseForge can help you manage skins, and help you fix the most common upload problems before looking at mods that add extra 3D details and animations.
Changing Your Skin from the Minecraft Launcher
The fastest route runs through the official Minecraft Launcher on your computer, with no website needed.
- Open the Minecraft Launcher and select Java Edition, then click the "Skins" tab in the top ribbon.
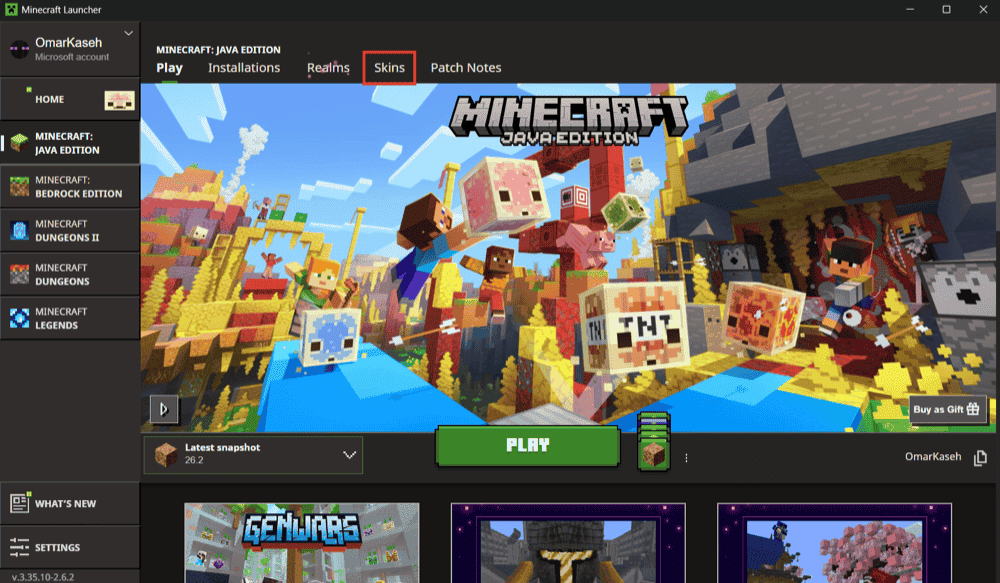
- Click the "New Skin" option to create a new skin slot.
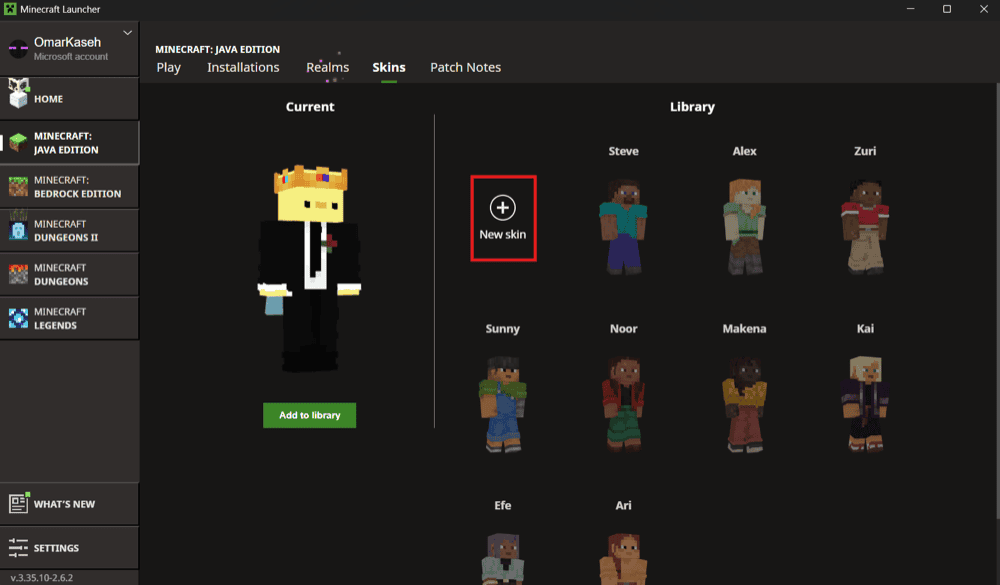
- Click "Browse" and select the PNG skin file from your computer.
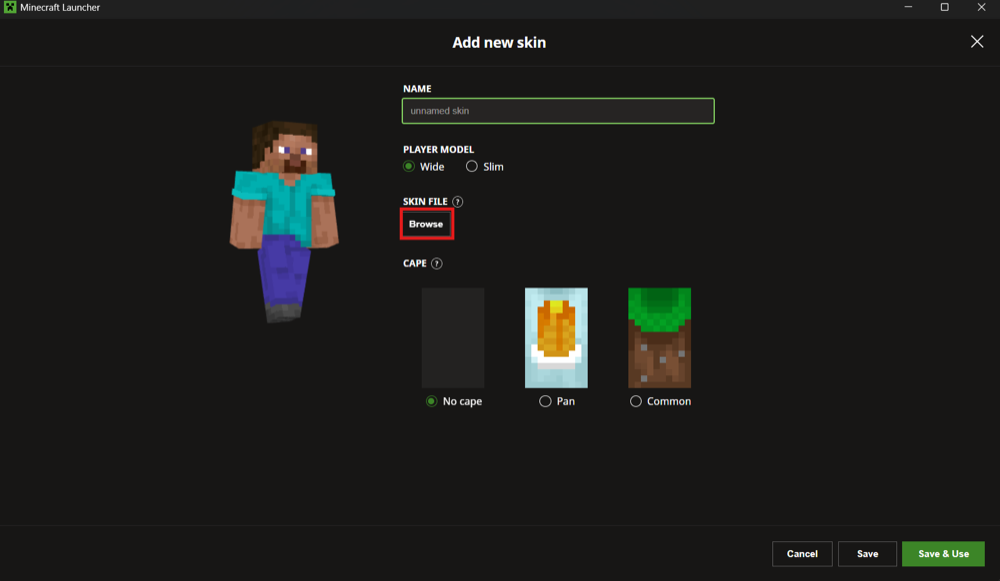
- Choose your model – "Wide" or "Slim" – based on the arm width your skin was made for.
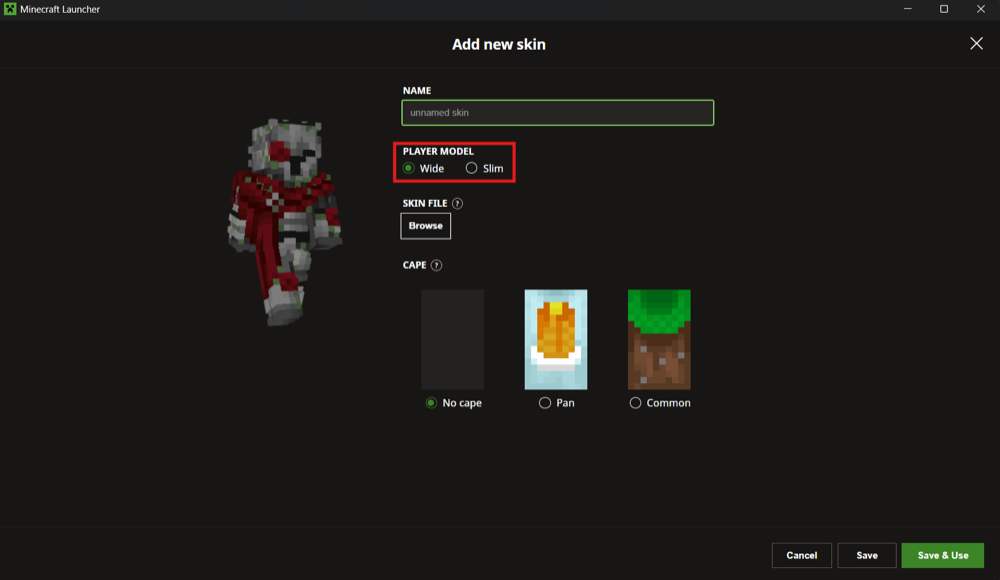
- Name your skin and then click "Save & Use" to apply it.
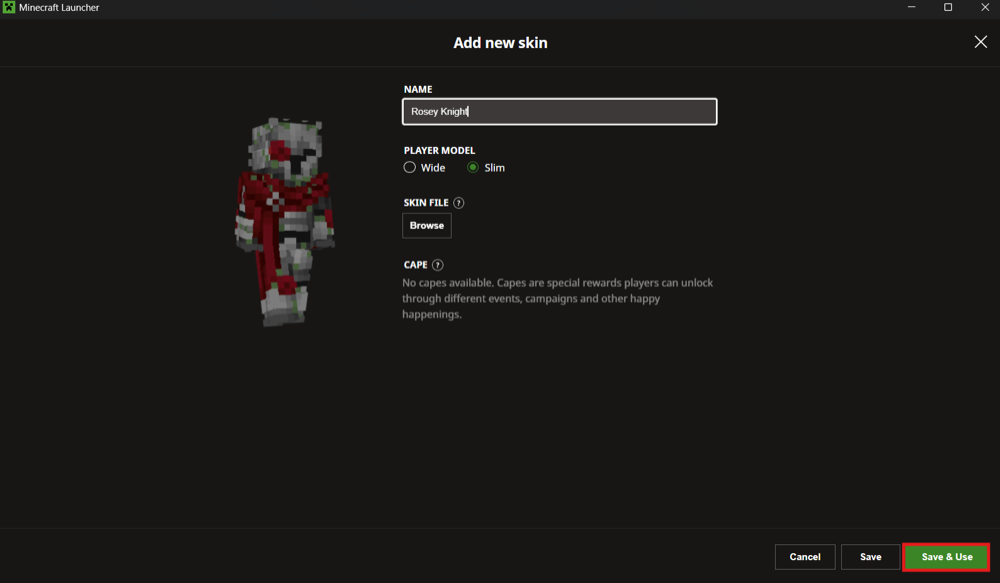
Your new skin should appear the next time you launch the game or reconnect to a server. You can also keep several skins saved in the launcher and switch between them whenever you like.
Changing Your Skin from the Minecraft Website
If you'd rather do this in a browser, you can change your skin straight from your Minecraft.net profile.
- Go to Minecraft.net and sign in with the Microsoft account connected to your copy of Minecraft.
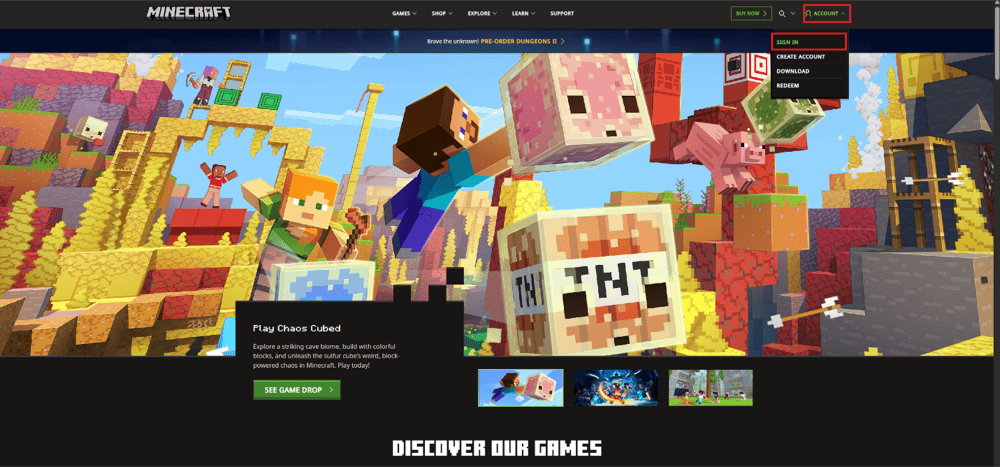
- After signing in, you will be taken to your profile page, where your games are listed. If you are not, click "Account", then select "Profile".
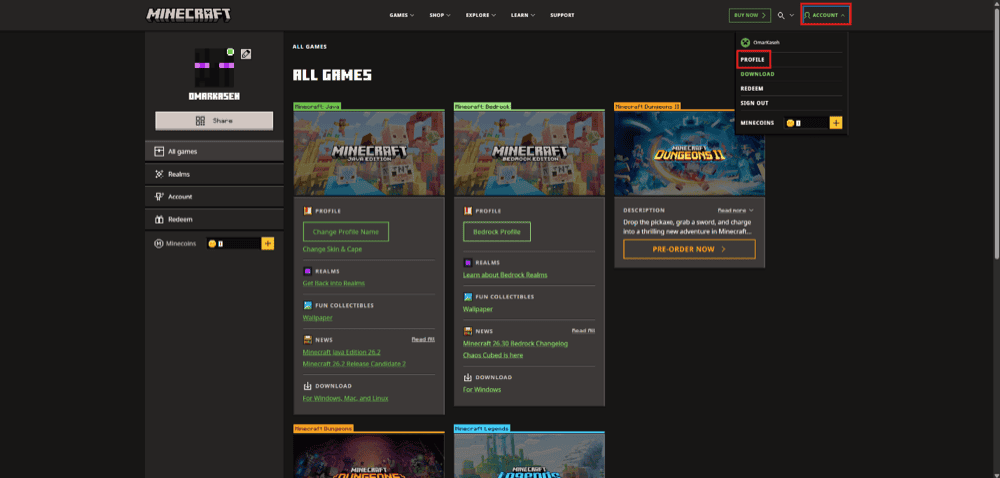
- Find Minecraft: Java Edition and click "Change Skin & Cape".
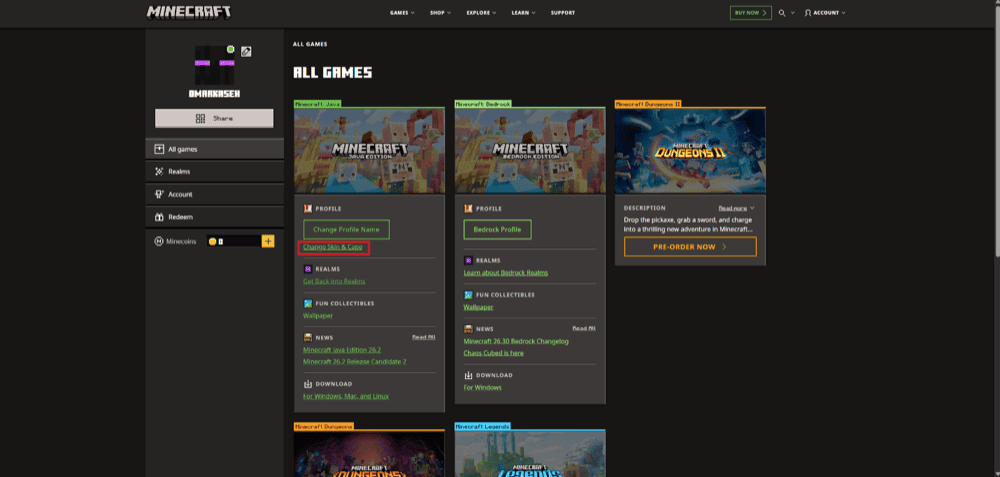
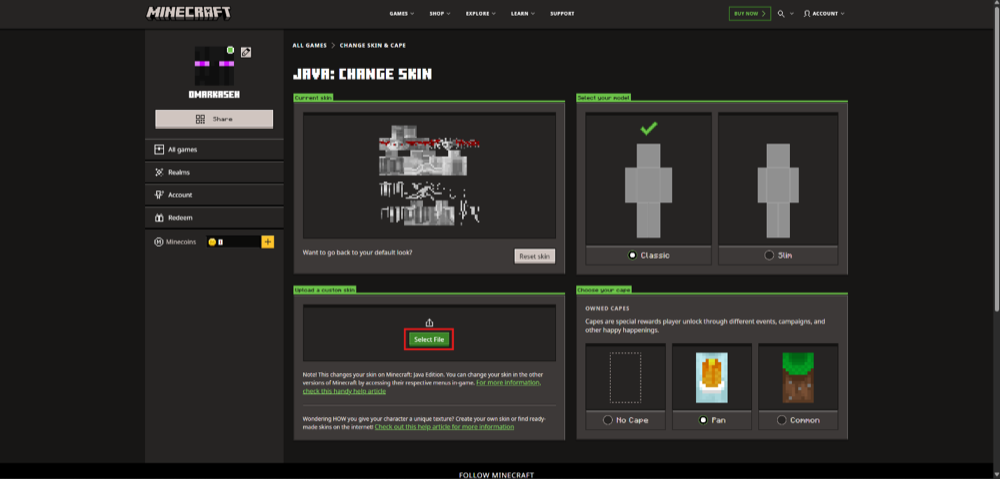
- Select your PNG skin file from your device by clicking on "Select File".
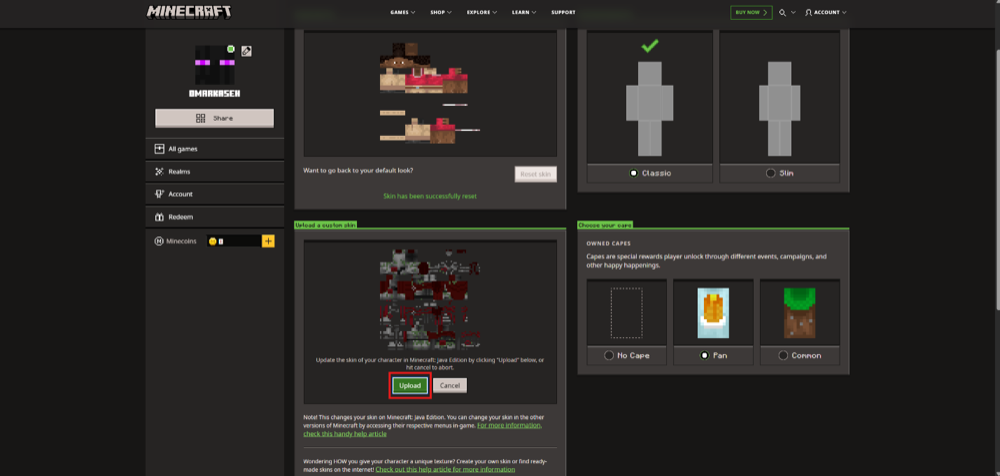
- Click "Upload" to apply the skin to your account.
- Choose the "Classic" or "Slim" model, depending on the arm style your skin uses.
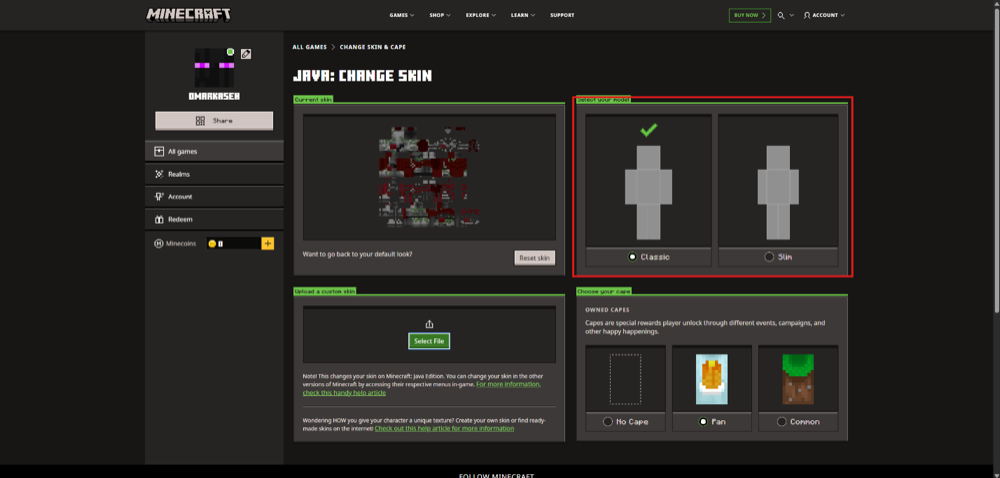
That’s it – the new skin should appear the next time you launch Minecraft or reconnect to a server.
Classic or Slim: Choosing the Right Model
One choice we see that often trips people up is “Classic” versus “Slim.” In essence, the two skin models differ only in arm width. “Classic”, labeled “Wide” in the Minecraft Launcher, has four-pixel-wide arms, while “Slim” has three-pixel-wide arms.
We recommend picking the one your skin was drawn for, because a skin made for slim arms looks slightly off on the classic model, and the reverse is true as well. To help with this, the download page will often tell you which model the skin uses. If it does not, make sure to preview the skin with both options and choose the one whose arms line up correctly.
Managing and Previewing Skins in the CurseForge App
The CurseForge app now includes a dedicated "Skins" tab that brings skin browsing, uploads, and previews all in one place. It is especially useful when you want to compare several designs before choosing one. Inside the tab you can:
- Upload your own custom skins straight into the app. Here are the steps:
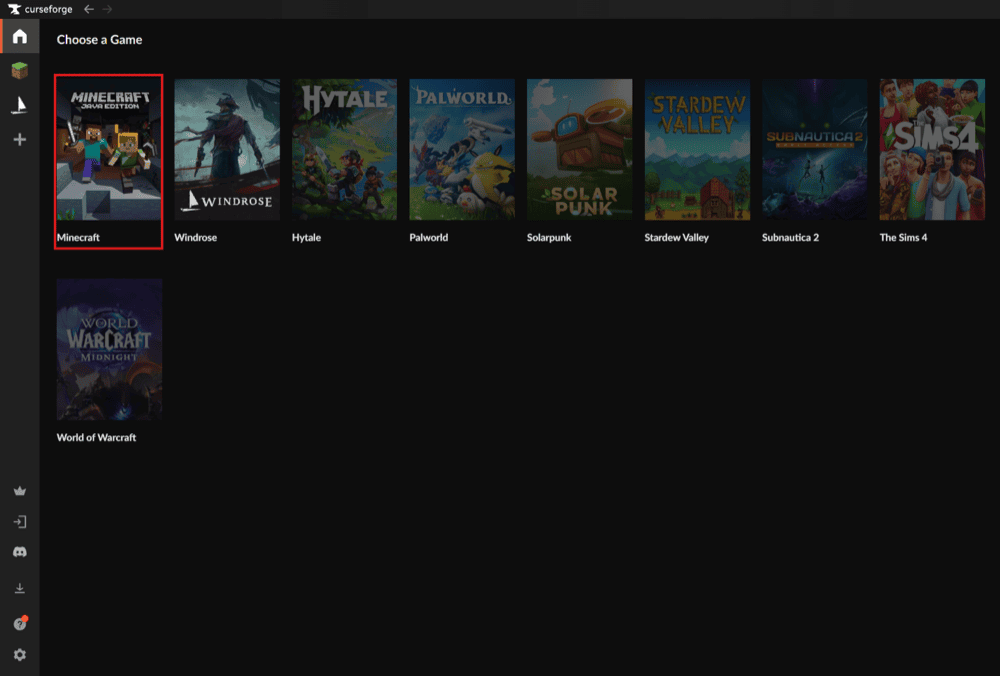
- Open the CurseForge app and choose Minecraft from the listed games.
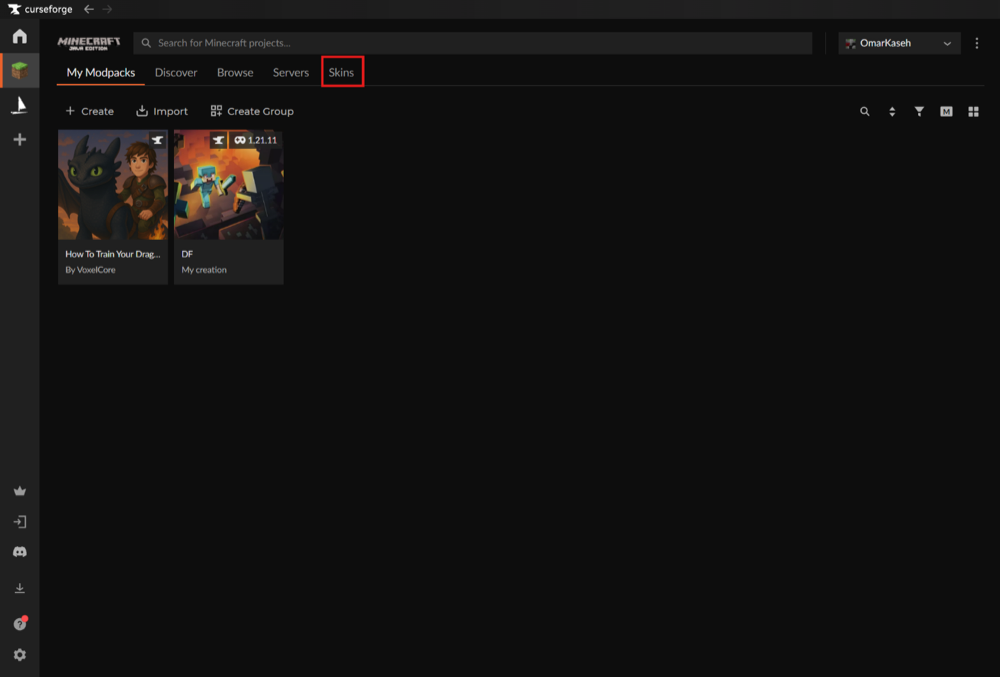
- Select the "Skins" tab.
- Click on "Upload Skin."
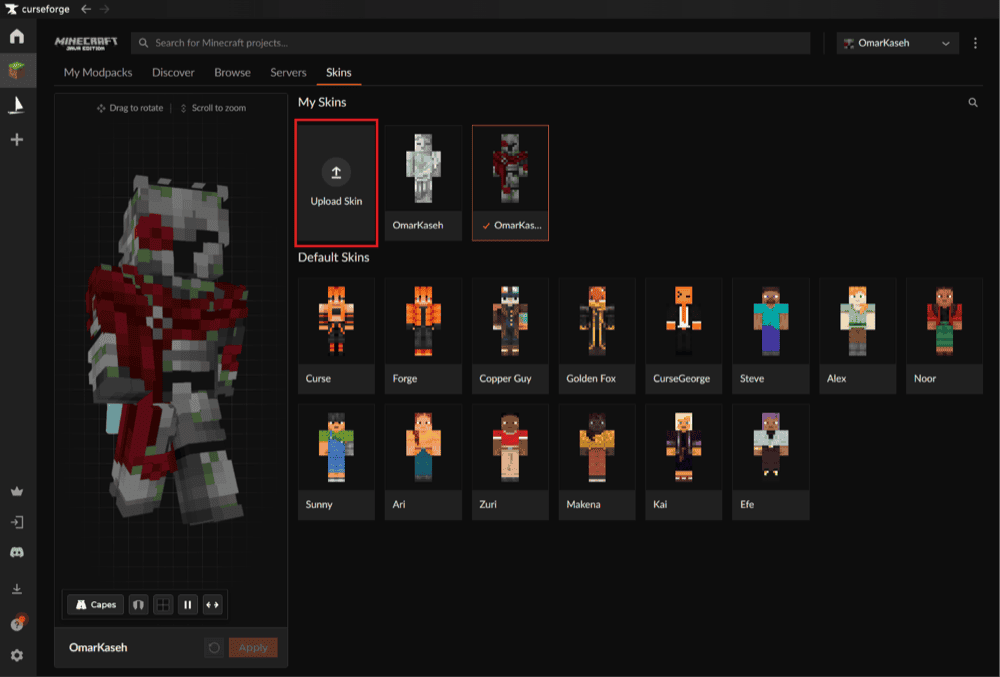
- Find and select the PNG skin file saved on your computer.
- Click the model type toggle, shown as a double-arrow icon, to switch between the “Classic” and “Slim” player models.
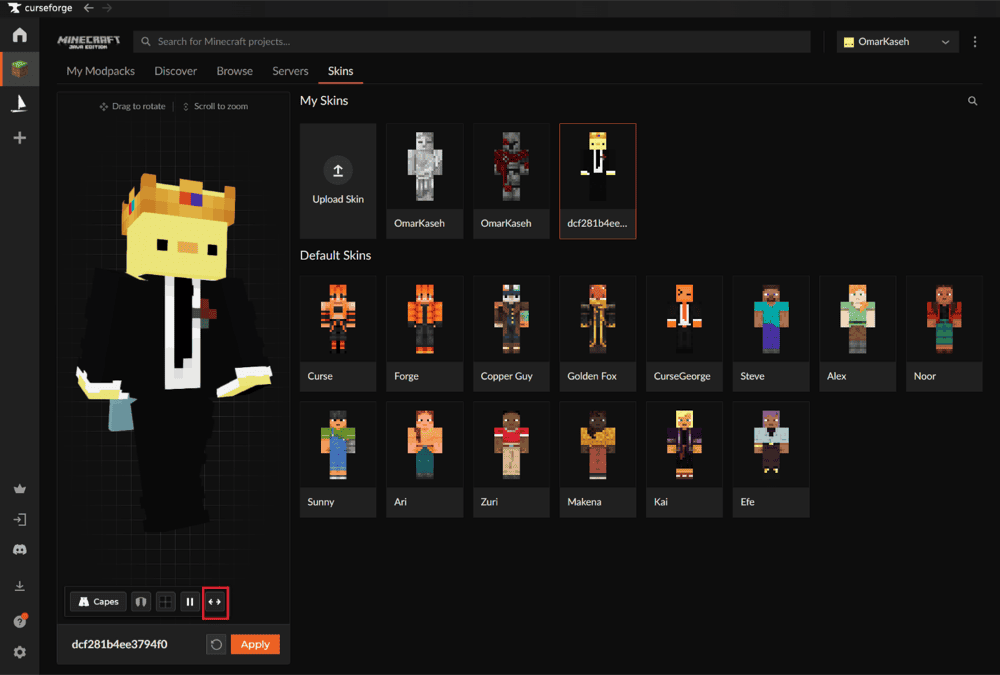
- Click "Apply" to save the skin and use it with the selected model type.
- Browse CurseForge skins and the default Minecraft skins from one screen.
- Preview any skin in a live 3D viewer, rotate the model to inspect it from every angle, pause its movement for a closer look, and switch the background between none, a daytime sky, or a nighttime sky.
- Preview capes and Elytra on the same model by clicking the Cape or Elytra controls below the 3D viewer.
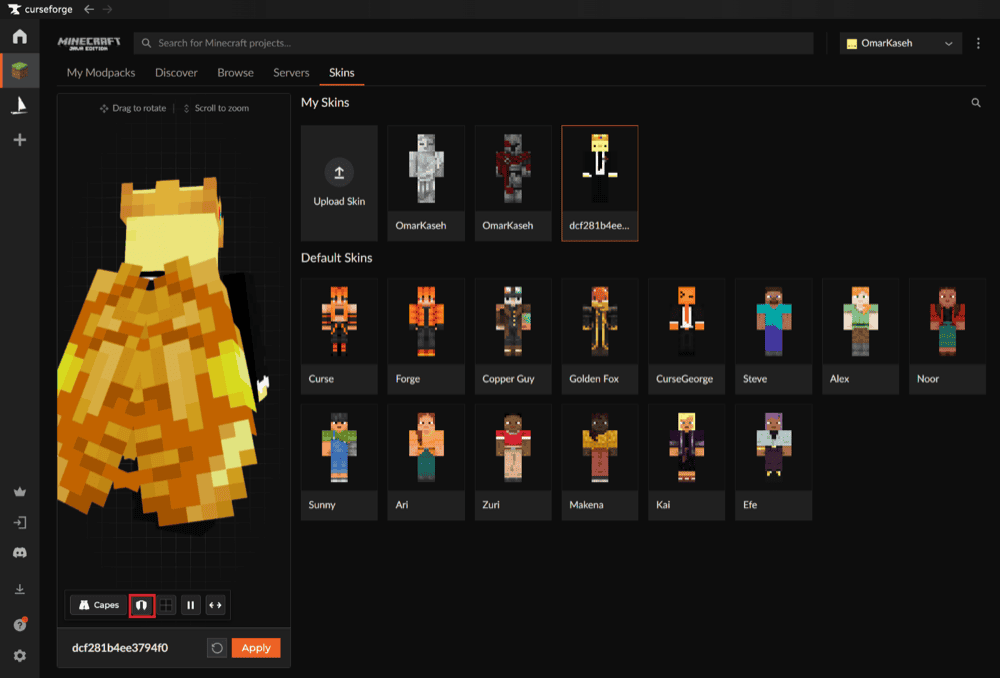
*Did you know? CurseForge launched the feature alongside a community skin contest, with three winning designs planned as featured default skins inside the app. The contest was part of the launch, while the "Skins" tab remains a quick way to rotate and inspect a design before using it.
Do Capes Work Differently in Java Edition?
The short answer is yes. Skins and capes are handled separately in Java Edition. You can upload a custom skin, but official Java capes are tied to eligible accounts and cannot be uploaded in the same way. Some third-party mods and clients offer their own cape systems, although those capes may only be visible to players using the same system.
Note that while the CurseForge "Skins" tab can let you preview how a cape or Elytra looks with your skin, it does not grant or upload an official Java cape.
Mods That Improve Minecraft Skins and Player Animations
Changing your skin only replaces the character texture. These mods go further by adding depth to flat skin layers, making your body visible in first person, adding wearable cosmetics, or improving how your character moves.
Not Enough Animations
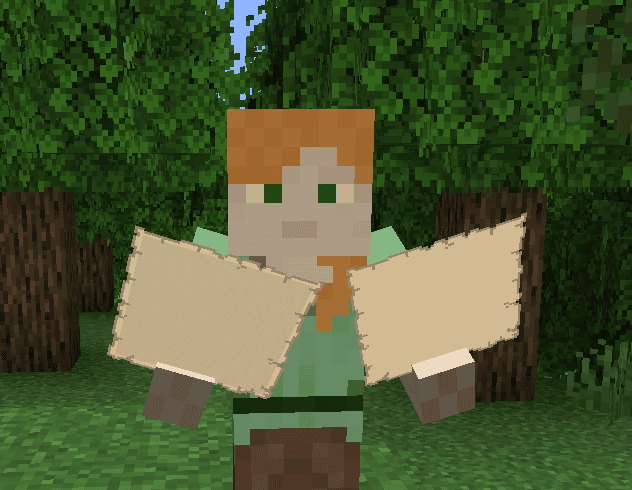
“Not Enough Animations” makes your player model feel more natural by adding third-person animations that Minecraft normally only shows in first person. Your character visibly eats and drinks, holds maps correctly, aims shields in the direction you are looking at, rows boats, holds horse reins, climbs ladders, crawls, and moves its arms more smoothly between actions.
The mod is client-side and works on vanilla and third-party servers as the changes are purely visual. Each feature can also be enabled or disabled from the in-game configuration screen, so you can keep only the animations you like. If you’re looking to experiment with other mods, it is also designed to pair well with First-person Model.
Skin Layers 3D
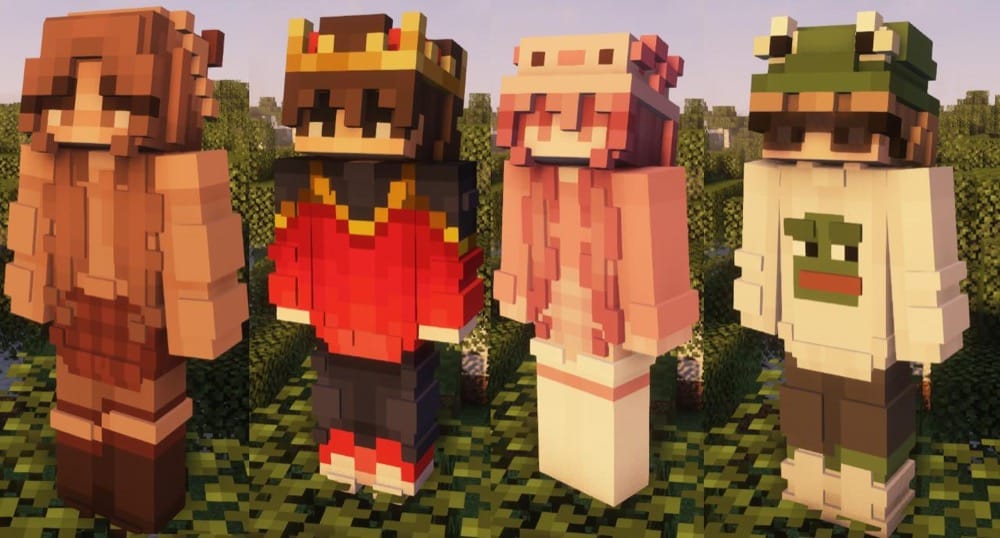
“Skin Layers 3D” replaces the flat outer layer of a Minecraft skin with a fully modeled 3D version. Details like hair, hats, jackets, sleeves, glasses, and visors gain real depth instead of sitting flat against the player model. It also supports transparent pixels and applies the same effect to player head items.
To help with performance, the mod switches distant players back to the normal flat skin layer when they are more than 12 blocks away. It is entirely client-side, so it does not need to be installed on the server. Note that HD skins are not supported, and some skins or modded armor may need small adjustments in the settings to align correctly.
First-person Model
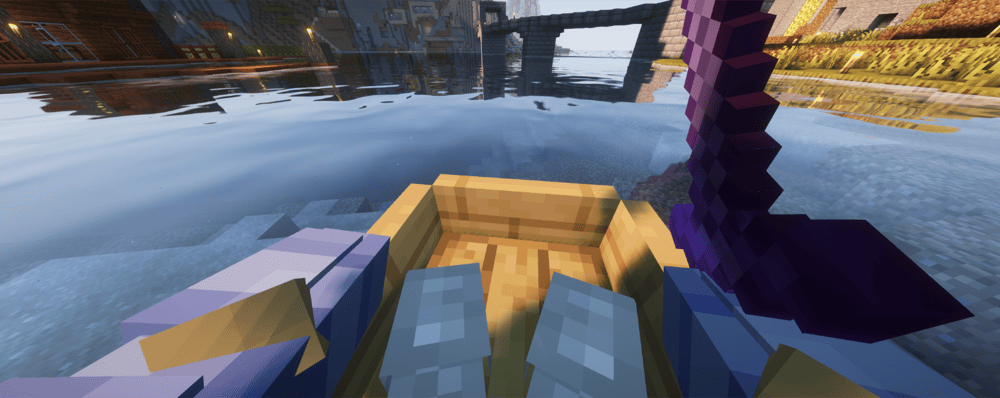
“First-person Model” replaces Minecraft’s normal first-person view with the full third-person player model. When you look down, you can see your body, clothing, skin layers, and third-person movements instead of only the item or arm shown by vanilla Minecraft. You can also switch between the modded and vanilla first-person views with the "F6" key.
The mod is entirely client-side, so it does not need to be installed on the server. Note that while it changes how your player model appears in first person, it does not add new animations by itself.
If you’re looking for the latter, Not Enough Animations provides the movements needed to make actions look natural from this view. One word of caution, though – mods that heavily change the player model have been known to cause visual issues, such as showing the inside of your character's head.
Cosmetica
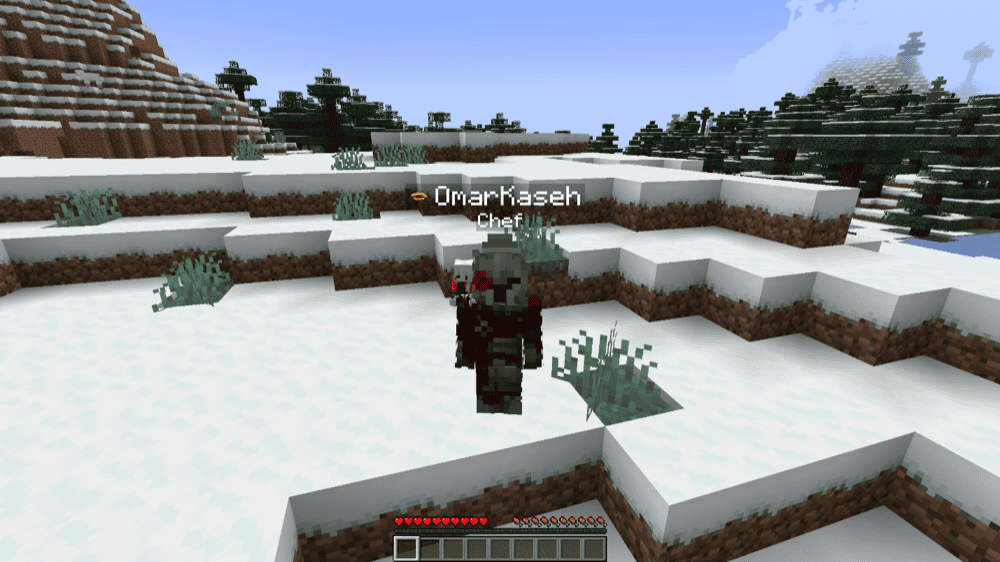
“Cosmetica” adds free wearable cosmetics that work alongside your existing Minecraft skin. You can equip custom or animated capes, Elytra designs, hats, shoulder buddies, back items, and a second nametag for details like a title, pronouns, or social links.
The mod includes both online and in-game catalogs where you can browse cosmetics and preview them on your character before equipping them. You can also upload your own designs, open the customization menu quickly with "Right Shift," and disable individual features you do not want to use.
How to Install Minecraft Mods
You can install the above mods automatically using the CurseForge app or manually by placing the mod files within your game's mods folder. Both methods allow you to easily add custom features and enhancements into your Minecraft experience.
If you want to learn more, you can read our detailed guide on how to install Minecraft mods.
Common Issues and Quick Fixes
My skin won't upload
Many failed uploads come down to the file format. Make sure the skin is an actual PNG file and not a JPG that was simply renamed. Additionally, make sure to download the image to your device and upload the file itself instead of pasting a link from Discord, Google Drive, or another website.
My skin looks stretched or wrong
This is usually a dimension or layout problem. Modern Java skins normally use a 64x64 pixel template, whereas older legacy skins may use 64 x 32. A regular image cannot simply be resized into a skin, because every part must be placed correctly on the skin template. To fix this, re-export the design using the proper layout and upload it again.
Part of my skin is invisible or missing
Check the selected model first, since choosing “Classic” for a “Slim” skin (or the reverse) can make the arms look broken or incomplete. If the model is correct, check the base skin layer for unintended transparent pixels. Then, re-save the image as a clean PNG and upload it again.
My new skin still isn't showing in-game
We recommend fully closing and relaunching Minecraft, or disconnecting and reconnecting if you are already on a server. If the old skin still appears, confirm that you changed it on the correct Microsoft account. Some servers may also take a moment to load the updated skin.
My game crashes on startup after installing mods
A startup crash usually means one of five things:
- The mod file does not match your Minecraft version.
- The mod was made for a different loader or another version of its loader.
- A required dependency is missing.
- Some of your mods are incompatible with each other.
- If you’re playing on Forge or NeoForge with an AMD graphics card and frequently experiencing crashes, your GPU driver might be outdated. If that’s the case, we recommend installing the latest drivers from the official AMD website.
Additionally, check that you installed the correct Forge, Fabric, Quilt, or NeoForge file for your profile, then look at the mod page for any required files, especially for Fabric API on Fabric profiles and for Quilted Fabric API on Quilt profiles.
Also note that Minecraft mod loaders are their own separate systems, so a Fabric file will not work in a Forge profile, with the same being true for NeoForge or Quilt builds.