Secret doors are one of those Minecraft builds that never really stop being useful. Maybe you want to hide a storage room, protect a base entrance, or add a fun hidden passage to a castle, library, or underground bunker – the options are truly endless here.
The best part is that you also do not need a huge redstone setup to start – some secret doors are simple decoration tricks, while others use sticky pistons to make a wall open cleanly.
In this guide, we’ll walk you through three solid designs from cheapest to most involved, then cover a few tips for triggers, camouflage, avoiding common mistakes, and of course, some mods.
Making a Painting Door
This is by far the cheapest and fastest secret entrance, which is especially useful for quick stash rooms or early-game bases.
Materials you will need:
- 1 painting
- 2 signs
- Matching wall blocks for the frame
- (Optional): 1 trapdoor for a Java Edition crawl entrance
Step 1: Make the Doorway
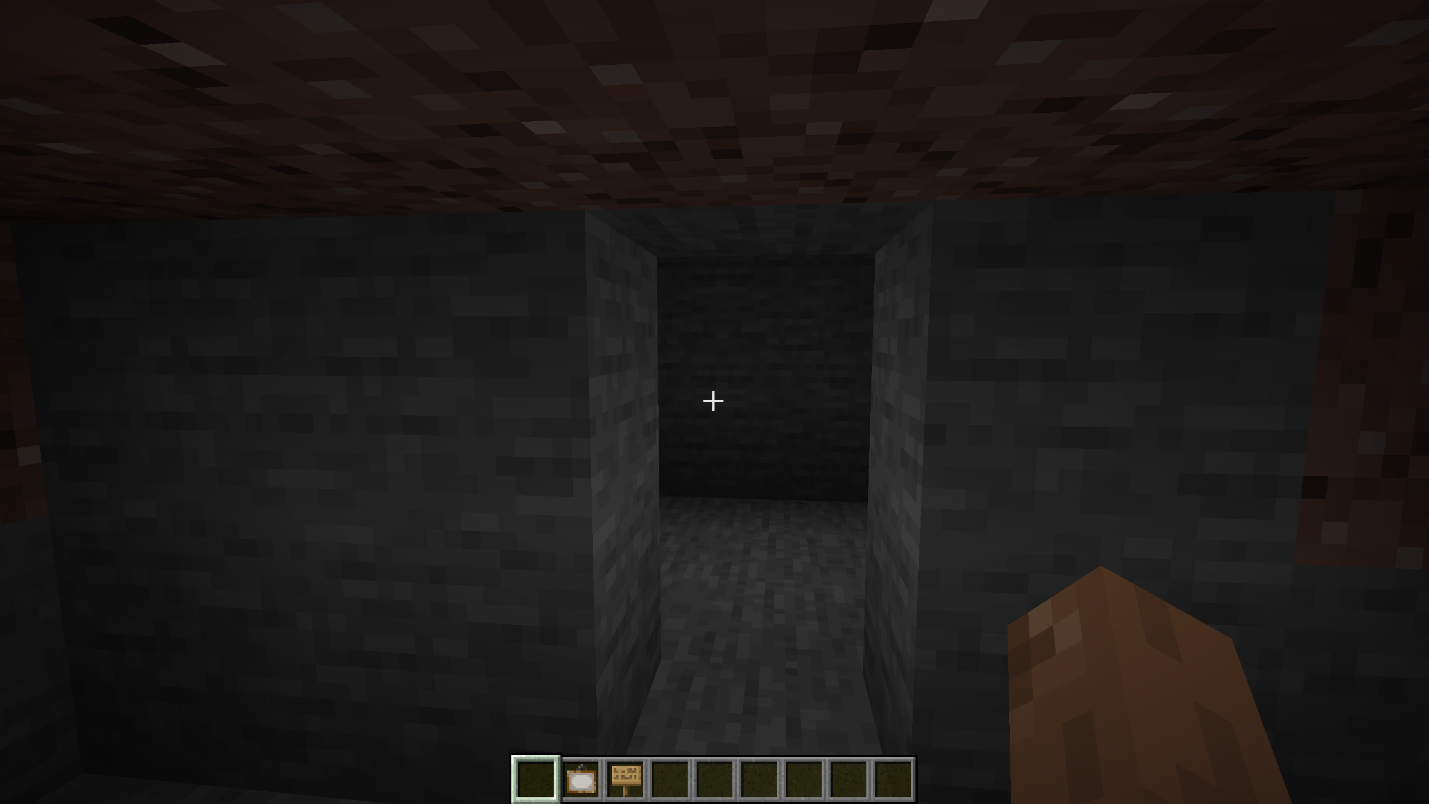
Punch a 1x2 hole in the wall where you want the hidden entrance to be. This opening serves as the actual passage, so make sure there is a room, tunnel, or small stash area behind it.
Step 2: Place the Signs
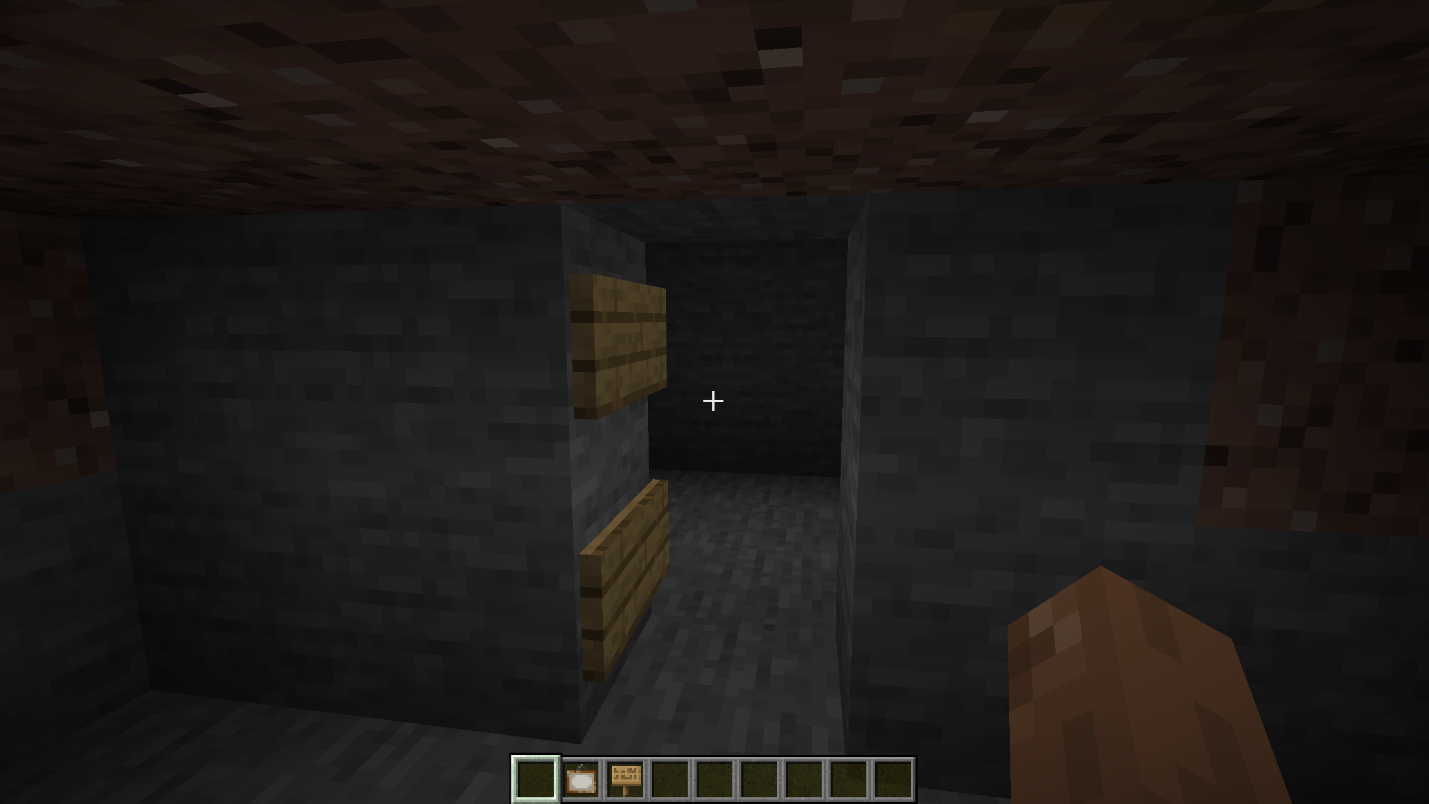
Place one sign on each inner side edge of the doorway. The signs will hold the painting in place while still leaving enough room for players to walk through the opening.
Step 3: Cover the Entrance with a Painting
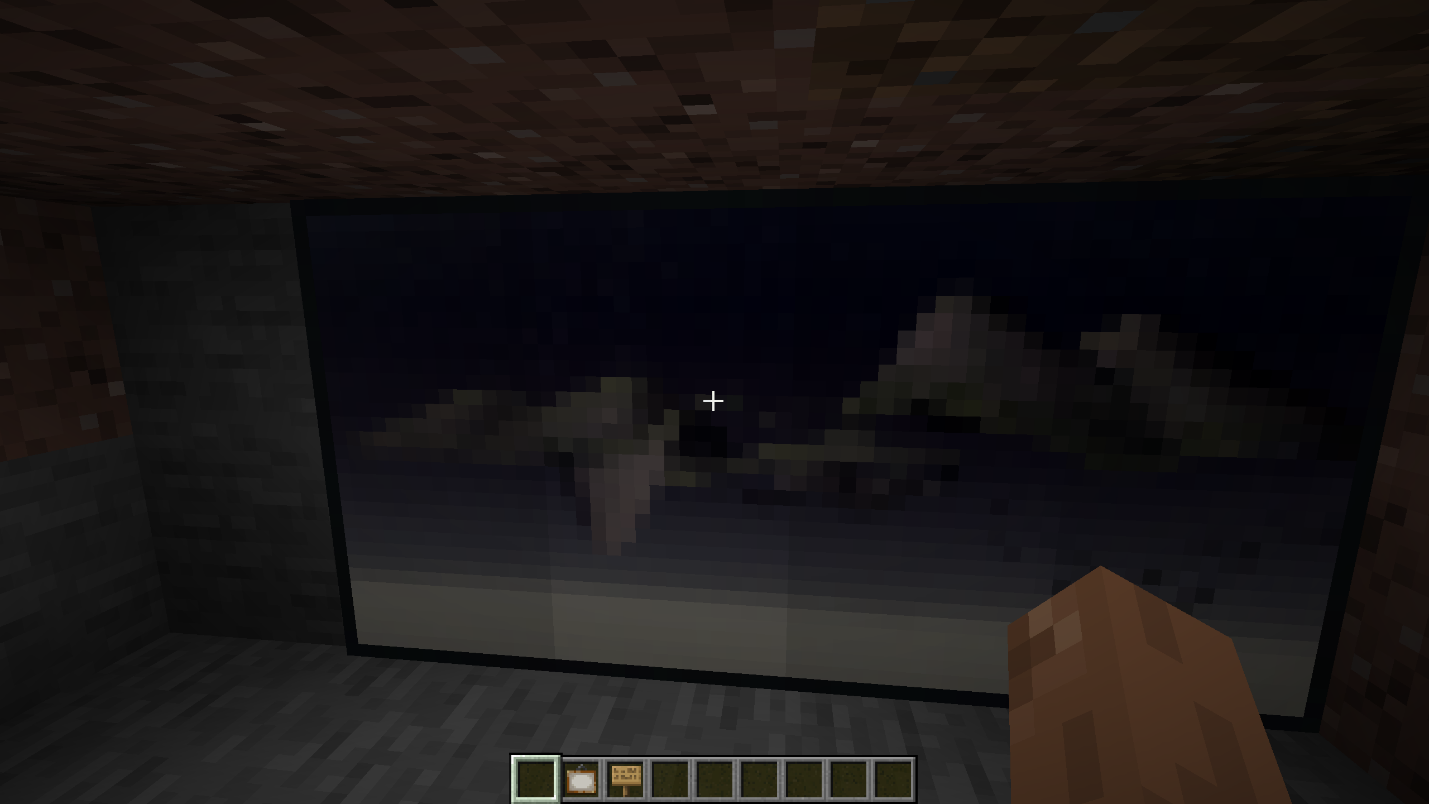
Hang a painting over the hole so it covers the opening completely. As long as the signs are in place, the painting stays attached and you can walk through it without breaking it.
Tip: If you want the entrance to feel less obvious, you could also make a crawl tunnel. Simply add a trapdoor behind the painting and lead it into a one-block-high crawl tunnel. In Java Edition, this can force the player into crawling, which makes the passage harder to see from the room side. A wooden trapdoor can be opened by hand, while an iron trapdoor needs a redstone signal.
However, you can skip this part entirely if you only want the simple painting doorway.
As fun as this painting trick is, be warned that it’s also well-known. Mojang's own hidden-door article points out that experienced players know to check paintings and will walk through them when scouting a suspicious wall. We recommend using it for quick stash rooms and decorative entries, but not as your main means of security on a competitive server.
Making a 2x2 Hidden Piston Door
This is the first "real" secret door to learn. The wall section actually moves, it blends in cleanly, and it teaches you some useful redstone basics without getting too complicated.
Materials you will need:
- 12 sticky pistons
- 4 matching wall blocks for the moving door
- 20 extra building blocks
- 2 redstone repeaters
- 18 redstone dust
- 1 or 2 levers
Step 1: Place the Sticky Pistons
Place 12 sticky pistons in two mirrored groups, with a 2-block gap between them. That center gap is where the hidden doorway will be. Each side should face inward so the pistons can push and pull the door blocks into place.
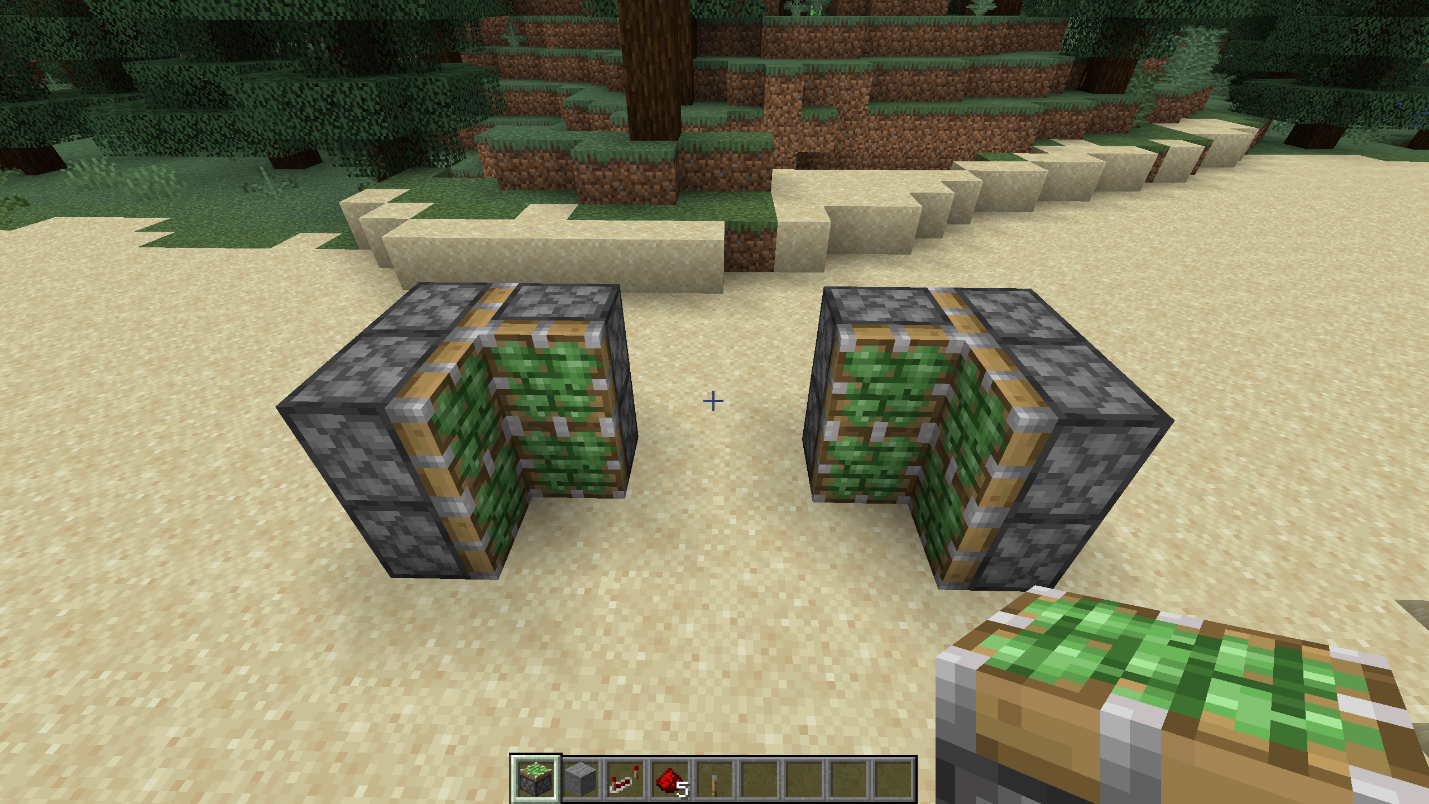
Step 2: Add the Moving Door Blocks
Place 2 matching wall blocks inside each piston group, for 4 moving door blocks in total. These are the blocks that will slide into the doorway when the door closes. Use the same block as the wall so the entrance blends in once it is finished.
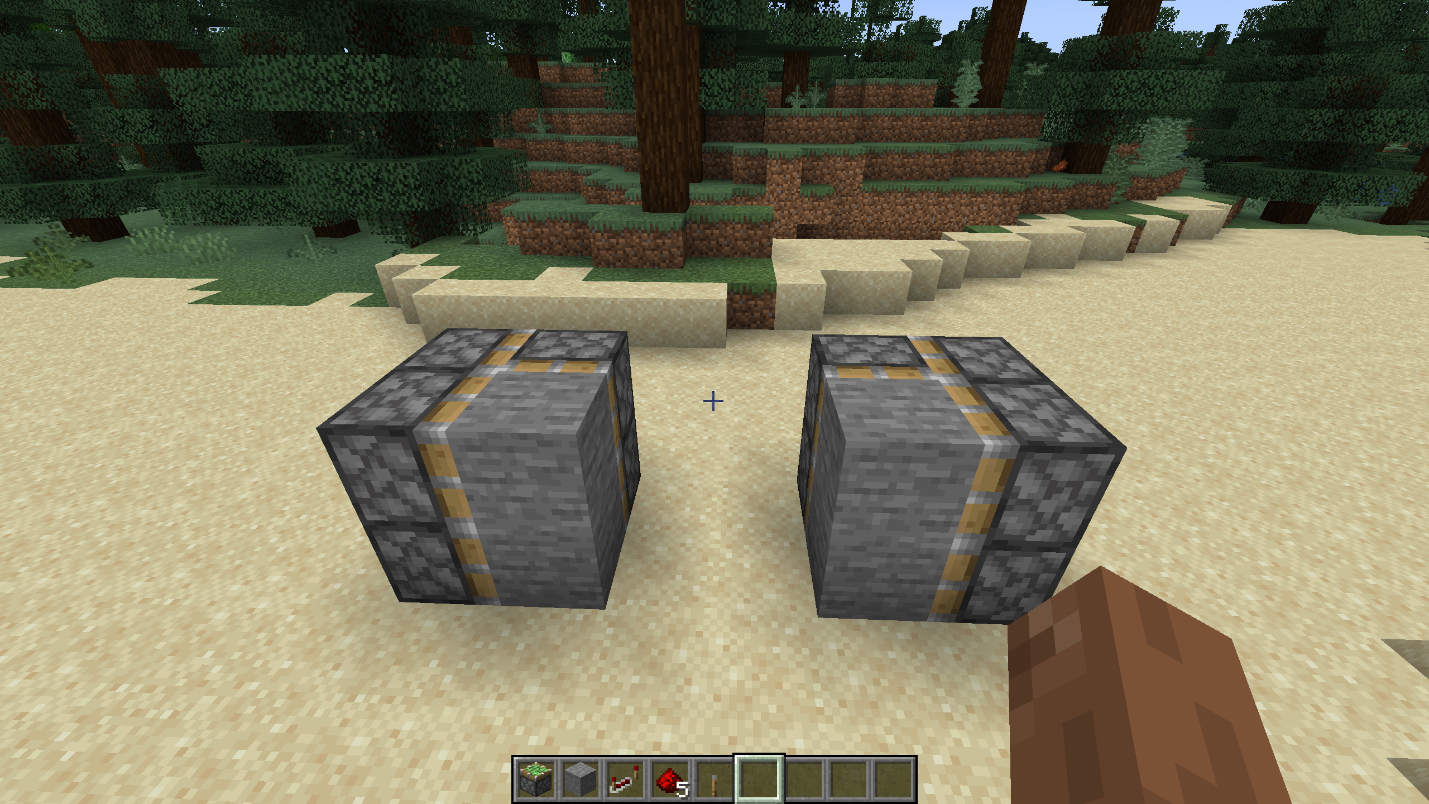
Step 3: Cover the Top With Building Blocks
Place one layer of building blocks across the top of the piston setup. This gives you a surface for the redstone and repeaters while also starting to hide the mechanism.
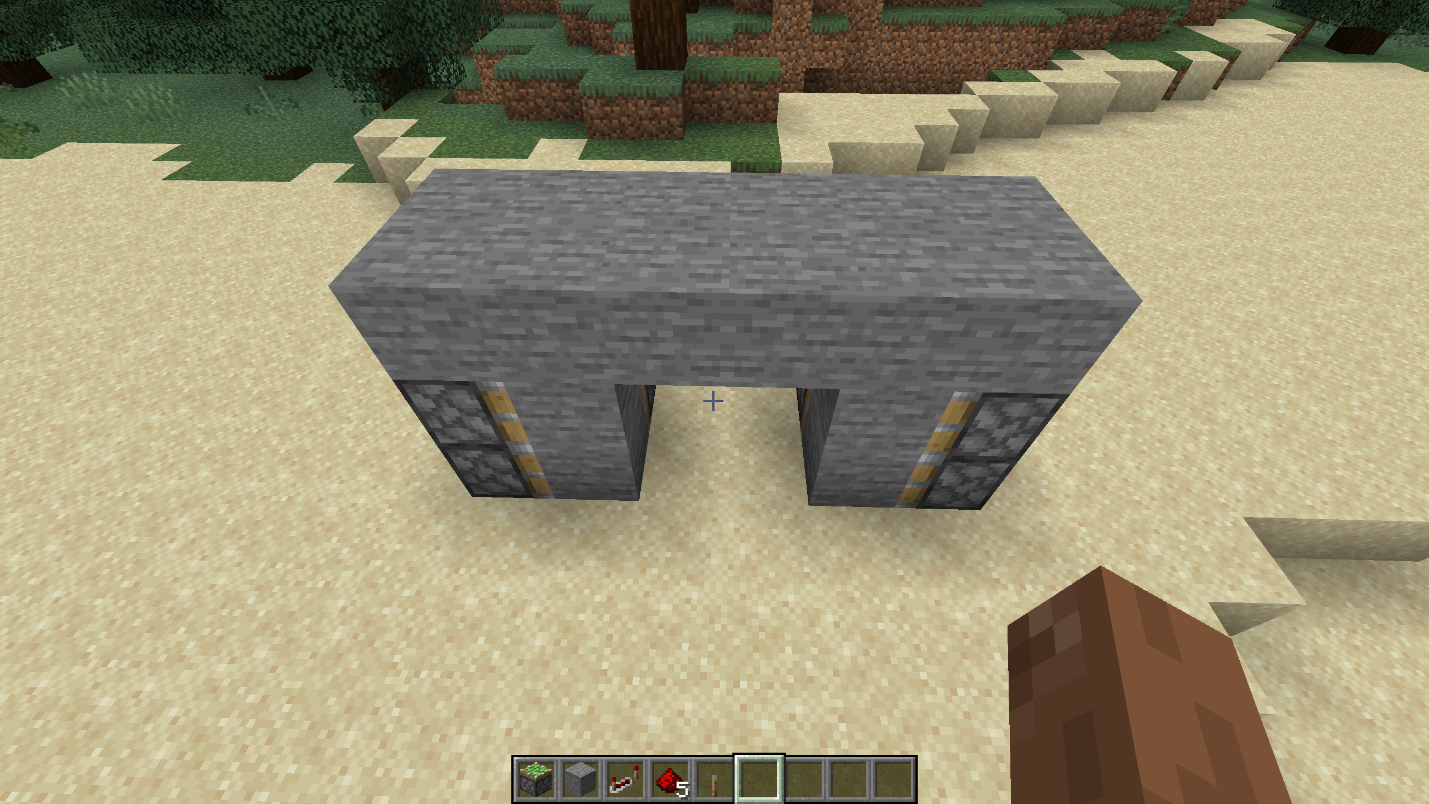
Step 4: Add the Side Blocks
Place 2 blocks on the side of each piston group, for 4 side blocks in total (make sure not to place them on the lower pistons). These side blocks help carry the redstone signal around the mechanism.
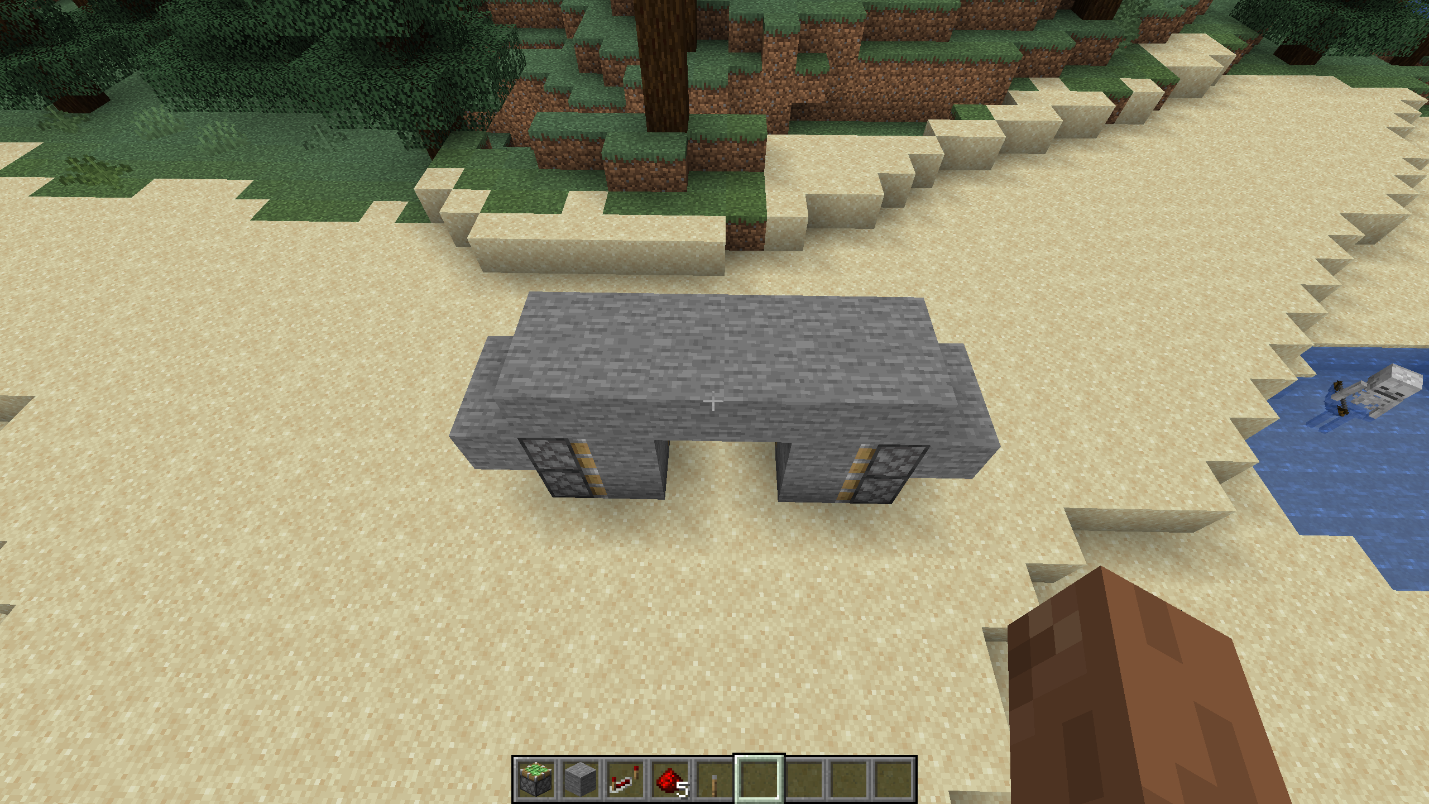
Step 5: Place the Entrance-Side Blocks
Place 1 extra block near the entrance side of the mechanism on each side. These blocks help connect the redstone path to the main circuit.
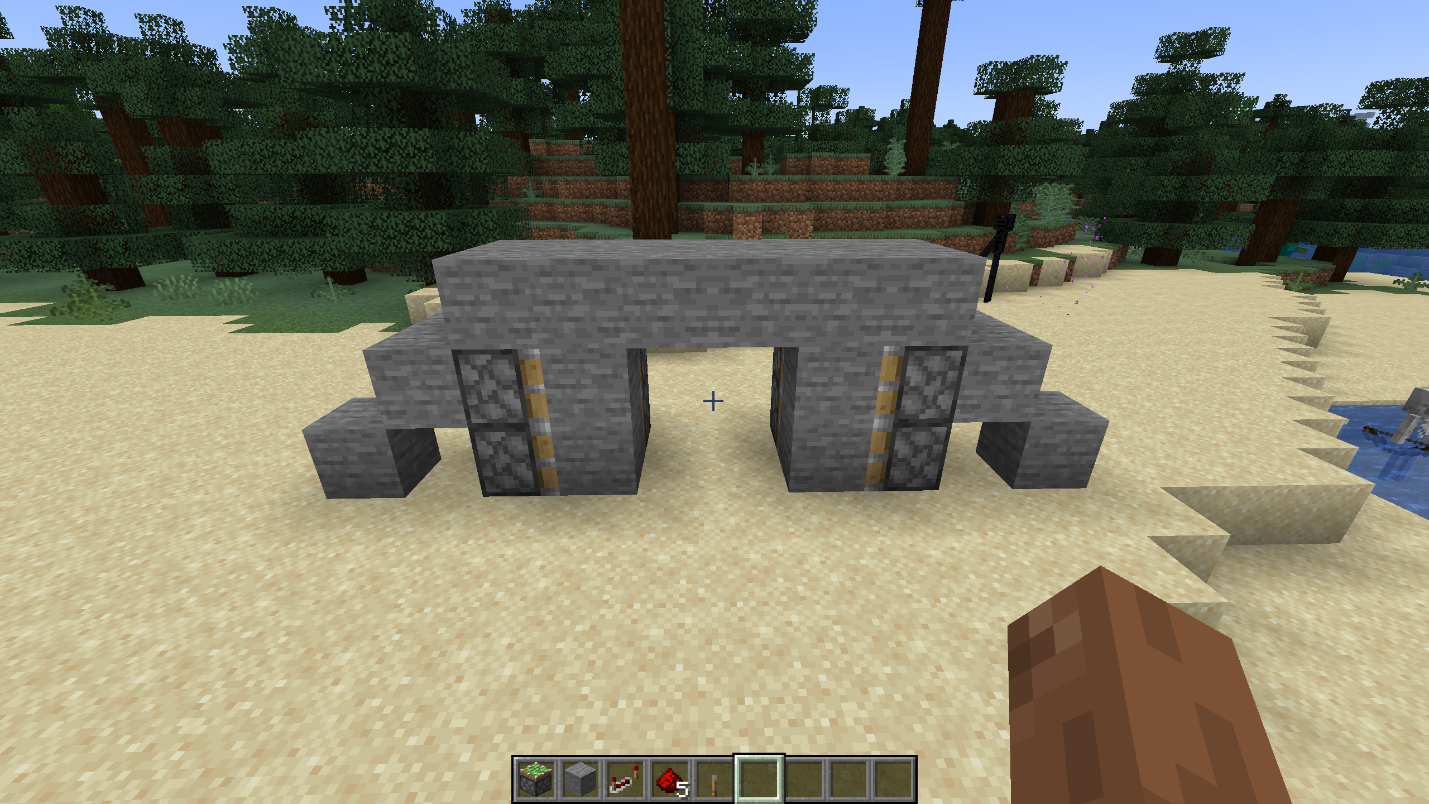
Step 6: Lay the Redstone Dust
Place redstone dust on the side blocks and along the ground so the signal can reach both piston groups. Keep the wiring exposed for now so you can fix mistakes before covering the build.
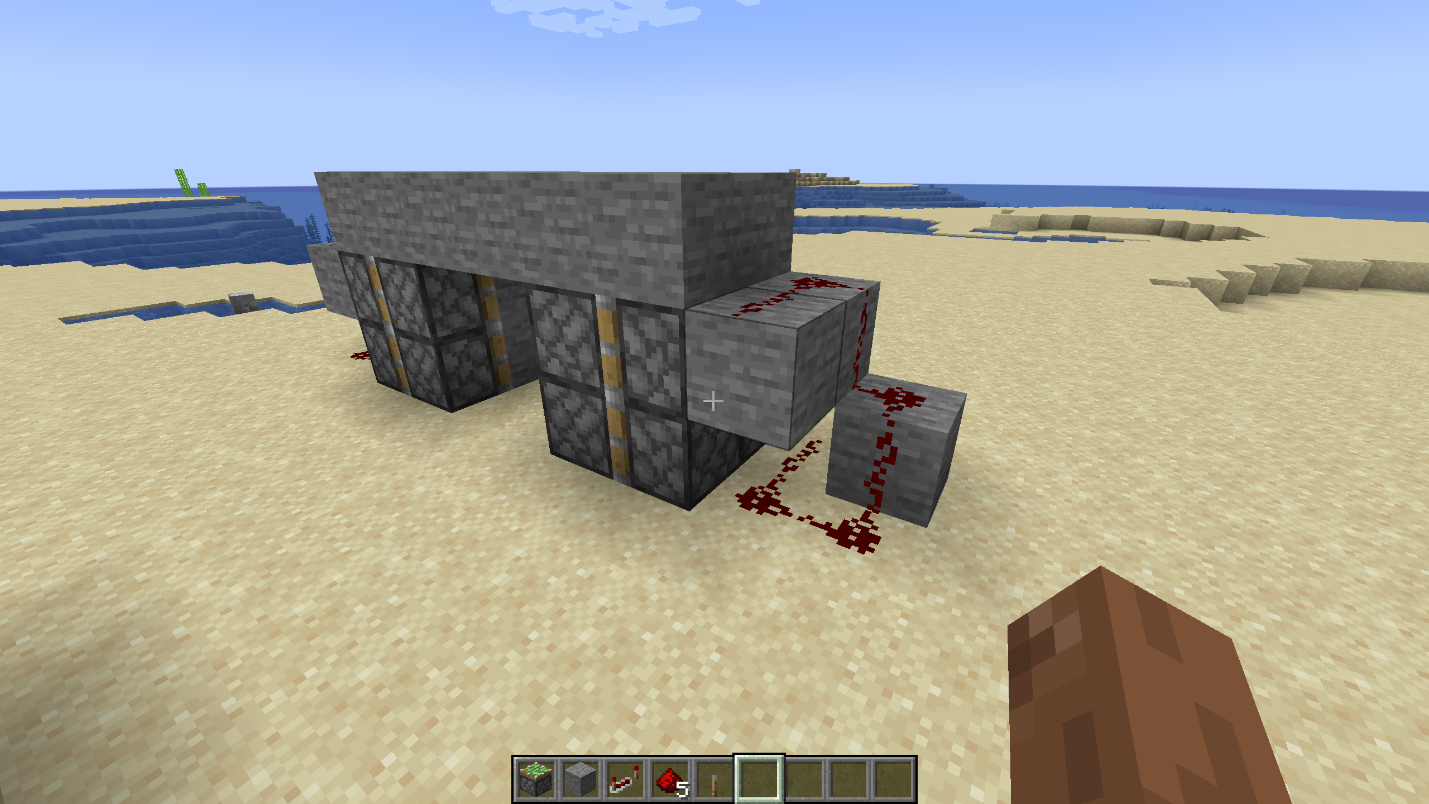
Step 7: Set the Repeaters
Place 2 redstone repeaters on top of the build, facing outward from the center. Set them to 3 in-game ticks. A redstone tick is the timing unit used by repeaters: one redstone tick equals two in-game ticks, or 0.1 seconds before lag. If the lower pistons do not retract properly during testing, try setting the repeaters to 4 ticks instead.
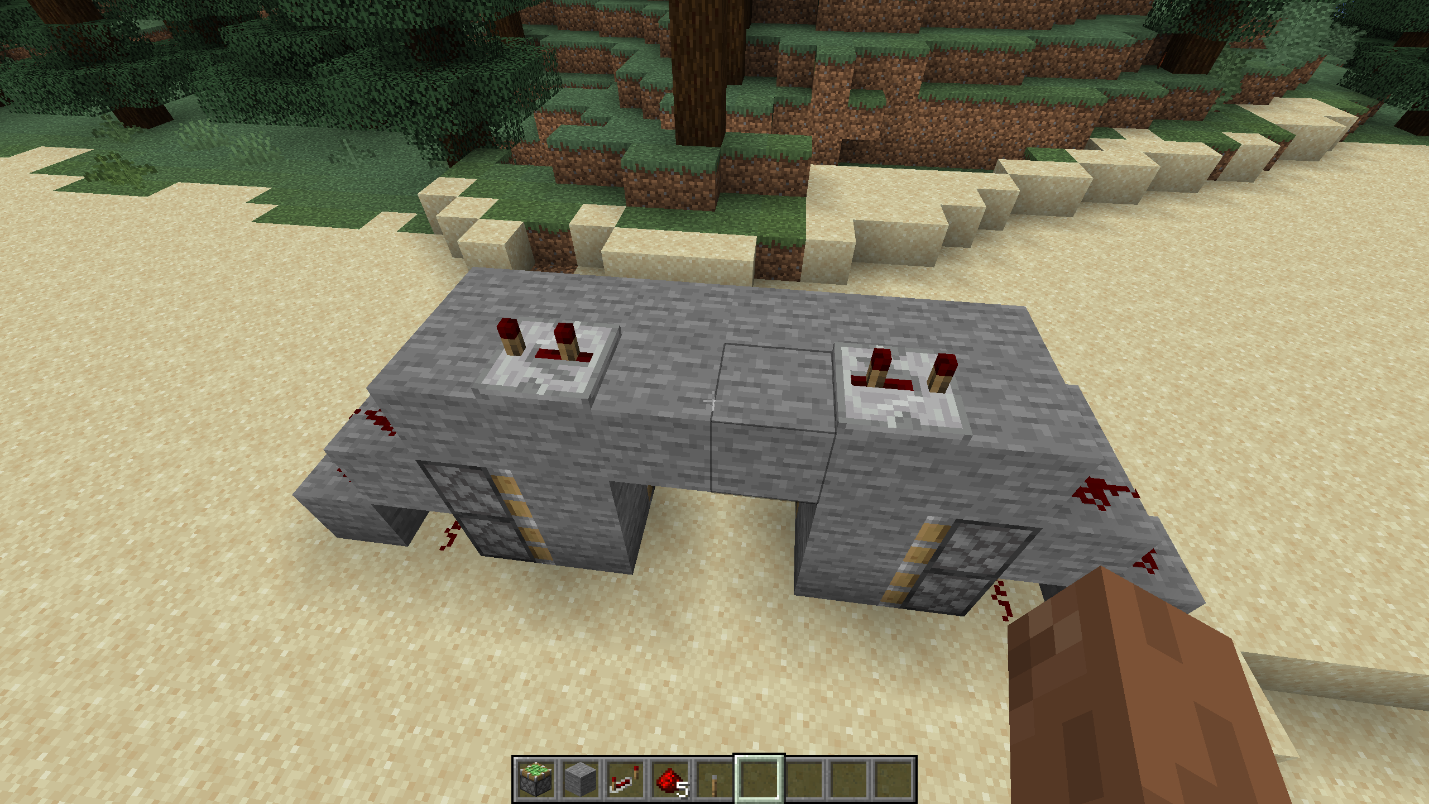
Step 8: Connect the Repeaters
Connect the redstone dust to both repeaters, then add the middle redstone line that links the circuit together. The lever needs to connect to this main redstone line and not to a random block on the side.
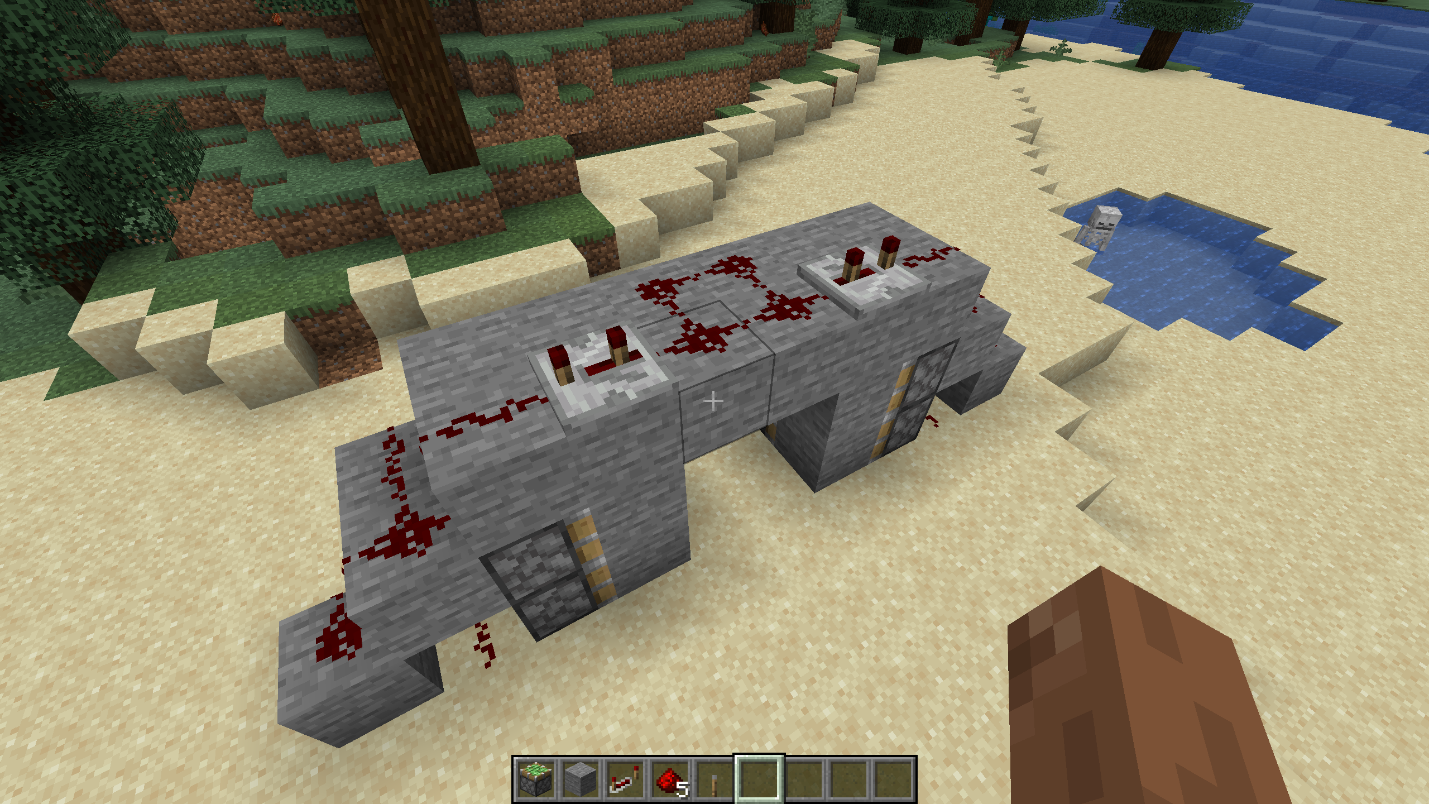
Step 9: Add the Lever and Test the Door
Place a lever so it connects to the main redstone line. Flip it and check that the four moving wall blocks slide into place and retract correctly. If the door only half-opens, check the repeater delay, redstone connections, and piston directions.
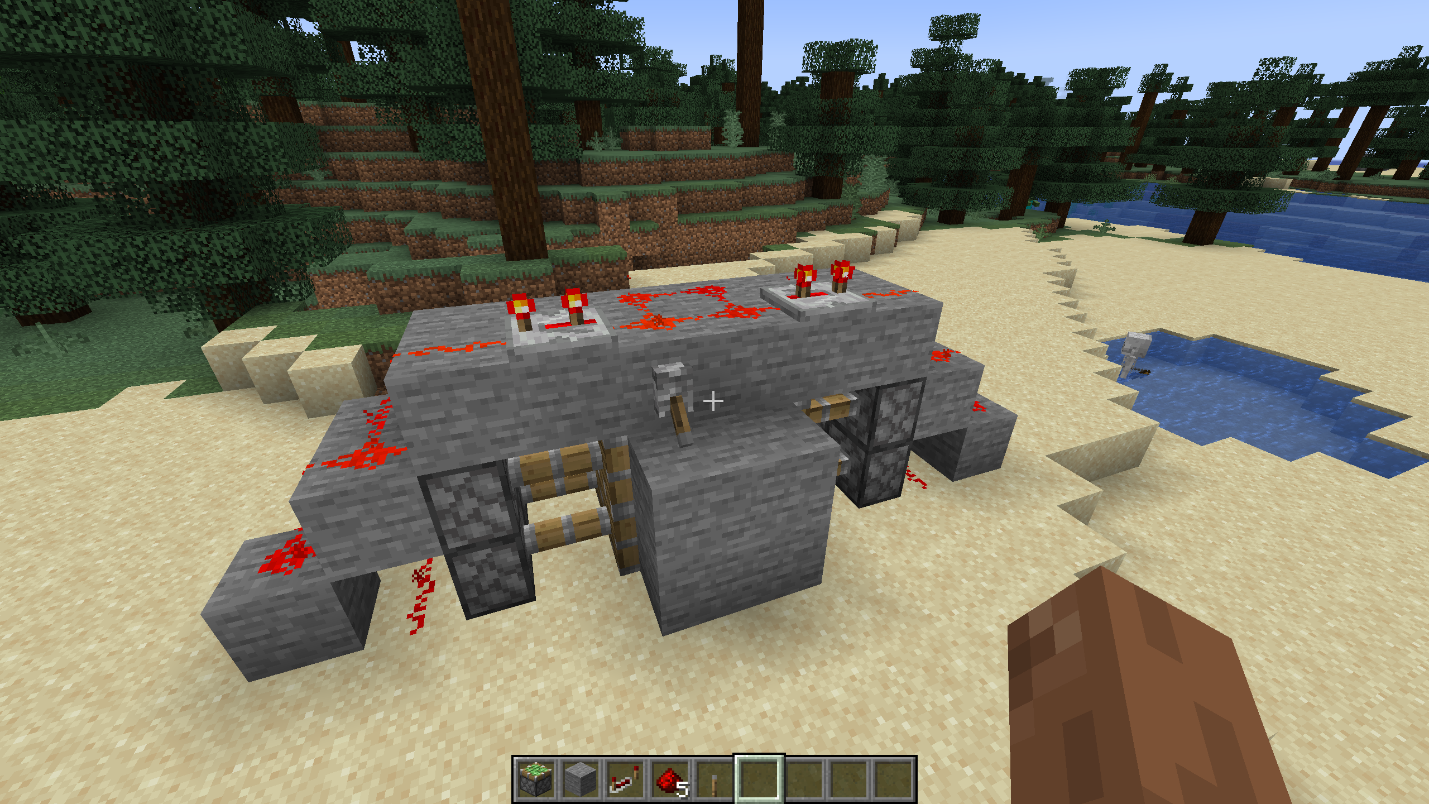
Step 10: Add a Second Lever or Hide the Input
If you want the door to open from both sides, add another lever on the opposite side of the wall and connect it to the same main redstone line. Make sure the lever feeds into the working circuit rather than a random block nearby, or the door may not open correctly.
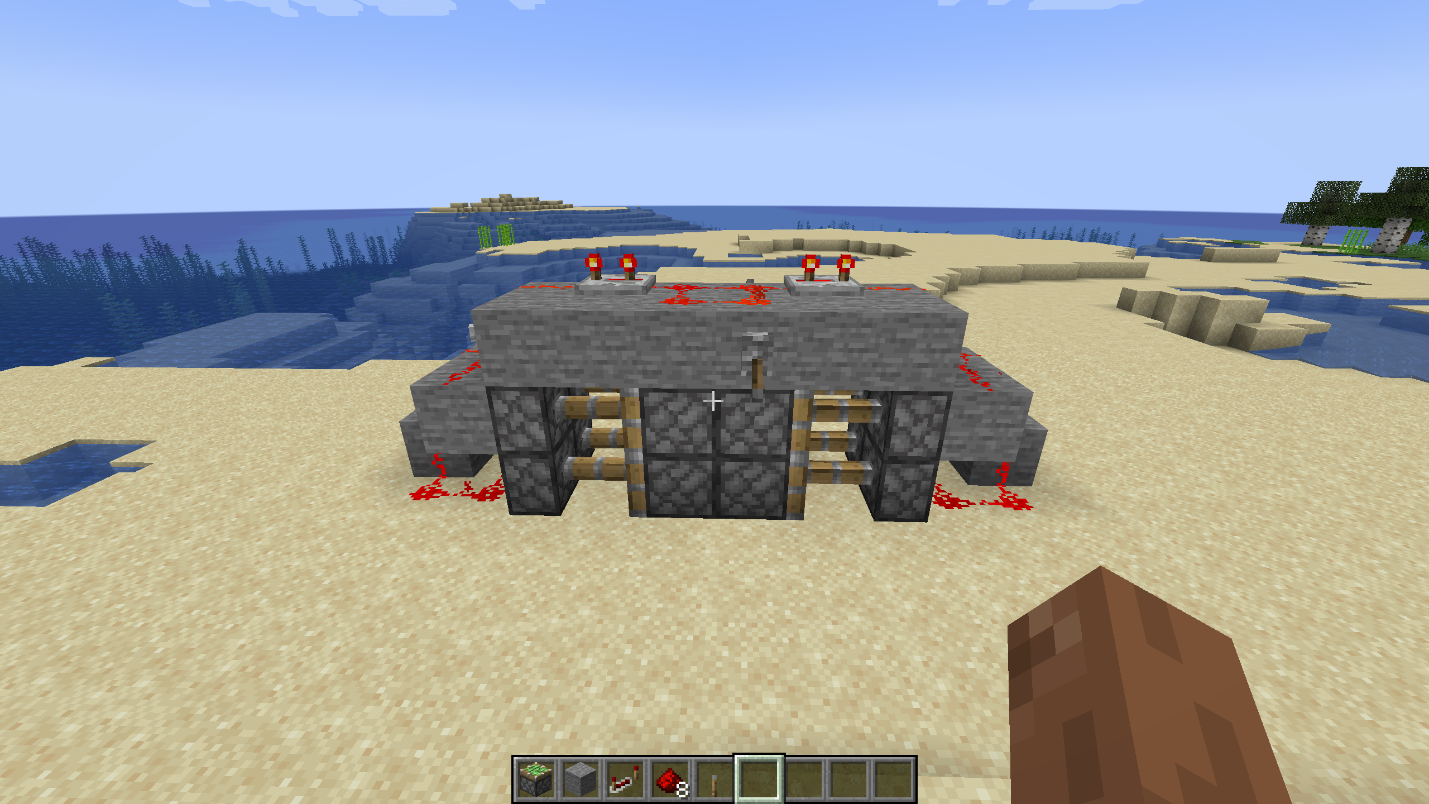
You can also extend the redstone line to move the lever or button farther away from the entrance. This is useful if you want the trigger hidden behind a tree, around a corner, under a block, or inside the base instead of sitting right next to the secret door.
Step 11: Cover and Camouflage the Entrance
Once the door works, cover the exposed pistons and redstone with matching wall blocks. You can hide the lever behind a tree, around a corner, behind decoration, or inside the base. From the outside, the closed door should look like a normal 2x2 section of a wall.
Important: use the exact same block as your wall. If your wall is stone bricks, the moving door blocks must be made of stone bricks as well. If it is polished andesite, use polished andesite. The reason is that secret doors tend to fail from bad block matching more often than bad redstone.
Making a Chiseled Bookshelf Trigger
This is the best themed entrance for any library, study, or storage-room builds. The trigger looks like a natural part of the room rather than a redstone puzzle box.
Materials you will need:
- 1 chiseled bookshelf
- 1 comparator
- 1 repeater
- 6 redstone dust for the slot-6 filter
- 2 books
- enough redstone dust to connect the trigger to your door's input line
Step 1: Place the Chiseled Bookshelf
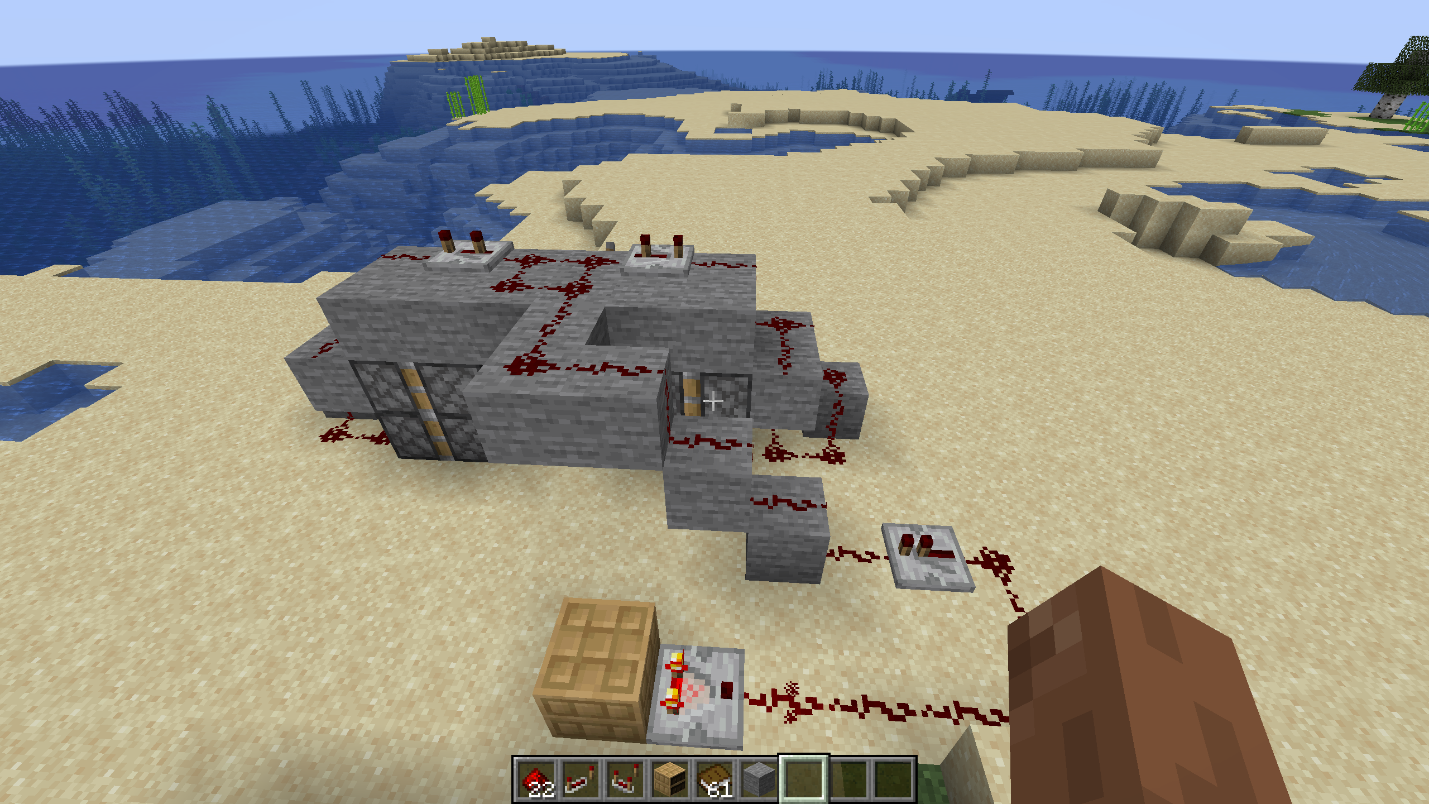
Place the chiseled bookshelf where it looks natural, like inside a library wall, beside other bookshelves, or near a storage room entrance. A chiseled bookshelf can hold up to six books, and those six slots are what make the hidden trigger work.
Step 2: Add the Comparator Behind It
Place a comparator directly behind the chiseled bookshelf, with the comparator facing outward away from the bookshelf. The two red torches should be on the bookshelf side, and the single red torch should point away from the shelf toward your redstone line. The comparator reads the last slot you interacted with and sends out a signal based on that slot.
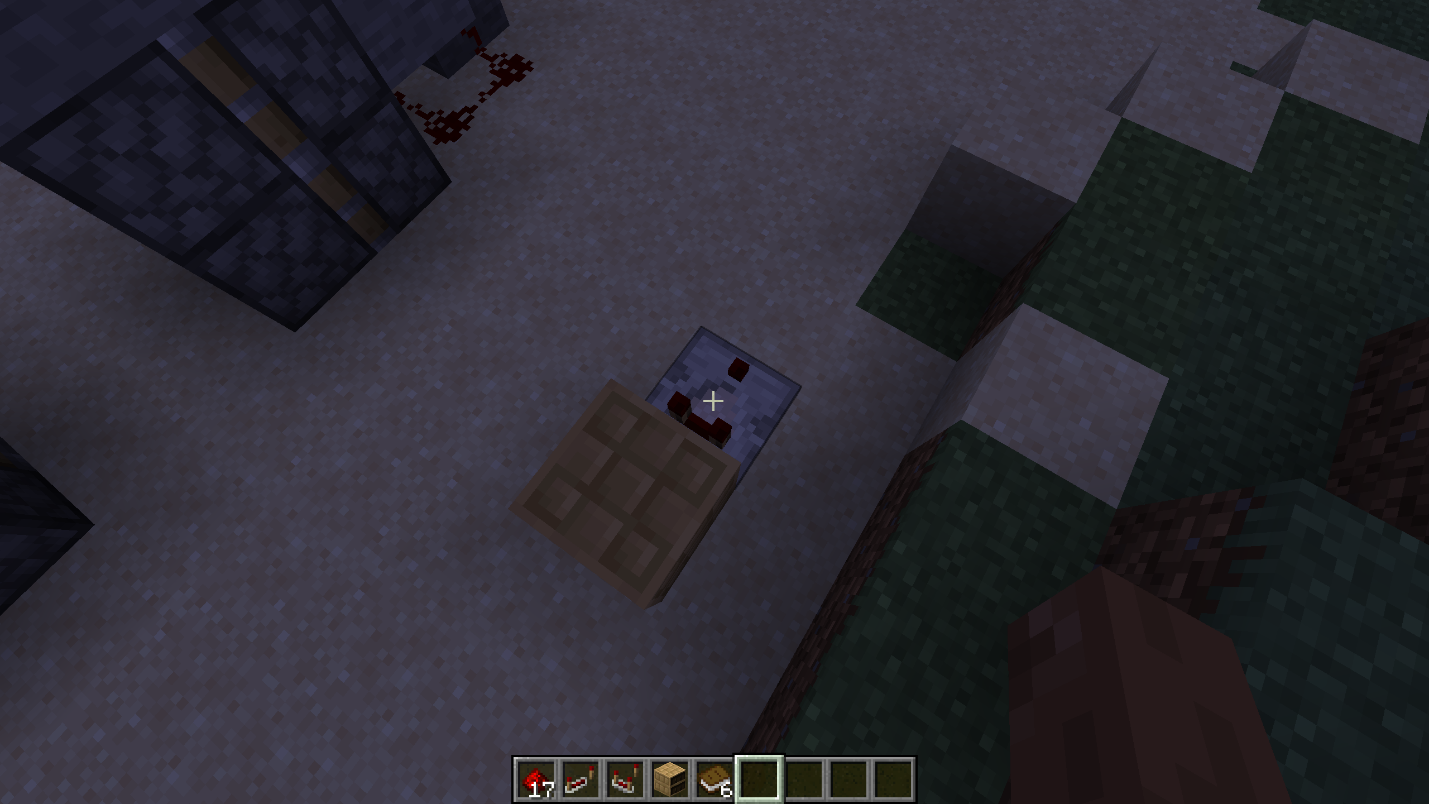
Step 3: Build the Slot-6 Filter
Run six pieces of redstone dust from the comparator output into a repeater. This creates a simple filter: the lower-right bookshelf slot sends the strongest signal, while lower-numbered slots lose power before reaching the repeater.
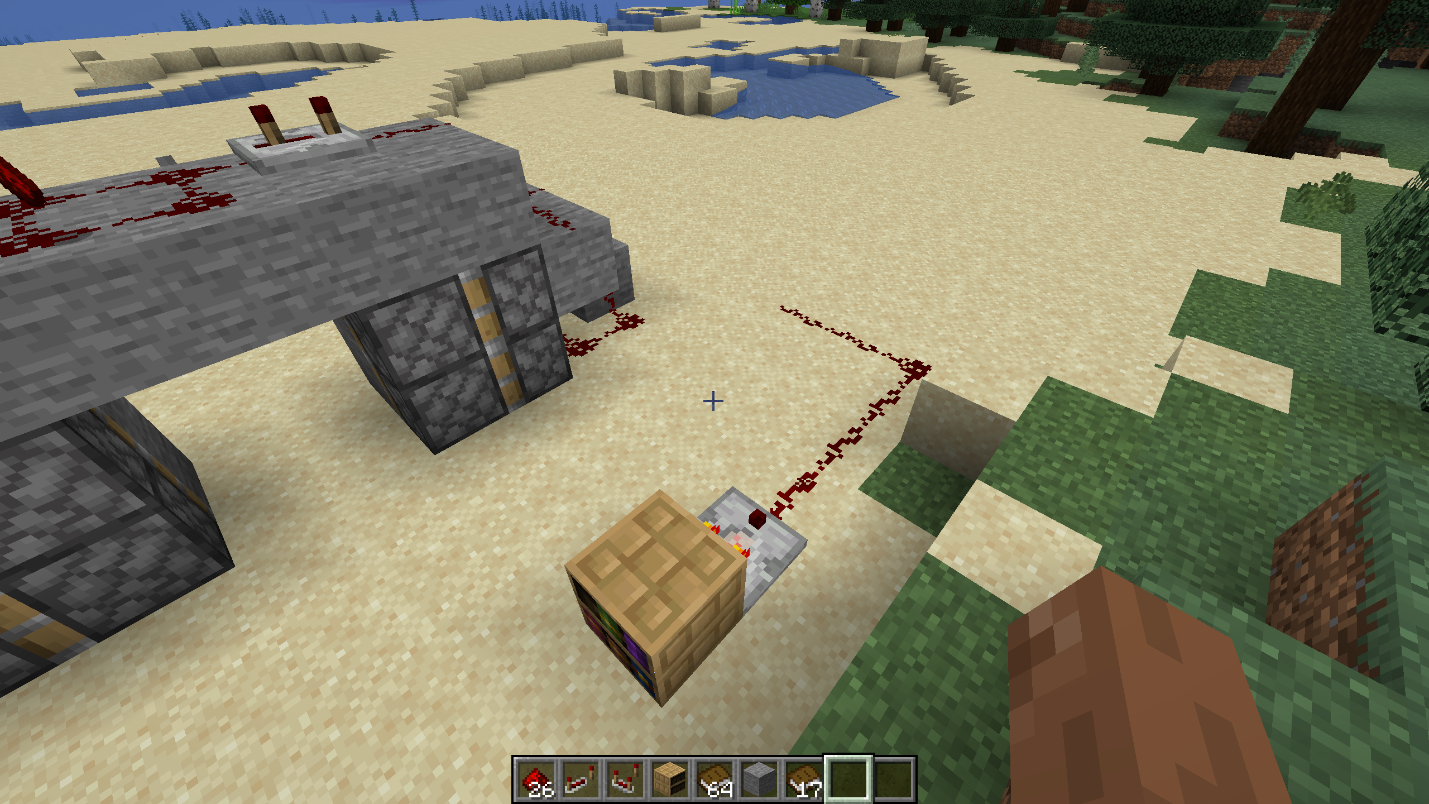
Step 4: Connect the Repeater to the Door
Place the repeater so it points toward the redstone line that leads to your piston door's main input line. The repeater should carry the filtered bookshelf signal forward, not back toward the bookshelf. Run redstone from the repeater into the same line that a lever or button would normally power. Keep the wiring exposed until you test it.
Step 5: Set Your Open and Close Slots
Use the lower-right slot as your "close" key. This slot sends the strongest bookshelf signal, which reaches the redstone line and keeps the compact piston door closed.
Use any of the other five slots as your "open" key. Those slots send weaker signals, so the filtered redstone line turns off and the door opens again. For the cleanest setup, we recommend picking one specific slot, like the upper-left slot, and using that as your open key every time.
Step 6: Test and Hide the Wiring
Click the upper-left slot, or any weaker slot, and check that the door opens. Next, click the lower-right slot and confirm that the stronger signal reaches the circuit and closes the door. On this compact piston door, powering it closes the door, while a weaker or missing signal opens it.
Once you’ve confirmed that it works, cover the redstone behind the wall, floor, or ceiling so only the bookshelf is visible.
Why this works: The chiseled bookshelf is a vanilla block from the Trails & Tales era. It can store up to six books, and a comparator can read the last slot interacted with, which is what makes this hidden-door trigger possible.
Tips for Better Secret Doors
Below, we’ve shared a few time-tested strategies to make the most of your secret entrances:
- Choose your trigger. Stone pressure plates detect only players and mobs. Wooden pressure plates detect all entities, including players, mobs, dropped items, arrows, experience orbs, and fishing bobbers. Near item farms, mob grinders, or anywhere arrows might land, wooden pressure plates can trigger your door constantly. We suggest using stone plates for interior exits and avoiding external plates entirely on competitive servers.
- Hide the input, not just the door. The piston wall may look clean but a lever on the wall can give it away. To fix this, replace the outside lever with a redstone torch key: place the torch on a specific hidden socket block tucked behind a banner, inside a wall notch, or behind leaves as it powers the same input line. Simply pull it back out after you go through and the door will close behind you.
- Choose a clear bookshelf key. On this compact piston door, the lower-right slot closes the door, while the other five slots open it. For a cleaner setup, pick one weaker slot – like the upper-left slot – as your open key, and use the lower-right slot as your close key. The comparator only reads the last slot you touched, so be deliberate about which slot you click.
- Use internal exit triggers. Stone pressure plates work well for interior exits since no stray entities should be inside. Position them so the door opens before you reach it, giving you room to step through the exit without dealing with awkward timing.
Mods That Work Well With Secret Doors
If you want to go beyond vanilla piston doors and painting tricks, these mods add more ways to hide entrances, triggers, and secret rooms. Whether you want simple hidden doors, full secret-base blocks, or camouflaged building pieces that blend into your base, it’s all here.
FramedBlocks
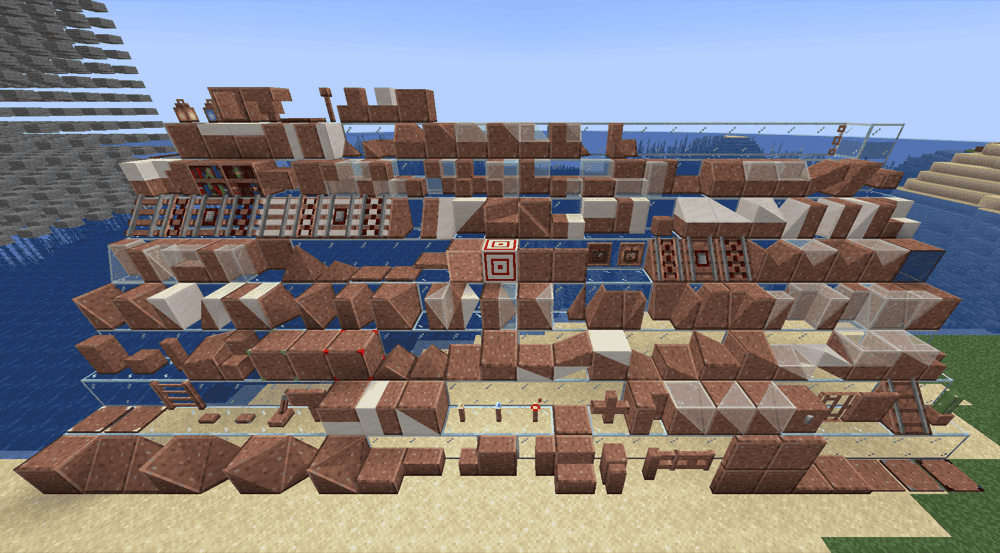
“FramedBlocks” adds fancy building blocks that can be made to look like almost any other block in the game. For a secret-door build, the useful part is that it includes framed doors, trapdoors, buttons, levers, pressure plates, one-way windows, and secret storage, giving players more ways to hide entrances and triggers inside a matching wall or base design.
The mod works best here as a camouflage and building-detail option rather than a dedicated hidden-base mod. It is a good fit for players who care about making secret doors blend into stone, wood, deepslate, or other build palettes without relying only on vanilla pistons and paintings.
The Secret Doors
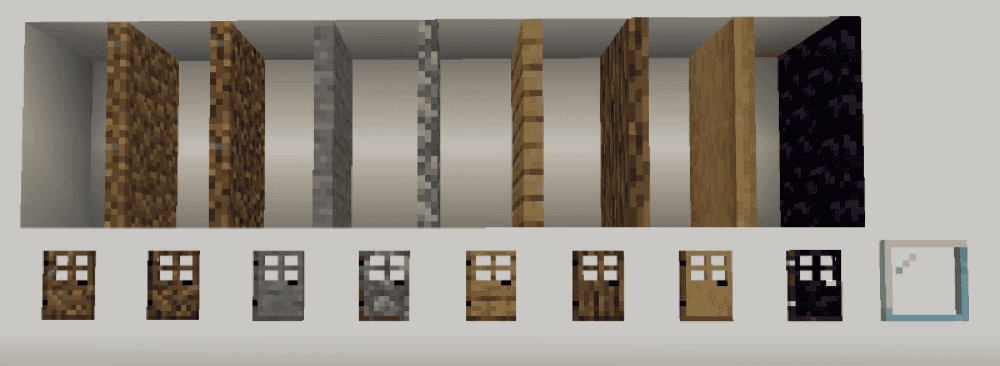
“The Secret Doors” adds basic doors, trapdoors, buttons, and pressure plates based on default Minecraft blocks, giving you ready-made, hidden-base pieces without having to build a full piston mechanism every time. Instead of placing a normal visible door or button, you can use a block-themed version that fits more naturally into a secret entrance setup.
“The Secret Doors” is useful if you want a simpler way to make hidden entrances without rebuilding the same redstone setup every time. It can also pair well with a hand-built piston door, since the mod’s hidden buttons and pressure plates help conceal the trigger while the piston mechanism handles the actual moving wall.
SecretRooms-Unofficial
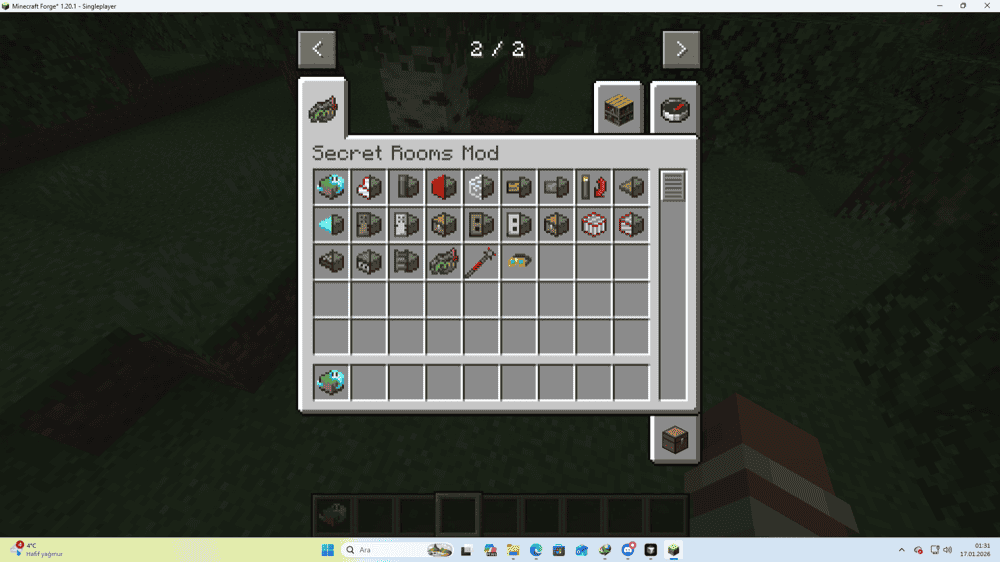
“SecretRooms-Unofficial” adds camouflage blocks, Ghost Blocks, One-Way Glass, hidden levers and buttons, Secret Clamber, and Secret Redstone for hidden power lines. The main idea is that blocks can appear normal while doing something unusual, like letting players walk through them, hide a trigger, or conceal redstone inside a secret base.
This mod works well for players who want more than one hidden entrance. Instead of only hiding the door, it helps hide the trigger, the passage, and parts of the redstone setup too, making it useful for larger secret bases or stash rooms built into walls, floors, or caves.
How to Install Minecraft Mods
You can install the above mods automatically using the CurseForge app or manually by placing the mod files within your game's mods folder. Both methods allow you to easily add custom features and enhancements into your Minecraft experience.
If you want to learn more, you can read our detailed guide on how to install Minecraft mods.
Common Issues and Quick Fixes
The pistons move but the door doesn't open fully
The roof circuit wiring is probably not mirrored correctly. The repeaters on top need to match the mirrored layout used in the build. If even one repeater points the wrong way, the timing breaks and the door may only move partway. Make sure to rebuild the ceiling circuit one side at a time and test with a lever before adding the second side.
The door opens from one side, but not the other
One of the levers likely isn't connected to the same circuit. Check that both levers feed into the same redstone line and that neither one has a repeater facing the wrong direction between it and the pistons.
The torch key doesn't do anything
The torch needs to be placed on the specific block that feeds the door's input line – not just any block nearby. Identify exactly which block connects to your door's redstone input and place the torch there.
The bookshelf trigger opens or closes the wrong way
On our guide’s compact piston door, the lower-right bookshelf slot closes the door, while the other five slots open it. That happens because the lower-right slot sends the strongest comparator signal, which reaches the redstone line and powers the piston door circuit. The other slots send weaker signals, so the line turns off and the door opens.
If your door works the opposite way, your piston door likely uses the opposite power state. Swap the labels and use the lower-right slot as your open key instead.
The painting keeps falling off my secret passage
The signs likely aren't placed correctly inside the hole. Place the signs on the inner side edges of the opening before hanging the painting – if the signs are missing or misplaced, the painting has nothing to attach to and will pop off. We recommend rebuilding the hole, re-placing both signs in the correct positions, then hanging the painting again.
The game crashes after adding a mod
A crash after installing a mod is usually caused by a version mismatch, loader mismatch, or missing dependency. Check that the mod file matches your Minecraft version and loader, such as Forge, NeoForge, or Fabric, then look at the mod page for any required files.
If you added several mods at once, remove the newest ones and add them back one at a time. This makes it much easier to find the culprit instead of guessing which mod broke the setup.