Minecraft gives you a huge amount of freedom, which is great until you open a new world and realize there are too many directions you could go. You can focus on survival, storage, travel, farms, decoration, villages, or pure creativity, so the easiest way to get unstuck is to start with something that gives your world a clear purpose.
If you're not sure what to build in Minecraft, start with something that solves a real problem first. A starter base, a farm district, an iron farm, a mob or XP farm, a workshop, and a bridge will make your world significantly more useful before you move into anything decorative. After those are done, builds like towers, map rooms, ports, and village upgrades feel more meaningful because you already have a world worth showing off.
Here's a quick list to pick from before the main breakdowns below:
- Starter base
- Crop and animal farm district
- Iron farm
- Mob or XP farm
- Workshop or smelting hall
- Bridge and dock
- Village upgrade or map room
- Watchtower or gatehouse
- Nether portal shrine
- Trophy hall
Starter Base Build Idea
A good starter base doesn't need to be impressive – it needs to work. An 11x11 footprint with 5-block walls, a simple loft, a furnace wall, a storage wall, and a 2-block roof overhang is enough to feel like a real home rather than a temporary box.
- Materials: roughly 2 stacks of logs, 5 stacks of planks, 3 stacks of cobblestone or stone bricks, 24 glass panes, 8 lanterns or torches, 8 chests, 2 barrels, and 1 bed.
- Build order: mark the footprint, place corner logs, build the storage wall first, finish the roof shape, then add windows and porch depth. Doing the interior before the roof stops you from boxing yourself out of the space you actually need.
- Uses: safe spawn point, early storage, crafting, smelting, and a foundation you can expand without demolishing everything.
Tips: keep one full wall dedicated to double chests from day one. Make the roof overhang by at least one block so that the silhouette doesn't look flat from outside.
Common mistakes: building too small for the storage you'll need, using a flat plank roof with no depth, and forgetting interior lighting. A two-block-thick roof with stairs around the edge takes ten minutes and makes the whole build look deliberate.
Crop and Animal Farm District Build Idea
A single crop patch isn't a project – but a farm district is. We suggest building one irrigated crop plot, one animal pen, one barn, and a path system that ties them all together. You can also do the food side first and add the decorative barn later without it looking unfinished.
A 9x9 crop plot with a water source in the center is the easiest layout – farmland stays hydrated within four blocks of water and grows faster for it. Animal pens beside the plot, a barn behind, and a path connecting everything to your base turns a functional necessity into a real part of your world.
- Materials: dirt or grass, a hoe, water bucket, fences, fence gates, hay bales as accent blocks, oak or spruce logs, planks, lanterns, and a composter.
- Build order: lay the paths first, place the water source, till the crop ring, build pens, then add the barn last. The path plan determines how everything else fits together.
- Uses: consistent food supply, wool, leather, trading support, and a world that looks like a settlement rather than a spawn camp.
Tips: hide water source blocks under trapdoors or slabs so that the fields don't have random blue squares in them. Keep the barn close enough to read as part of the same district rather than a separate build.
Common mistakes: dark corners in pens that let mobs spawn, no path plan, and crop plots that feel disconnected from the rest of the base.
Iron Farm Build Idea
An iron farm is one of the highest-value builds in Minecraft survival. Iron covers hoppers, buckets, lantern chains, rails, anvils, and tool replacement – all the things you never seem to have enough of in the mid-game stage. It's also edition-sensitive, so read this section carefully depending on which version you're on.
The core principle is edition-specific: you need villagers, valid village or farm conditions, controlled golem spawn space, and a way to move or kill the golems quickly. Bedrock designs rely more heavily on bed, villager, and workstation linking, while Java designs often use a smaller villager group with a panic setup.
- Java Edition: many compact iron farm designs use three or more villagers with beds and a visible zombie or pillager to trigger panic. The hostile mob should be close enough for the villagers to detect, but safely separated so it cannot reach them. From there, the farm controls where golems can spawn, pushes them with water, and drops the iron into hoppers under a lava kill chamber.
- Bedrock Edition: the requirements are stricter. You need at least 20 beds, 10 villagers, at least 75% of them having worked the previous day, all villagers linked to beds, the village within simulation distance, and available spawn space around the village center.
- Materials: beds, villagers, water buckets, lava bucket, signs or open fence gates to control water flow, hoppers, building blocks for the containment structure, and workstations if your design or edition requires them.
- Build order: secure the villager area first, center the bed and workstation layout, build the spawn platform and water channels, then add the kill chamber and item collection below.
Common mistakes: mixing up Java and Bedrock rules, broken villager-bed links, blocked or misplaced golem spawn spaces, and letting golems stay alive inside the farm's active spawn volume.
Mob or XP Farm Build Idea
These two goals need different designs, so decide which one you want before building.
- For loot drops: build a dark-room mob tower and place your AFK spot so nearby caves and ground-level spawn spaces are outside the 128-block spawning radius, while the farm platforms stay inside it. Building high over an ocean or well-lit terrain makes this easier. Mobs fall or are funneled into a kill chamber at the bottom. A fall of around 24 blocks kills most common hostile mobs, giving you drops but no XP.
- For XP: find a dungeon spawner and build a spawner trap around it. Automated mob deaths don't give player XP – you need to land the killing blow yourself. A near-death trap, where the fall leaves mobs at half a heart, lets you one-hit everything with any weapon and collect both drops and XP levels fast.
A common spawner-trap layout uses a 9x9x5 room centered on the spawner. Torch the spawner first to disable it while you build, then remove the torches once your kill funnel is ready.
- Materials: solid building blocks, slabs, trapdoors, water buckets, signs, hoppers, chests, ladders or scaffolding, and torches for lighting the safe paths during construction.
- Build order: disable the spawner, dig the full room, funnel mobs with water toward the drop shaft, tune the drop height, then add collection and a safe maintenance path.
Common mistakes: bad AFK position that's too far from the spawn zone, no safe maintenance path into the kill area, automated kill chambers that remove the XP goal, and forgetting that spiders don't fall through the same shaft designs that work for zombies and skeletons.
Workshop or Smelting Hall Build Idea
This is the build that gives a Minecraft world real identity. A workshop or forge with believable interior logic – one wall for smelting, one for storage, one for crafting and enchanting – looks purposeful rather than decorative.
- Materials: 2 to 4 stacks of stone bricks or deepslate bricks, smooth stone, copper blocks or cut copper, blast furnaces, smokers, furnaces, chains, lanterns, iron bars, barrels, anvils, grindstones, and campfires for the chimney top.
- Build order: place the utility blocks where they functionally need to be first, then build the shell that fits around them, then finish the chimney and roofline, then clutter the interior with barrels, item frames with tools on the walls, and an anvil corner.
- Uses: faster item processing, cleaner storage logic, a natural home for late-game utility blocks, and a visual anchor for an industrial corner of your base.
Tips: build around the real workstation layout – not the other way around. Chains hanging from a ceiling beam, a campfire chimney going through the roof, and a barrel wall make the space read as used rather than staged.
Common mistakes: building a detailed exterior with an empty interior, and mixing too many unrelated block palettes in one room. A workshop that's visually coherent inside is more impressive than one with a fancy shell and nothing believable behind it.
Bridge and Dock Build Idea
Many worlds feel disconnected because they have no infrastructure. A bridge and dock gives you a mid-game build that instantly improves travel and makes any river, coastline, or ravine feel planned rather than accidental.
Decide the span first, then the style. A 3-wide or 5-wide bridge with supports every 5 to 7 blocks reads as structural rather than flat. For the dock, stripped logs for posts, slab decking, barrels as cargo, chains and lanterns, and a small crane arm built from fences and chains ties the whole structure together.
- Materials: stripped logs, slabs, stairs, fences, chains, lanterns, trapdoors, barrels, and stone support blocks if you want arched pillars underneath.
- Build order: determine the span, build the center profile, copy the side rails, add dock posts, then clutter the dock with cargo details.
- Uses: faster travel between areas, cleaner terrain transitions, and a world that feels like it has infrastructure instead of isolated builds.
Tips: bridges look better with a visible center rise or a rhythm of supports. A flat deck with no variation reads as unfinished regardless of how much detail is on it.
Common mistakes: dead-flat decks, rails that are too thick and block the view, and bridge widths that don't match the paths leading into them.
Village Upgrade or Map Room Build Idea
The last vanilla category is about world character rather than raw resource gain. Two options work well here depending on where you are in the game.
- Village upgrade: pick one lane of a village and rework it. Replace roofs first – that single change does more than any other for visual fidelity. Then fix the windows, add porches, and put lantern posts along the path. Match the biome palette: oak and cobblestone in plains, spruce in taiga, sandstone in desert. Carry one repeated motif – the same roof pitch, the same lantern placement – across several buildings so the upgrades feel like a coherent district instead of isolated improvements.
- Map room: mount filled maps on item frames across a dark wood wall to create a visual record of your exploration. The room itself can be simple – dark oak planks, stone brick floor, item frames arranged in a grid – but it turns your exploration into something you can see and show others.
- Materials: item frames, glass panes, wood planks, trapdoors, stairs, lanterns, signs, and biome-matching blocks for village work.
- Build order for your village: replace roofs first, then windows, then paths, then decoration that repeats across multiple buildings.
Common mistakes: one over-detailed house surrounded by ten untouched vanilla ones, and decorating before deciding which motif ties the buildings together.
Mods That Work Well for Building
Vanilla Minecraft gives you plenty of build ideas, but mods can make those projects easier to expand or more detailed. The mods below focus on the same goals as the builds above: machines and factories, faster large-scale building, better doors and windows, cleaner roofs, and more polished bridges.
Create
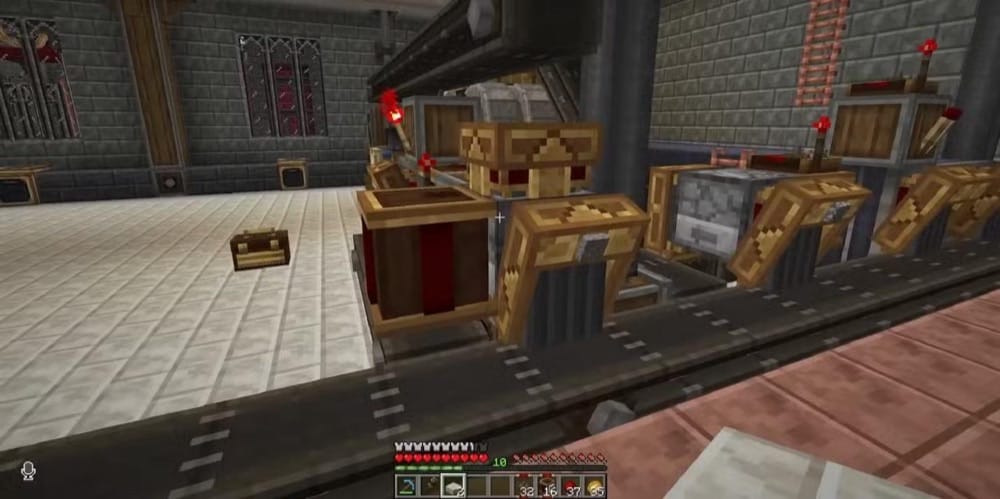
“Create” turns a vanilla workshop into a real machine district. Its appeal is that many of its machines are animated and visible in the world rather than hidden inside a GUI.
Waterwheels spin to provide rotational force, conveyor belts move items you can actually see, mechanical arms transfer items between inventories, and encased fans can push or pull items and help with processing setups. A waterwheel on the river, a millstone in the barn, and a sorting system behind the workshop wall are all things you can build into the structure instead of hiding away.
The mod also adds blocks that fit an industrial building style, including casings, framed glass, shafts, belts, and gearboxes. These work well in a forge, factory, mill, or workshop without making the build feel separate from the machines inside it. For players who want a workshop to grow into a full machine district over time, “Create” gives them a clear path to do that through visible contraptions and building details rather than menus.
Building Gadgets
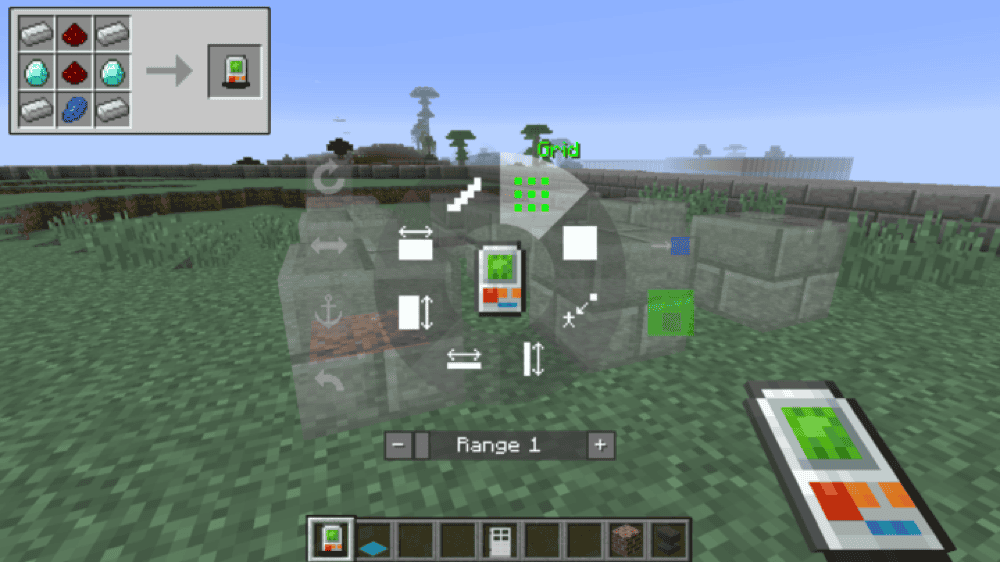
“Building Gadgets” makes large builds less repetitive by giving players tools for placing, replacing, copying, and removing blocks in bigger sections. The Building Gadget helps place blocks using different building modes, while the Exchanging Gadget lets you swap existing blocks more quickly. That makes it useful for long walls, storage halls, factory floors, roofs, paths, and other projects where vanilla block-by-block placement starts to slow everything down.“Building Gadgets” also includes a Copy Paste Gadget for moving saved sections, a Destruction Gadget for clearing larger areas, and a Template Manager that can preview builds before placing them.
Macaw's Doors / Macaw's Windows / Macaw's Roofs / Macaw's Bridges
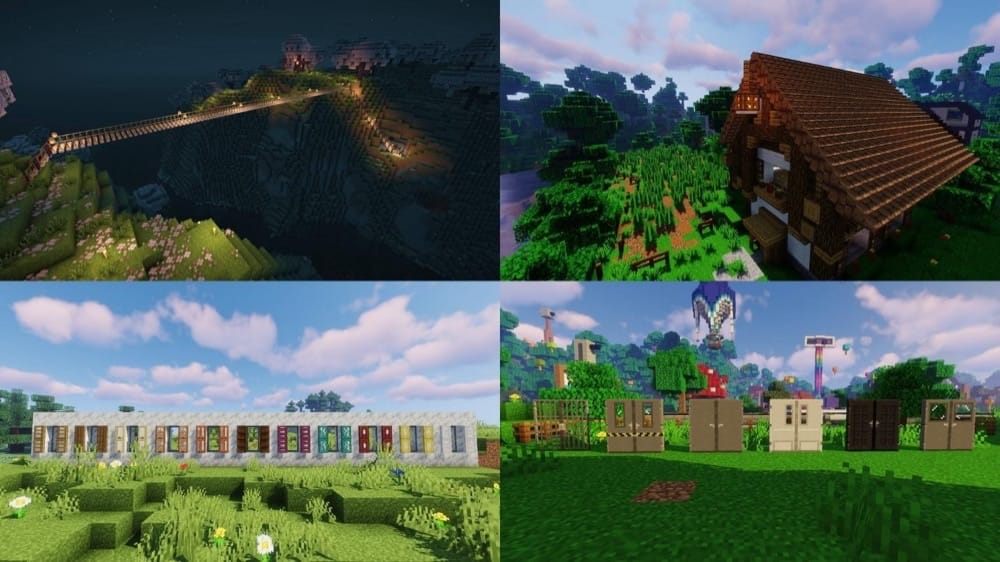
These four mods each fix a specific architectural problem that vanilla building hits quickly.
- “Macaw's Doors” adds vanilla doors in every wood color plus new types – shoji doors, metal doors, jail doors, and modern doors – which matters as soon as your gatehouse, village house, or market building needs a front entrance that doesn't look identical to everything else.
- “Macaw's Windows” adds windows, shutters, curtains, mosaic glass, gothic windows, and arrow slits, covering everything from cozy house windows to castle and tower walls where arrow slits actually make visual sense.
- “Macaw's Roofs” replaces the stair-block workaround with actual roof pieces – flat slopes, steep slopes, awnings, and rain gutters – which removes the blocky flatness from most vanilla rooflines.
- “Macaw's Bridges” adds bridge pieces and bridge-specific shaping blocks: wider end pieces connect using in-game pliers, giving you cleaner bridge terminations than vanilla fences allow.
WorldEdit
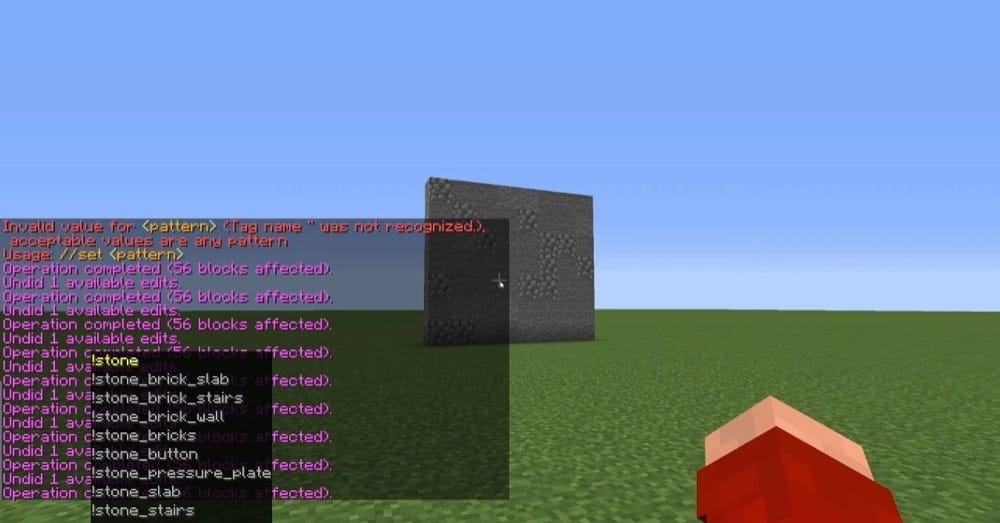
“WorldEdit” is one of the most established copy-paste and world-editing tools for Minecraft Java Edition. You can select a region, copy it, paste it, rotate it, flip it, or save it as a schematic to reuse later. It also includes brush and block-replacement tools, which are useful before large builds when you need to clear land, shape terrain, or replace blocks in bulk instead of placing everything by hand.
How to Install Minecraft Mods
You can install the above mods automatically using the CurseForge app or manually by placing the mod files within your game's mods folder. Both methods allow you to easily add custom features and enhancements into your vanilla Minecraft experience.
If you want to learn more, you can read our detailed guide on how to install Minecraft mods.
Common Issues and Quick Fixes
I’m not sure which build to start with
Start with whatever fixes your most immediate problem. Running out of food? Build a farm district. Constantly buying iron? Build an iron farm. Dying to mobs? Build a watchtower or a mob farm. All in all, we suggest that you focus on practical builds you actually need to get through the game. Conversely, decorative builds you're not ready for usually get put off indefinitely.
The build looks fine up close but bad from a distance
Silhouette is the issue. Flat roofs, flat walls, and uniform block types read as unfinished from a distance even when they're detailed up close. Add at least two block types to any large exterior surface, vary the roofline, and let walls have recesses or depth breaks every several blocks.
Iron Golems are not spawning in my iron farm
Check the edition-specific requirements first. On Bedrock, verify you have at least 10 villagers and 20 beds, confirm the villagers are linked properly, and make sure the farm is within your simulation distance. On Java, make sure the villagers can sleep or reset as required by the design, and check that the panic mechanic is working if you're using a zombie. The glass barrier needs to keep the zombie visible to villagers without letting it reach them.
My mob farm rates are disappointing
The most common cause is competing spawn surfaces. Hostile mobs spawn across all valid dark surfaces within 128 blocks of you in Java Edition. If caves under your farm or dark ground nearby are providing more spawn space than your farm does, rates will be poor. Light everything within 128 blocks of your AFK position or build the farm well above that radius so the underground competition doesn't apply.
WorldEdit commands are not working in singleplayer
“WorldEdit” needs commands enabled in the world. If you forgot to enable them at world creation, open the world to LAN ("Escape" → "Open to LAN", → "Allow Commands") for that session. This setting needs to be applied each time you load the world unless you change it permanently.
My game crashes after adding a new mod
Check three things first: Minecraft version, mod loader, and missing requirements. A mod made for Forge will not work in a Fabric profile, and a mod made for one Minecraft version may crash on another. Open the mod's Files page, make sure the downloaded file matches your exact Minecraft version and loader, then check whether the mod needs any extra library or API installed.
If the game still crashes, remove the newest mod you added and launch again to confirm whether that mod caused the problem.